🚀 Building a Fullstack App with dart_frog and Flutter in a Monorepo - Part 5
Learn to create a full-stack to-do application using Dart, Flutter, and popular packages like dart_frog and stacked, all in a monorepo structure
In the previous part of this series, we set up the foundation for our full-stack to-do application by creating models, data sources, repositories, exceptions and handling failures. In this part, we will take it to the next level by:
Scaffolding an empty
flutterprojectImporting necessary dependencies
Creating a folder structure
Connecting our front end with the backend using
TodosHttpClientSetting up dependency injection using
injectableandget_itImplementing
TodosRemoteDataSourceandTodoRepositoryHandling errors as
NetworkFailureCreating
NetworkExceptionandDioNetworkExceptionCreating
NetworkErrorInterceptorCreating
ShowTodosViewandShowTodosViewModelto show the fetched todosCreating
MaintainTodoViewandMaintainTodoViewModelto maintain the todosAdding linting with
very_good_analysisto make sure our code is clean.
We will be diving deeper into the world of flutter making use of the best practices, packages and libraries available for flutter. And by the end of this part, we will have a fully functional front end for our to-do application.
Don't forget to check the GitHub repo for this tutorial at GitHub if you need a little help along the way. Let's get started 🚀
🚀 Scaffolding Frontend
🌟 Frontend is about to shine.
We will begin by scaffolding an empty Flutter project using the command:
flutter create --project-name fullstack_todo --org np.com.saileshdahal frontend
This will create an empty flutter project in frontend directory. We will then do some initial setup, and add some dependencies.
Importing necessary dependencies 📦
Time to bring in the big guns! 💪 Let's import those dependencies
We will import the necessary dependencies in the pubspec.yaml file. The dependencies that we are using are as follows.
These dependencies will allow us to easily handle communication with the backend, handle state management, and implement a clean and maintainable codebase for our application.
To install you can use the following command:
flutter pub add dio either_dart flutter_hooks get_it injectable stacked stacked_services retrofit

flutter pub add --dev build_runner very_good_analysis stacked_generator injectable_generator retrofit_generator
We will also include the packages that we have built, once done pubspec.yaml should look something like this.
dependencies:
  data_source:
    path: ../data_source
  dio: ^4.0.6
  either_dart: ^0.3.0
  exceptions:
    path: ../exceptions
  failures:
    path: ../failures
  flutter:
    sdk: flutter
  flutter_hooks: ^0.18.5+1
  get_it: ^7.2.0
  injectable: ^2.1.0
  models:
    path: ../models
  repository:
    path: ../repository
  retrofit: ^3.3.1
  stacked: ^3.0.1
  stacked_services: ^0.9.9
  typedefs:
    path: ../typedefs

dev_dependencies:
  build_runner: ^2.3.3
  flutter_test:
    sdk: flutter
  injectable_generator: ^2.1.3
  integration_test:
    sdk: flutter
  mockito: ^5.3.2
  retrofit_generator: ^4.2.0
  stacked_generator: ^0.8.3
  very_good_analysis: ^3.1.0
Folder Structure 📂
This is how we will architect our folder structures.
.
├── constants
├── core
│   ├── app
│   ├── di
│   └── network
│       ├── exceptions
│       └── interceptors
├── data
│   ├── data_source
│   │   ├── todo_http_client
│   │   └── todo_remote_data_source
│   └── repositories
├── data_services
└── presentation
constants: This folder will include all the hard-coded constants in our project, such as API endpoints or keys.core: This directory will include all the core functionalities of our app, which are common for all the features. This includes routing, dependency injection, and network interceptors.data: This directory will include all the implementations related to data sources and repositories.data_services: This will include the implementation of services that will be shared across different view models.presentation: This will include the views and view models for creating and listing
The data_source and repositories folders contain the implementation of the abstract contracts defined in the data_sources and repository packages, respectively. This allows for the separation of concerns and easier maintenance of the codebase.
Connecting with the backend 🔌
Let's get this party started 🎉
Let's start by connecting with the dart_frog backend using dio. For this, we will create a new class TodosHttpClient
Create TodosHttpClient
TodosHttpClient will be responsible for calling our backend. We will be using retrofit to generate the necessary codes to call the backend.
Retrofit allows us to define our API endpoints as interfaces with annotated methods, and it will automatically generate the necessary code to handle the network requests and convert the JSON responses to Dart objects.
We will create a new file in data/data_source/todo_http_client/todos_http_client.dart with the following code.
import 'package:dio/dio.dart';
import 'package:injectable/injectable.dart';
import 'package:models/models.dart';
import 'package:retrofit/retrofit.dart';
import 'package:typedefs/typedefs.dart';

part 'todos_http_client.g.dart';

@RestApi()
@lazySingleton
abstract class TodosHttpClient {
  @factoryMethod
  factory TodosHttpClient(Dio _dio) = _TodosHttpClient;

  @GET('/todos')
  Future<List<Todo>> getAllTodo();
  @GET('/todos/{id}')
  Future<Todo> getTodoById(@Path('id') TodoId id);
  @POST('/todos')
  Future<Todo> createTodo(@Body() CreateTodoDto todo);
  @PATCH('/todos/{id}')
  Future<Todo> updateTodo(@Path('id') TodoId id, @Body() UpdateTodoDto todo);
  @DELETE('/todos/{id}')
  Future<void> deleteTodoById(@Path('id') TodoId id);
}
After completing the steps, we will execute build_runner to generate the necessary code. This will create an implementation of TodosHttpClient and we will link the generated _TodosHttpClient to the factory method of this abstract class. The Dio object will be passed as a dependency through the constructor. Since we are using get_it and injectable, it will be necessary to manage the injection of this dependency.
Setup injectable 🔧
Injectable is a package for Dart that allows for dependency injection in our application. It provides a simple and easy-to-use API for managing dependencies and injecting them into our classes. By using Injectable, we can easily swap out dependencies for different environments, like testing, and make our code more modular and testable.
👉 Read more about
injectable.
To handle how we inject the Dio instance, we will create some files to inject third-party modules. In the core directory, we will create a new directory called di, short for Dependency Injection.
Here, create a new file called locator.dart, and add the following code.
import 'package:fullstack_todo/core/di/locator.config.dart';
import 'package:get_it/get_it.dart';
import 'package:injectable/injectable.dart';

final locator = GetIt.instance;

@injectableInit
void setupLocator() => locator.init();
Now, we will create another file called third_party_modules.dart, this file will have a getter which will resolve the instance of Dio.
import 'package:dio/dio.dart';
import 'package:injectable/injectable.dart';

@module
abstract class ThirdPartyModules {
  @lazySingleton
  Dio get dio => Dio(BaseOptions(baseUrl: kBaseUrl));
}
Then, we will create the missing kBaseUrl constant in constants/constants.dart file.
const String kBaseUrl = 'http://localhost:8080';
Note: The port for you may be different, please check what port your backend will run by running
dart_frog devin thebackendfolder.
If you check the generated code in locator.config.dart, it creates the instance of dio and passes it to our TodosHttpClient.
Implement TodosRemoteDataSource 💻
We will now use TodosHttpClient to implement our TodosDataSource. For this, we will create data_source/todos_remote_data_source.dart file, and we will implement TodosDataSource as follows.
import 'package:data_source/data_source.dart';
import 'package:fullstack_todo/data/data_source/todos_http_client/todos_http_client.dart';
import 'package:injectable/injectable.dart';
import 'package:models/models.dart';
import 'package:typedefs/typedefs.dart';

@LazySingleton(as: TodoDataSource)
class TodosRemoteDataSource implements TodoDataSource {
  const TodosRemoteDataSource(this.httpClient);

  final TodosHttpClient httpClient;

  @override
  Future<Todo> createTodo(CreateTodoDto todo) => httpClient.createTodo(todo);

  @override
  Future<void> deleteTodoById(TodoId id) => httpClient.deleteTodoById(id);

  @override
  Future<List<Todo>> getAllTodo() => httpClient.getAllTodo();

  @override
  Future<Todo> getTodoById(TodoId id) => httpClient.getTodoById(id);

  @override
  Future<Todo> updateTodo({required TodoId id, required UpdateTodoDto todo}) =>
      httpClient.updateTodo(id, todo);
}
Here, we are passing the TodosHttpClient as a dependency. This will help us to test the implementation by passing a mock implementation of HttpClient to the data source implementation.
Handling errors as NetworkFailure 🛑
We need to handle the errors that we send from the backend as failures, and other possible errors as well. One possible way to do this is, when we implement our TodoRepository, we will catch all the exceptions as NetworkException, and then resolve the exception to the Failure and handle the failures in the UI.
The way we do this is can create an interceptor, that we can plug into our dio instance, and then handle the errors from there.
By creating a new NetworkException class in our exceptions package, we will be able to effectively handle network errors that may occur while communicating with the backend. This is especially important when implementing the TodoRepository class in the front end, as it ensures that any network errors that occur are caught and handled in a consistent and efficient manner.
However, it is important to note that when working with APIs, we will encounter errors that are returned in the form of DioError. To handle these errors, we will use an ErrorInterceptorHandler to continue the Dio request-response cycle, while also rejecting any errors that occur.
To ensure that we are able to catch NetworkException in the repository, we will create a new class called DioNetworkException which extends DioError and implements NetworkException. This allows us to create a new instance of DioNetworkException and reject it from the handler.
Create NetworkException 🌐
In our exceptions package, we will create a new exception called NetworkExeption. We are doing this because we don't want any external dependencies on our packages, as much as we can. Let's create a new file exceptions/lib/src/network_exception/network_exception.dart in exceptions package with the following contents.
class NetworkException implements Exception {
  NetworkException({
    required this.message,
    required this.statusCode,
    this.errors = const {},
  });

  final String message;

  final int statusCode;

  final Map<String, List<String>> errors;
}
👉 Make sure to export this from
exceptions.dartlibrary.
library exceptions;

export 'src/http_exception/http_exception.dart';
export 'src/network_exception/network_exception.dart';
export 'src/server_exception/server_exception.dart';
Once this is done, let's come back to frontend and create a new class called DioNetworkException.
Create DioNetworkException
Let's create a new file in lib/core/network/exceptions/dio_network_exception.dart in the frontend package.
import 'package:dio/dio.dart';
import 'package:exceptions/exceptions.dart';

class DioNetworkException extends DioError implements NetworkException {
  DioNetworkException({
    required this.message,
    required this.statusCode,
    required this.errors,
    required super.requestOptions,
  });

  @override
  final int statusCode;
  @override
  final String message;
  @override
  final Map<String, List<String>> errors;
}
This exception is created to convert the DioError we get while implementing the error interceptor, to our NetworkException so that we only care about the NetworkException we implemented in our package, and catch it.
Create NetworkErrorInterceptor 🔒
We will now implement NetworkErrorInterceptor extending Interceptor from dio. Here we will have to override onError method, which will give us DioError object and a handler.
👉 Read more about interceptors from here.
Create a new file frontend/lib/core/network/interceptors/dio_error_interceptor.dart
import 'package:dio/dio.dart';
import 'package:failures/failures.dart';
import 'package:fullstack_todo/core/network/exceptions/dio_network_exception.dart';

class NetworkErrorInterceptor extends Interceptor {
  @override
  void onError(DioError err, ErrorInterceptorHandler handler) {
    const genericInternetIssue =
        'Please check your internet connection and try again';
    try {
      if (err.response == null) {
        throw DioNetworkException(
          message: genericInternetIssue,
          statusCode: 500,
          requestOptions: err.requestOptions,
          errors: {},
        );
      }
      final errorJson = err.response!.data as Map<String, dynamic>;
      final failureFromServer = NetworkFailure.fromJson(
        {
          ...errorJson,
          'status_code': err.response!.statusCode,
        },
      );
      throw DioNetworkException(
        message: failureFromServer.message,
        statusCode: err.response!.statusCode ?? failureFromServer.statusCode,
        errors: failureFromServer.errors,
        requestOptions: err.requestOptions,
      );
    } on DioNetworkException catch (e) {
      handler.reject(e);
    } catch (e) {
      handler.reject(
        DioNetworkException(
          message: genericInternetIssue,
          statusCode: 500,
          requestOptions: err.requestOptions,
          errors: {},
        ),
      );
    }
  }
}
Note: we may need to make a small change to our
NetworkFailureclass and runbuild_runner
  const factory NetworkFailure({
    required String message,
    required int statusCode,
-   @Default([]) List<String> errors,
+   @Default({}) Map<String, List<String>> errors,
  }) = _NetworkFailure;
Now once, we have implemented the NetworkErrorInterceptor, we will attach this interceptor to our dio object.
Open third_party_modules.dart and add the following line.
abstract class ThirdPartyModules {
  @lazySingleton
  Dio get dio => Dio(BaseOptions(baseUrl: kBaseUrl));
+    ..interceptors.add(NetworkErrorInterceptor());
}
Implement TodoRepository 📚
Now we will implement the todo repository at lib/data/repositories/todo_repository_impl.dart in the following way.
import 'package:data_source/data_source.dart';
import 'package:either_dart/either.dart';
import 'package:exceptions/exceptions.dart';
import 'package:failures/failures.dart';
import 'package:injectable/injectable.dart';
import 'package:models/models.dart';
import 'package:repository/repository.dart';
import 'package:typedefs/typedefs.dart';

@LazySingleton(as: TodoRepository)
class TodoRepositoryImpl implements TodoRepository {
  const TodoRepositoryImpl(this._todoDataSource);
  final TodoDataSource _todoDataSource;

  @override
  Future<Either<Failure, Todo>> createTodo(CreateTodoDto createTodoDto) =>
      handleError(() => _todoDataSource.createTodo(createTodoDto));

  @override
  Future<Either<Failure, void>> deleteTodo(TodoId id) =>
      handleError(() => _todoDataSource.deleteTodoById(id));

  @override
  Future<Either<Failure, Todo>> getTodoById(TodoId id) =>
      handleError(() => _todoDataSource.getTodoById(id));

  @override
  Future<Either<Failure, List<Todo>>> getTodos() =>
      handleError(_todoDataSource.getAllTodo);

  @override
  Future<Either<Failure, Todo>> updateTodo({
    required TodoId id,
    required UpdateTodoDto updateTodoDto,
  }) =>
      handleError(
        () => _todoDataSource.updateTodo(id: id, todo: updateTodoDto),
      );

  Future<Either<Failure, T>> handleError<T>(
    Future<T> Function() callback,
  ) async {
    try {
      final res = await callback();
      return Right(res);
    } on NetworkException catch (e) {
      return Left(
        NetworkFailure(
          message: e.message,
          statusCode: e.statusCode,
          errors: e.errors,
        ),
      );
    }
  }
}
Here, we are passing the data source as a dependency and calling methods from the data source for each implementation. In addition to that, we have created a handleError generic method, which takes a caller method, and checks if there is a NetworkException.
The NetworkException will be caught here which was thrown from the interceptor as DioNetworkException.
Now, let's do some UI, and connect our view model to the repository.
Creating ShowTodosView 📋
Next, we will move on to creating the user interface and retrieving data from our repositories. To do this, we will perform some initial setup. We will be utilizing stacked to implement a Model-View-ViewModel (MVVM) architecture. The necessary dependencies have already been imported. Let's begin by creating the views and adding them to the routes.
Create ShowTodosView and ShowTodosViewModel
In lib/presentation//show_todos we will create two new files called show_todos_view.dart and show_todos_viewmodel.dart.
We will begin by creating an empty implementation of the view and view model.
In show_todos_viewmodel.dart
import 'package:stacked/stacked.dart';
import 'package:injectable/injectable.dart';

@injectable
class ShowTodosViewModel extends BaseViewModel {}
Similarly in show_todos_view.dart.
import 'package:flutter/material.dart';
import 'package:fullstack_todo/core/di/locator.dart';
import 'package:fullstack_todo/presentation/show_todos/show_todos_viewmodel.dart';
import 'package:stacked/stacked.dart';

class ShowTodosView extends StatelessWidget {
  const ShowTodosView({Key? key}) : super(key: key);

  @override
  Widget build(BuildContext context) {
    return ViewModelBuilder<ShowTodosViewModel>.nonReactive(
      viewModelBuilder: () => locator<ShowTodosViewModel>(),
      builder: (
        BuildContext context,
        ShowTodosViewModel model,
        Widget? child,
      ) {
        return Scaffold(
          body: Center(
            child: Text(
              'ShowTodosView',
            ),
          ),
        );
      },
    );
  }
}
We will also take advantage of the routing system provided by stacked. This system uses context-less routing, allowing us to easily navigate within our application from the view model.
We will create a NavigationService that can be injected as a dependency, which will enable us to handle routing in a consistent and efficient manner.
👉 Read more about
NavigationServicefrom here.
Let's create a new core/app/routes.dart file with the following contents.
import 'package:fullstack_todo/presentation/show_todos/show_todos_view.dart';
import 'package:stacked/stacked_annotations.dart';

@StackedApp(
  routes: routes,
)
const List<StackedRoute<dynamic>> routes = [
  AdaptiveRoute(page: ShowTodosView, initial: true),
];
Here, the @StackedApp decorator does the magic. Once this is done, we run build_runner to run code generation. We will get a new file routes.router.dart
👉 Read more about
@StackedApp
Now, in main.dart file, let's remove all the comments and make these changes.
import 'package:flutter/material.dart';
import 'package:fullstack_todo/core/app/routes.router.dart';
import 'package:fullstack_todo/core/di/locator.dart';
import 'package:stacked_services/stacked_services.dart';

void main() {
  setupLocator();
  runApp(const MyApp());
}

class MyApp extends StatelessWidget {
  const MyApp({super.key});

  @override
  Widget build(BuildContext context) {
    return MaterialApp(
      title: 'Fullstack Todo App',
      theme: ThemeData(
        primarySwatch: Colors.blue,
      ),
      navigatorKey: StackedService.navigatorKey,
      onGenerateRoute: StackedRouter().onGenerateRoute,
    );
  }
}
Before calling runApp(), we are invoking setupLocator() from locator.dart. This function will handle all the logic related to dependency injection. We are also providing navigatorKey and onGenerateRoute parameters, which come from stacked and routes.router.dart, respectively.
We also need to take an extra step, which is to manage the injection of the NavigationService. For this, we need to add a getter to the third_party_modules.dart file.
@module
abstract class ThirdPartyModules {
  @lazySingleton
  Dio get dio => Dio(BaseOptions(baseUrl: kBaseUrl))
    ..interceptors.add(NetworkErrorInterceptor());

  @lazySingleton
  NavigationService get navigationService;
}
Once this is done, if you build the app you should see the first visual output.

Implement ShowTodosViewModel
This view model will utilize the TodoRepository to retrieve data from the backend.
Similar to initState method used when working with StatefulWidgets, we can create a new method in our ViewModel called init to handle initialization logic.
Within this method, we can call the repository to fetch all the todos. We will also create a refresh method to handle pull-to-refresh functionality.
@injectable
class ShowTodosViewModel extends BaseViewModel {
  final TodoRepository _todoRepository;

  ShowTodosViewModel(this._todoRepository);

  void handleFailure(Failure failure) {
    setError(failure.message);
    log(failure.message);
  }

  void init() => runBusyFuture(refresh());

  Future<void> refresh() async {
    final response = await _todoRepository.getTodos();
    response.fold(handleFailure, print);
  }
}
Here, we have three methods, init refresh and handleFailure.
initThis method is ideally run oninitStatestate. This will call therefreshmethod, but in addition to that, this will mark the ViewModel asbusybefore calling the method. This will be helpful when we want to show a loading indicator when we first fetch the todos.refreshThis method will call theTodoRepositoryand than handle re response accordingly.handleFailureIdeally, this is the place where we would handle the failure and show the UI accordingly. ThesetErroris storing the failure message in the view model, which will be accessible bymodelErrorgetter fromBaseViewModel.
Now we are getting the todos from the backend. We will also be marking todos as completed and deleting the todo from this same view model.
Where should we put the todos once we fetch them?
We will also have another view called MaintainTodoView which will be responsible for creating and updating the todos. We will come across a problem, where we will have to update the state of the created and updated todo. We can do this by passing the todo down the routes once it is created or updated.
Another way to do this is by creating a data service, which will be shared across different view models. This service will be reactive, meaning if the data changes, it will rebuild all the view models listening to this data. This will help us avoid passing down the problem of the route.
Implement TodosDataService
We will create a TodosDataService which will be shared across the view models. This will have some helper methods that will be used to maintain the state of all the todos. We will create a new file lib/data_services/todos_data_service.dart
import 'package:flutter/material.dart';
import 'package:injectable/injectable.dart';
import 'package:models/models.dart';
import 'package:stacked/stacked.dart';

@lazySingleton
class TodosDataService with ReactiveServiceMixin {
  TodosDataService() {
    listenToReactiveValues([_todos]);
  }
  late final ReactiveValue<List<Todo>> _todos = ReactiveValue<List<Todo>>([]);

  List<Todo> get todos => _todos.value;

  void add(Todo todo) {
    final index = _todos.value.indexWhere((element) => element.id == todo.id);
    if (index == -1) {
      _todos.value.insert(0, todo);
    } else {
      _todos.value[index] = todo;
    }
    notifyListeners();
  }

  void addAll(List<Todo> todos) {
    _todos.value
      ..clear()
      ..insertAll(0, todos);
    notifyListeners();
  }

  void remove(Todo todo) {
    _todos.value.removeWhere((element) => element.id == todo.id);
    notifyListeners();
  }
}
Here, we are using ReactiveServiceMixin and ReactiveValue objects. When we call add method, it checks if the todo is present already, if so, it will update the existing one, or else it will add it to the top, so that we can see the latest one at the top.
Similarly, there is addAll which will clear all todos and then add them to the top.
👉 Read more about reactivity in stacked from here.
Updating ShowTodosViewModel
Now we will inject TodosDataService from the constructor and make some changes to the view model to handle reactivity.
@injectable
class ShowTodosViewModel extends ReactiveViewModel {
  ShowTodosViewModel(
    this._todoRepository,
    this._todosDataService,
  );

  final TodoRepository _todoRepository;
  final TodosDataService _todosDataService;
  List<Todo> get todos => _todosDataService.todos;

  Future<void> init() => runBusyFuture(refresh());

  void handleFailure(Failure failure) {
    setError(failure.message);
    log(failure.message);
  }

  Future<void> refresh() async {
    final response = await _todoRepository.getTodos();
    response.fold(handleFailure, _todosDataService.addAll);
  }

  @override
  List<ReactiveServiceMixin> get reactiveServices => [_todosDataService];
}
If you noticed, we are extending from ReactiveViewModel and also overriding reactiveServices. We are listening to the _todosDataService and will be reflecting the UI whenever the data is changed in the reactive service.
Update ShowTodosView to show fetched todos
Now we can update the show_todos_view.dart to show the fetched todos.
class ShowTodosView extends StatelessWidget {
  const ShowTodosView({super.key});

  @override
  Widget build(BuildContext context) {
    return ViewModelBuilder<ShowTodosViewModel>.reactive(
      viewModelBuilder: locator,
      onModelReady: (model) => model.init(),
      builder: (
        BuildContext context,
        ShowTodosViewModel model,
        Widget? child,
      ) {
        return Scaffold(
          appBar: AppBar(
            title: const Text('Todos'),
          ),
          floatingActionButton: FloatingActionButton(
            onPressed: () {},
            child: const Icon(Icons.add),
          ),
          body: Builder(
            builder: (context) {
              if (model.isBusy) {
                return const Center(child: CircularProgressIndicator());
              }
              if (model.hasError) {
                return Center(child: Text(model.modelError.toString()));
              }
              if (model.todos.isEmpty) {
                return Center(
                  child: Text(
                    'No todos found!',
                    style: Theme.of(context).textTheme.titleLarge,
                  ),
                );
              }
              return RefreshIndicator(
                onRefresh: model.refresh,
                child: ListView.builder(
                  physics: const AlwaysScrollableScrollPhysics(),
                  itemCount: model.todos.length,
                  itemBuilder: (context, index) {
                    final todo = model.todos[index];
                    return ListTile(
                      title: Text(todo.title),
                      subtitle: Text(todo.description),
                      leading: Checkbox(
                        value: todo.completed,
                        onChanged: (val) {},
                      ),
                      trailing: Row(
                        mainAxisSize: MainAxisSize.min,
                        children: [
                          IconButton(
                            icon: const Icon(
                              Icons.edit,
                              color: Colors.blue,
                            ),
                            onPressed: () {},
                          ),
                          IconButton(
                            icon: const Icon(
                              Icons.delete,
                              color: Colors.red,
                            ),
                            onPressed: () {},
                          ),
                        ],
                      ),
                    );
                  },
                ),
              );
            },
          ),
        );
      },
    );
  }
}
This view will get all the lists from the view model with init method.
Notice the
onModelReadyin theViewModelBuilderwhere we are callinginitmethod from the view model.
We are using the Builder to check the different states of the view model and show the UI accordingly.
We show a CircularProgressIndicator when the view model is isBusy. This value is set by runBusyFuture method in the view model.
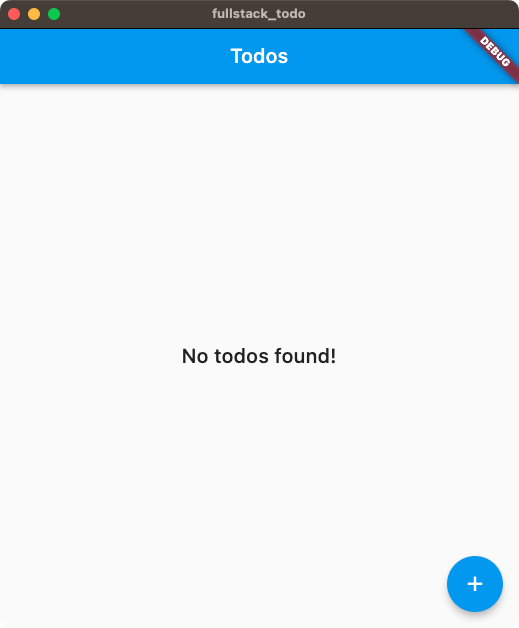
Also if the model has an error, we can check hasError and show the error message accordingly. We will also show the todos with a ListView.builder, when there are todos, and an empty message as well.
Now let's build the app, and check out the progress.
Tip: If you are using macOS, make sure to allow network access in the entitlements file.
And, if you create one using postman, you should see something like this.
Create TodoListTile
Once this is done, let's do some refactoring. We can create a TodoListTile widget as a separate stateless widget in show_todos/widgets/todo_list_tile.dart
class TodoListTile extends ViewModelWidget<ShowTodosViewModel> {
  const TodoListTile({
    super.key,
    required this.todo,
  });

  final Todo todo;

  @override
  Widget build(BuildContext context, ShowTodosViewModel viewModel) {
    return ListTile(
      title: Text(todo.title),
      subtitle: Text(todo.description),
      leading: Checkbox(
        value: todo.completed,
        onChanged: (val) => viewModel.markCompleted(todo),
      ),
      trailing: Row(
        mainAxisSize: MainAxisSize.min,
        children: [
          IconButton(
            icon: const Icon(
              Icons.edit,
              color: Colors.blue,
            ),
            onPressed: () => viewModel.handleTodo(todo),
          ),
          IconButton(
            icon: const Icon(
              Icons.delete,
              color: Colors.red,
            ),
            onPressed: () => viewModel.deleteTodo(todo),
          ),
        ],
      ),
    );
  }
}
Here, we have missing view model methods, which we will implement later. Also, we are not using a StatelessWidget here, but it's a ViewModelWidget. This is a wrapper around StatelessWidget which will also provide us with the view model. This works with Provider under the hood.
Let's use this TodoListTile widget in ShowTodosView. We can update the ListView.builder as follows.
ListView.builder(
  physics: const AlwaysScrollableScrollPhysics(),
  itemCount: model.todos.length,
  itemBuilder: (context, index) =>
      TodoListTile(todo: model.todos[index]),
),
Implement delete and markCompleted methods.
We will now implement deleteTodo and markCompleted methods as follows.
  Future<void> deleteTodo(Todo todo) async {
    final response = await _todoRepository.deleteTodo(todo.id);
    response.fold(
      handleFailure,
      (_) => _todosDataService.remove(todo),
    );
  }
Here, we are calling the deleteTodo method from the repository, and if it's successful, we will remove the todo from the data service, that in turn will remove it from the UI.
  Future<void> markCompleted(Todo todo) async {
    if (busy('updating')) return;
    final completed = !todo.completed;
    _todosDataService.add(todo.copyWith(completed: completed));
    final updateDto = UpdateTodoDto(
      completed: !todo.completed,
    );
    final update = await runBusyFuture(
      _todoRepository.updateTodo(id: todo.id, updateTodoDto: updateDto),
      busyObject: 'updating',
    );
    update.fold(
      (failure) {
        _todosDataService.add(todo.copyWith(completed: !completed));
        handleFailure(failure);
      },
      (_) {},
    );
  }
Here, in markCompleted method, we are first negating the state, and then adding it to the data service, and then calling the API. This is to show the update in an instantaneous manner. If the update fails, we will revert the checkbox state.
We will add an empty implementation for the handleTodo method as follows.
  Future<void>? handleTodo([Todo? todo]) {
      return null;
  }
This method will take an optional Todo object, and we will pass it to MaintainTodoView, which will create or update the todo based on the value provided.
Once these methods are completed, we will have these functionalities.
Creating MaintainTodoView📝
This view will be able to create and update the todos. We will create the view and the view model. Also, we will create a route for this, and implement handleTodo method in ShowTodosViewModel.
We will create maintain_todo_view.dart and maintain_todo_viewmomdel.dart in presentstion/main_todo directory.
We will create the view model as follows.
@injectable
class MaintainTodoViewModel extends ReactiveViewModel {
  MaintainTodoViewModel(this._todosDataService);
  final TodosDataService _todosDataService;

  Todo? _todo;
  void init(Todo? todo) {
    if (todo == null) return;
    _todo = todo;
  }

  @override
  List<ReactiveServiceMixin> get reactiveServices => [_todosDataService];
}
Similarly, we will create an empty view, as follows
class MaintainTodoView extends StatelessWidget {
  const MaintainTodoView(this.todo, {super.key});
  final Todo? todo;
  @override
  Widget build(BuildContext context) {
    return ViewModelBuilder<MaintainTodoViewModel>.nonReactive(
      onModelReady: (model) => model.init(todo),
      viewModelBuilder: () => locator<MaintainTodoViewModel>(),
      builder: (
        BuildContext context,
        MaintainTodoViewModel model,
        Widget? child,
      ) {
        return Scaffold(
          body: Center(
            child: Text(
              'MaintainTodoView',
            ),
          ),
        );
      },
    );
  }
}
Now, we can add this view to the route, and handle routing from ShowTodosViewModel. In lib/core/app/routes.dart add the following route entry:
const List<StackedRoute<dynamic>> routes = [
  AdaptiveRoute(page: ShowTodosView, initial: true),
  AdaptiveRoute(page: MaintainTodoView),
];
Once you run the build_runner, open the ShowTodosViewModel, and make the following change.
We will have to register NavigationService in our third-party modules as follows.
@module
abstract class ThirdPartyModules {
  @lazySingleton
  Dio get dio => Dio(BaseOptions(baseUrl: kBaseUrl));

  @lazySingleton
  NavigationService get navigationService;
}
Now, we will inject the NavigationService from the ShowTodosViewModel constructor and implement the handleTodo as follows.
  ShowTodosViewModel(
    this._todoRepository,
    this._todosDataService,
+   this._navigationService,
  );

  final TodoRepository _todoRepository;
  final TodosDataService _todosDataService;
+ final NavigationService _navigationService;

  Future<void>? handleTodo([Todo? todo]) {
+   return _navigationService.navigateTo<void>(
+     Routes.maintainTodoView,
+     arguments: MaintainTodoViewArguments(todo: todo),
+   );
  }
Make sure to run
build_runner.
Now, you should be able to navigate to MaintainTodoView.
Implementing MaintainTodoViewModel
We will create three state variables for handling title, description, and completed value. We will also expose the getters for these variables. Also, we will create onChanged methods for these variables.
We will also create an init method, which will take an optional Todo object and populate these state variables. Here if we pass this optional todo, we will be updating that todo.
@injectable
class MaintainTodoViewModel extends BaseViewModel {
  MaintainTodoViewModel(
    this._todosDataService,
    this._repository,
    this._navigationService,
  );

  final TodosDataService _todosDataService;
  final TodoRepository _repository;
  final NavigationService _navigationService;
  String _title = '';
  String get title => _title;

  String _description = '';
  String get description => _description;

  bool _completed = false;
  bool get completed => _completed;

  bool get isValidated {
    final empty = _title.isEmpty || _description.isEmpty;
    if (empty) return false;
    final errors = error('title') != null || error('description') != null;
    if (errors) return false;
    return true;
  }

  void onTitleChanged(String value) {
    _title = value;
    if (value.isEmpty) {
      setErrorForObject('title', 'Title is required');
    } else {
      setErrorForObject('title', null);
    }
    notifyListeners();
  }

  void onDescriptionChanged(String value) {
    _description = value;
    if (value.isEmpty) {
      setErrorForObject('description', 'Description is required');
    } else {
      setErrorForObject('description', null);
    }
    notifyListeners();
  }

  Todo? _todo;
  void init(Todo? todo) {
    if (todo == null) return;
    _title = todo.title;
    _description = todo.description;
    _todo = todo;
    _completed = todo.completed;
  }

  void onCompletedChanged({bool? value}) {
    _completed = value ?? false;
    notifyListeners();
  }

  void handleTodo() {}
}
In change handlers, we are also validating the values, and setting the errors for each state on change, and then we have a isValidated getter which would return if the values are validated or not.
Implementing MaintainTodoView
class MaintainTodoView extends HookWidget {
  const MaintainTodoView(this.todo, {super.key});
  final Todo? todo;

  @override
  Widget build(BuildContext context) {
    final titleController = useTextEditingController(text: todo?.title);
    final descriptionController =
        useTextEditingController(text: todo?.description);
    final titleFocusNode = useFocusNode();
    final descriptionFocusNode = useFocusNode();
    final checkBoxFocusNode = useFocusNode();
    final buttonFocusNode = useFocusNode();
    return ViewModelBuilder<MaintainTodoViewModel>.nonReactive(
      onModelReady: (model) => model.init(todo),
      viewModelBuilder: locator,
      builder: (
        BuildContext context,
        MaintainTodoViewModel model,
        Widget? child,
      ) {
        return Scaffold(
          appBar: AppBar(
            title: Text('${todo == null ? 'Create' : 'Edit'} Todo'),
          ),
          body: Padding(
            padding: const EdgeInsets.all(16),
            child: Column(
              crossAxisAlignment: CrossAxisAlignment.stretch,
              children: [
                TextFormField(
                  controller: titleController,
                  focusNode: titleFocusNode,
                  decoration: const InputDecoration(
                    hintText: 'Title',
                    border: OutlineInputBorder(),
                  ),
                  onChanged: model.onTitleChanged,
                  onEditingComplete: descriptionFocusNode.requestFocus,
                ),
                const SizedBox(height: 14),
                TextFormField(
                  controller: descriptionController,
                  focusNode: descriptionFocusNode,
                  decoration: const InputDecoration(
                    hintText: 'Description',
                    border: OutlineInputBorder(),
                  ),
                  onChanged: model.onDescriptionChanged,
                  onEditingComplete: checkBoxFocusNode.requestFocus,
                ),
                if (todo != null) const SizedBox(height: 14),
                if (todo != null)
                  SelectorViewModelBuilder<MaintainTodoViewModel, bool>(
                    selector: (model) => model.completed,
                    builder: (context, val, _) {
                      return CheckboxListTile(
                        focusNode: checkBoxFocusNode,
                        contentPadding: EdgeInsets.zero,
                        title: const Text('Mark Completed'),
                        value: val,
                        onChanged: (v) => model.onCompletedChanged(value: v),
                      );
                    },
                  ),
                const Spacer(),
                SelectorViewModelBuilder<MaintainTodoViewModel, bool>(
                  selector: (model) => model.isValidated,
                  builder: (context, validated, child) {
                    if (validated) return child!;
                    return const SizedBox.shrink();
                  },
                  child: SizedBox(
                    height: 50,
                    child: ElevatedButton(
                      focusNode: buttonFocusNode,
                      onPressed: model.handleTodo,
                      child:
                          SelectorViewModelBuilder<MaintainTodoViewModel, bool>(
                        selector: (model) => model.isBusy,
                        builder: (context, isBusy, child) {
                          if (isBusy) return child!;
                          return Row(
                            mainAxisSize: MainAxisSize.min,
                            children: const [
                              Icon(
                                Icons.save,
                                size: 30,
                              ),
                              SizedBox(width: 10),
                              Text(
                                'Save',
                                style: TextStyle(
                                  fontSize: 20,
                                ),
                              ),
                            ],
                          );
                        },
                        child: const CircularProgressIndicator(
                          valueColor:
                              AlwaysStoppedAnimation<Color>(Colors.white),
                        ),
                      ),
                    ),
                  ),
                )
              ],
            ),
          ),
        );
      },
    );
  }
}
This form includes crucial text fields for the title and description of the to-do task. The optional check box is displayed only when an existing to-do task is provided for updating. If a to-do task is provided, the form will be populated with the previous values and the check box will be visible for updating.
To handle the form's input, we utilize the flutter_hooks library for managing TextEditingControllers and FocusNodes. The ElevatedButton takes care of the create/update action.
We are also using SelectorViewModelBuilder with a selector to rebuild only when the value returned from the selector is changed, resulting in partial rebuilds. For example, we are only showing the ElevatedButton when the form is validated.
With this, we have a functional form UI something like this.
In the final part, let's implement handleTodo method in MaintainTodoViewmodel like this.
  Future<void> handleTodo() {
    if (!isValidated) return Future.value();
    if (_todo == null) {
      return _createTodo();
    }
    return _updateTodo();
  }

  Future<void> _createTodo() async {
    final dto = CreateTodoDto(title: title, description: description);
    final response = await runBusyFuture(_repository.createTodo(dto));
    return response.fold(
      (failure) {
        setError(failure.message);
      },
      (todo) {
        _todosDataService.add(todo);
        _navigationService.back<void>();
      },
    );
  }

  Future<void> _updateTodo() async {
    if (_todo == null) return;
    final dto = UpdateTodoDto(
      title: title,
      description: description,
      completed: completed,
    );
    final response = await runBusyFuture(
      _repository.updateTodo(id: _todo!.id, updateTodoDto: dto),
    );
    return response.fold(
      (failure) {
        setError(failure.message);
      },
      (todo) {
        _todosDataService.add(todo);
        _navigationService.back<void>();
      },
    );
  }
The handleTodo method is responsible for creating or updating a to-do task based on the optional Todo provided in the init method.
It calls the private methods _createTodo and _updateTodo internally. _createTodo creates a data transfer object, passes it to the repository, and navigates back upon successful creation.
Similarly, _updateTodo updates the provided to-do task and navigates back upon successful update.
Finally, we have a fully functional app.
Bonus 🎉
To ensure our code follows best practices and is consistent throughout our project, let's add some linting with very_good_analysis in analysis_options.yaml.
Linting is an important step in the development process as it helps catch potential errors and enforces a set of coding standards. This results in more readable and maintainable code, making it easier for both you and other developers to understand and work with the codebase.
include: package:very_good_analysis/analysis_options.yaml
analyzer:
  exclude:
    - '**/*.router.dart'
    - '**/*.locator.dart'
    - '**/*.config.dart'
    - '**/*.g.dart'
linter:
  rules:
    public_member_api_docs: false
🎉 Congrats, we've made it to the end of Part 5! 🚀 We've successfully built the front end of our full-stack to-do application using Flutter. From importing necessary dependencies to connecting with the backend, we've covered it all. We've even implemented features such as creating and updating todos, handling errors and creating a reactive data service.
It's been an amazing journey, and we've come a long way since Part 1. We've built a complete full-stack to-do application using Dart and Flutter. But our work doesn't stop here. In this series, we haven't covered testing yet, but it's a crucial part of building any application. If you're interested in learning more about testing your code in all the modules we've built in this series, let us know in the comments.
As always, you can refer back to the GitHub repo for this tutorial at https://github.com/saileshbro/full_stack_todo_dart if you need any help. Don't forget to give it a ⭐ and spread the love for the project. Also, if you're stuck or need help, feel free to open an issue or better yet, send a pull request.
Thank you for joining me in this adventure, let's make more amazing apps together. Happy coding! 💻