# Sailesh Dahal — full corpus
> AI integration consultant. I take LLMs, agents and retrieval from demo to production inside real products and real workflows — with evals, guardrails and traceability, not vibes.
10 posts. Generated 2026-07-29.
Individual posts are available as markdown at https://saileshdahal.com.np/{slug}.md
==============================================================================
# Few takeaways on getting amazed with AI
URL: https://saileshdahal.com.np/few-takeaways-on-getting-amazed-with-ai
Published: 2025-01-25
Tags: AI, llm, Machine Learning, chatgpt, learning
==============================================================================
On 24th Jan 2025, I attended an insightful session organized by Department of Artificial Intelligence at [Kathmandu University (KU)](http://ku.edu.np) . This session was by [Dr. Saumendra Mohanty](https://www.lloydbusinessschool.edu.in/faculty/dr-saumendra-mohanty.html) and was really insightful providing a different perspective on AI and it’s applications.
Here are few takeaways from the session.
[Orange Data Mining](https://orangedatamining.com/)
This was my first time hearing about this tool and I was like “man this is good”. This is a no code tool that you can do a lot with drag and drop interface.
I know you may have a ‘eek’ by hearing ‘no code’ but this can be a huge time saver if you are trying to find the best model for your data set.
The instructor demonstrated how you can use multiple models/strategies in the same dataset to find the optimal one for your data set. I think the demo was around 15-mins long, but we tried models like Linear Regression, Random Forest, SVM, Multi-Layer Perceptron, KNN etc, and for that dataset, the Random Forest was more accurate.
We generate the confusion matrix for all these models, tried with multiple datasets, analyzed the accuracy without any code and within 15 mins.
It was surprisingly good. Game changer stuff.
[Cosine Similarity in Resume](https://medium.com/@kirudang/job-resume-matching-part-1-2-obtaining-similarity-score-using-doc2vec-a6d07fe3b355)
He explained that how companies use cosine similarity to filter out potential spams resume, and how we can think through it and optimize our resume. We had a practical demonstration where we calculated how likely a resume is going to be passed to a second round for a given job description.
The working behind this is, the job description is converted into a vector ( i need to read more on how this is done, If you are familiar on this, feel free to comment) and similarly the resume is also converted into a vector. Once this is done, calculate the cosine of the angle between these vector.
The angles being closer to 0 means that the provided resume and the job description has a greater match.
Before you ask, yes we will also be taking into account all the irrelavent details in the resume, that is not the part of the job description.
**Sentiment Analysis**
We also got to know how sentiment analysis are being used in industries to optimize sales. We got to know about the Filpkart’s success story of a failing product turned to a top selling one by analyzing the reviews, followed by sentiment analysis on it, and then changing on the product. We briefly discussed other areas where sentiment analysis is being used like, Customer Feedback analysis, Product success prediction based on customer data, stock market trends (we did a on google data direct from yahoo finance with orange data mining) e.t.c.
**Localized AI**
We also discussed about current trends on LLM and what the next focus is going to be. Professor explained that the next big thing on LLMs is going to be on the regional languages, how the local government can help subsidize this, and it’s challenges to improve accessibility in the rural areas so that AI is accessible.
**Neural Networks and Reinforcement Learning**
We also briefly talked about the Neural Networks and machine learning method like Supervised Learning and Reinforcement Learning and its tradeoffs. He explained that reinforcement learning may not be the best for self driving car due to the accidents that may happen for the model to learn.
---
It was a really fruitful session and I got to learn a lot. This session left me thinking about how rapidly things are evolving and how we are surrounded with AI.
What I think is, although we are surrounded by AI and most of the repetitive tasks are being replaced by AI, we will still have edge in sophisticated problem solving.
If you’re curious about Orange, cosine analysis, or just AI in general, let’s chat in the comments. Always eager to discuss and learn from others in this space!
PS, Yes I generate this thumbnail with AI
---
That's it for today. If you have any questions on the topic you want me to write about, please feel free to write in comments. I will try to cover as much topics as I can.
Thank you for joining me on this journey, and happy coding! 💻👨💻
==============================================================================
# Flutter FAQ: codegen and bundle size
URL: https://saileshdahal.com.np/flutter-faq-codegen-and-bundle-size
Published: 2025-01-24
Tags: Flutter, Dart, Firebase, #dart-for-beginners, Mobile Development
==============================================================================
After 2 years of not writing and ditching my readers, I am trying to get back to writing again. The past couple of years have been really busy with freelancing on Upwork, where I delivered multiple apps for clients that are generating steady MRR.
I’m starting with some topics that might sound trivial but can be confusing to many Flutter developers. These are the kind of questions that often get overlooked but are important to address for smoother development.
Let's try to answer these questions that you may have come across while using flutter and it's build\_runner.
1. Is codegen secretly bloating your app size? **TLDR; It's not!**
2. Will static metaprogramming make tools like build\_runner obsolete?
3. How are you handling generated files? Do you commit them to VCS?
4. Is build\_runner getting slower as the project grows? Can you fix it? Yes? How?
---
> **What determines the flutter app size, and how to make it smaller?**
Flutter provides tools to analyze the size breakdown of your app’s final build, helping you optimize the app size and make it smaller.
There is a special flag that many might not know about, which allows you to view the final contents of the release build. With this command, the Dart compiler will monitor package usage and code utilization within the app, generating a JSON report that details the build contents.
```bash
flutter build ipa --analyze-size
```
The `--analyze-size` flag lists all the components of the bundle, including the frameworks used, their sizes, and the total asset size of the final bundle. This is how it will look like.
This command also generates a JSON file that we can use to view a TreeMap with dart DevTools.
```bash
dart devtools --appSizeBase=ios-code-size-analysis_02.json
```
Once you run the command, you can see the TreeMap with all the details interactively. You can also click on one node and explore further.
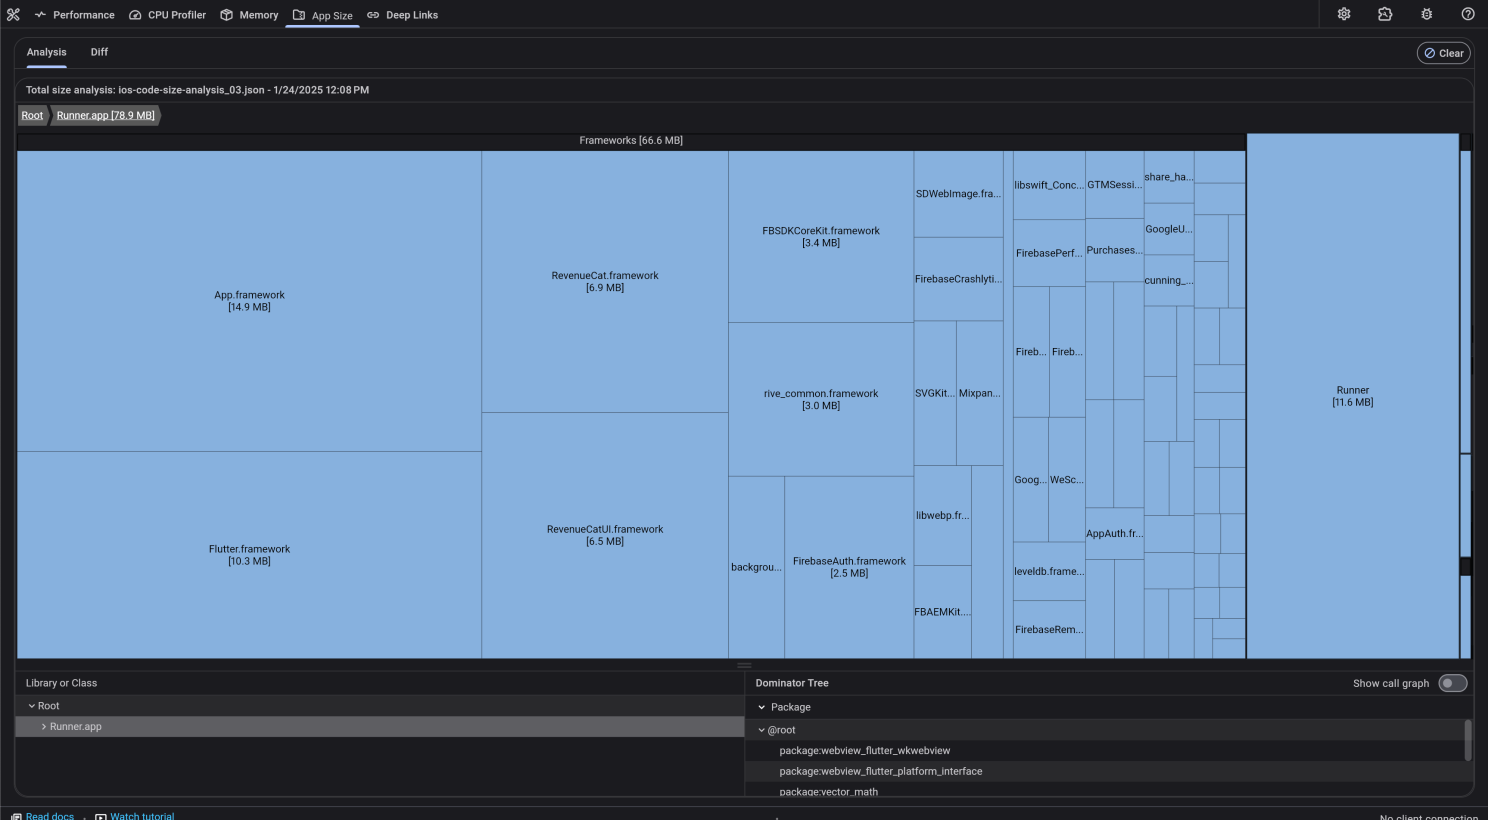
Now it's clear that using codegen won't significantly increase the app size (it might only add a few kilobytes), so we don't need to worry about it bloating the app.
---
> **What occurs if I list multiple packages in my pubspec.yaml file but don't actually use them?**
When you have specified packages/plugins to use in your flutter project, the Dart compiler will treeshake all the unused dart code optimizing the app's size. The tricky part is with the plugin (ones containing native dependencies).
[▶ Watch on YouTube](https://youtu.be/Y9WifT8aN6o)
If your pubspec.yaml contains unused plugins, the Dart compiler will treeshake unused Dart code, but native dependencies will remain, increasing the app size.
To prevent this, remove unused packages from pubspec.yaml and regularly check for unused dependencies.
You can use available tools to scan for your unused dependencies and assets from your codebase.
1. [dependency\_validator](https://pub.dev/packages/dependency_validator) reports any missing, under-promoted, over-promoted, and unused dependencies. Any package that either provides an executable or a builder that will be auto-applied via the [dart build system](https://github.com/dart-lang/build) will be considered used even if it isn't imported.
2. [Flutter: Find Unused Dart Files & Assets](https://marketplace.visualstudio.com/items?itemName=esentis.flutter-find-unused-assets-and-dart-files) is a VS code extension which allows you to find unused assets, dart files & dependencies in your project.
---
> If I list an asset in my pubspec.yaml but don't use it within the app, will it still get bundled into the application?
Yes, If you list an asset in your pubspec.yaml but don't use it within your Flutter app, it will still be bundled into the application. This applies to most assets like images, sounds, or general files. The asset bundling process in Flutter does not remove unused assets based on their use in the code. That's why all the assets listed in pubspec.yaml are bundled into the app, regardless of their use, ultimately bloating your app.
> What about that message about fonts being treeshaken while I build for android?
The message about fonts being "treeshaken" refers to Flutter's font tree-shaking feature. This feature is different from how assets like images or other files are handled.

When you build your Flutter app in release mode, Flutter includes only the font glyphs (characters) that are actually used in your app.
Flutter analyzes your app's text usage and optimizes font files by including only the required characters. This is why you see the "fonts being treeshaken" message during the build.
> Will static metaprogramming make tools like build\_runner obsolete?
The [Dart macro system](https://dart.dev/language/macros/) has introduced support for static meta-programming to the Dart language.
This means that, when the feature is live, we could use annotations and the dart compiler will JIT compile the annotations to code on the fly. Most of the notable packages are planning to adapt this approach to mitigate the short coming of the build\_runner (time consuming).
Here's [Remi Rousselet](https://hashnode.com/@remi_rousselet) talking about rewriting Freezed with macros.
[▶ Watch on YouTube](https://youtu.be/AsF_liobO-c)
> **How are you handling generated files? Do you commit them to VCS?**
Using tools like build\_runner generates a significant number of files, which can be cumbersome to manage, potentially leading to issues like merge conflicts if not handled correctly.
Committing these files to a version control system would be a matter of preference and is somewhat opinionated.
*Personally, I do not check these files into VCS when working on collaborative projects to avoid merge conflicts.*
If you choose not to check these files into your VCS, you may need to add an additional build step in your CI process to generate these files, which might increase your CI build time.
[https://stackoverflow.com/questions/893913/should-i-store-generated-code-in-source-control](https://stackoverflow.com/questions/893913/should-i-store-generated-code-in-source-control)
> Is build\_runner getting slower as the project grows? Can you fix it? Yes? How?
As your project expands with more files and additional build\_runner generators, the overhead increases, leading to longer times for code generation.
This can be optimized by creating a build.yaml file and explicitly telling the generator which files to check for code generation. This can drastically decrease the codegen time.
Here's an example of such build.yaml file.
```yaml
targets:
$default:
builders:
freezed:freezed:
generate_for:
exclude:
- test/**.dart
include:
- lib/**/*data/**/*.dart
- lib/**/*models/**/*.dart
- lib/**/*domain/**/*.dart
- lib/core/error/failures/**/*_failure.dart
- lib/features/**/*bloc/*_bloc.dart
injectable_generator:injectable_builder:
generate_for:
exclude:
- test/**.dart
include:
- lib/**/*_{bloc,data_source,interceptor,http_client,repository,service,plugin,viewmodel}.dart
- lib/**/*usecases/**/*.dart
- lib/core/di/**/*.dart
- lib/domain/**/*_{factory,api,filters,impl}.dart
- lib/network/**/*.dart
json_serializable:json_serializable:
generate_for:
exclude:
- test/**.dart
include:
- lib/**/*{data,models,domain}/**/*.dart
options:
create_factory: true
create_to_json: true
field_rename: snake
explicit_to_json: true
retrofit_generator:
generate_for:
exclude:
- test/**.dart
include:
- lib/**/*{data_source,http_client}.dart
stacked_generator:
stackedBottomsheetGenerator:
generate_for:
exclude:
- test/**.dart
include:
- lib/**/*_bottom_sheet.dart
stackedDialogGenerator:
enabled: false
stackedLocatorGenerator:
enabled: false
stackedFormGenerator:
enabled: true
generate_for:
exclude:
- test/**.dart
include:
- lib/**/*_view.dart
stackedLoggerGenerator:
enabled: true
generate_for:
exclude:
- test/**.dart
include:
- lib/**/*_view.dart
- lib/core/setup/config/logger.dart
- lib/core/setup/circles_app.dart
stackedRouterGenerator:
enabled: true
generate_for:
exclude:
- test/**.dart
include:
- lib/**/*_{view,navigator,screen}.dart
- lib/core/setup/config/routes.dart
```
Although this reduces the time it takes to run codegen, using this method without proper code architecture will be a nightmare, causing even more problem in the longer run.
[https://johnthiriet.com/optimizing-your-flutter-build-runner-for-faster-development/](https://johnthiriet.com/optimizing-your-flutter-build-runner-for-faster-development/)
---
That's it for today. If you have any questions on the topic you want me to write about, please feel free to write in comments. I will try to cover as much topics as I can.
Thank you for joining me on this journey, and happy coding! 💻👨💻
==============================================================================
# 🤳 Effortless Sharing: From external apps to your Flutter app in no time
URL: https://saileshdahal.com.np/sharing-media-from-external-to-flutter-app
Published: 2023-02-14
Tags: Flutter, Dart, Programming Blogs, Beginner Developers
==============================================================================
Sharing things like files, pictures, videos, and texts from external apps can be difficult, especially when done without any external packages.
Facilitating content sharing via external apps boosts user engagement, improves the user experience, and helps to spread the word about our app.
In this article, we'll be taking advantage of the awesome [share\_handler](https://pub.dev/packages/share_handler) package to make sharing from external apps to our Flutter app really easy!
We will be using a multi-flavored flutter app as our starting point for this tutorial. You can [find the repo **here**](https://github.com/saileshbro/sharing_into_flutter_app.git)
> **🥳 Sounds great, right?**
Let's get started by adding `share_handler` as a dependency in `pubspec.yaml`
### Android setup 🤖
We will start with the easy setup. In our `android/app/src/main/AndroidManifest.xml` file, we will add the intent filters and metadata for the media types we want to support.
For text-only support
```xml
```
For image-only support
```xml
```
For video-only support
```xml
```
If you want to support any type of files
```xml
```
> **💡 Tip:** You can add `SHARE_MULTIPLE` action, if you want to support more than one media sharing.
```xml
```
> **💡Tip:** You can change the `android:mimeType` accordingly for the file types.
Also, if you want to prevent the incoming shares from opening a new activity each time, you can prevent this by changing `android:launchMode` to `singleTask`
```xml
...
```
For adding our app in share suggestions and shortcuts, we can create a new file `share_targets.xml` in `android/app/src/main/res/xml/share_targets.xml`
```xml
```
> **💡 Tip:** Make sure you have `app_id_suffix` resource string defined for each flavor.
```apache
resValue "string", "app_id_suffix", applicationIdSuffix
```
If you are **not using flavors**, you can define this in the following format.
```xml
```
Now, we will add a metadata field in the `AndroidManifest.xml` file.
```xml
```
Once done, if you try to share something, you should see the app icon on the share page.
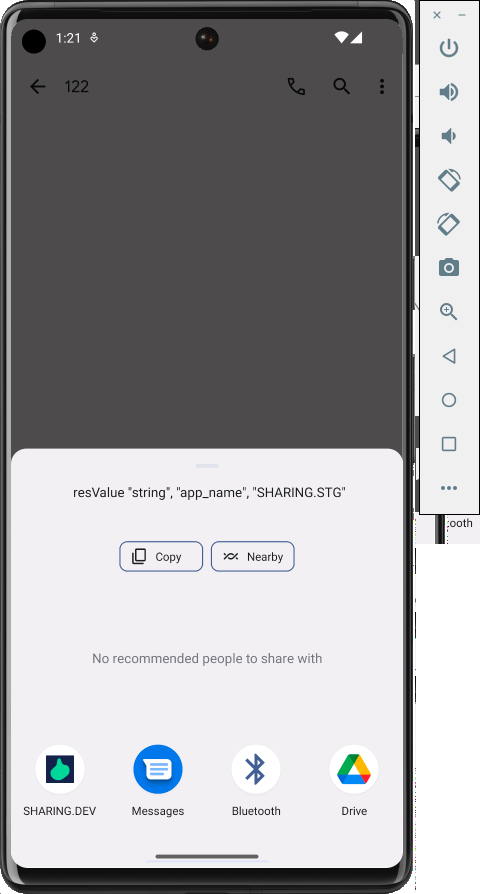
---
### iOS setup 📱
#### Update Runner `Info.plist`
For iOS, let's get started by editing our `Info.plist` file. We will be registering a deep link that will be launched by Share Extension.
For registering the deep link, add the following in your `Info.plist`
```xml
CFBundleURLTypes
CFBundleTypeRole
Editor
CFBundleURLSchemes
ShareMedia-$(PRODUCT_BUNDLE_IDENTIFIER)
```
If you already have some entries for `CFBundleURLTypes`, you can add a new entry like this.
```xml
CFBundleURLTypes
...
CFBundleTypeRole
Editor
CFBundleURLSchemes
ShareMedia-$(PRODUCT_BUNDLE_IDENTIFIER)
...
```
> **💡 Tip:** Make sure you have a user-defined variable `PRODUCT_BUNDLE_IDENTIFIER` for your iOS project.
Make sure you have an entry for `NSPhotoLibraryUsageDescription` if you are planning to share images.
```xml
NSPhotoLibraryUsageDescription
Photos can be shared to and used in this app
```
If you are planning to add `AirDrop` support, add the following entry in `Info.plist`.
```xml
LSSupportsOpeningDocumentsInPlace
No
CFBundleDocumentTypes
CFBundleTypeName
ShareHandler
LSHandlerRank
Alternate
LSItemContentTypes
public.file-url
public.image
public.text
public.movie
public.url
public.data
```
> 💡 You can modify `LSItemContentTypes` array based on your need.
#### Share Extension setup
Now for this part, we will create a share extension from Xcode.
* Open `ios` folder of your flutter project in Xcode.
```bash
open ios/Runner.xcworkspace
```
* Go to `File` -> `New` -> `Target`
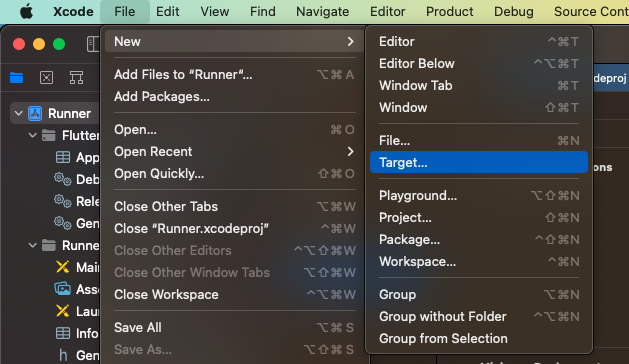
* Search for `Share Extension` and hit `Next`
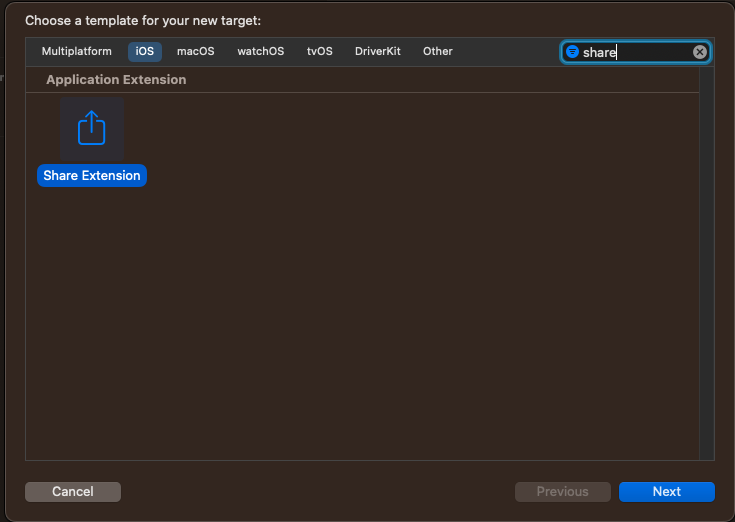
Now create the extension with `ShareExtension` name, and hit save. This will add a new target for your project.
> **🚨 Note:** Make sure the name is `ShareExtension`
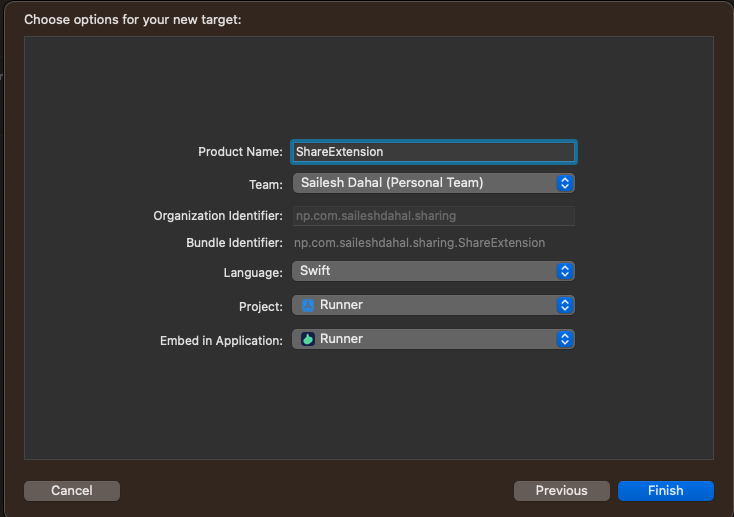
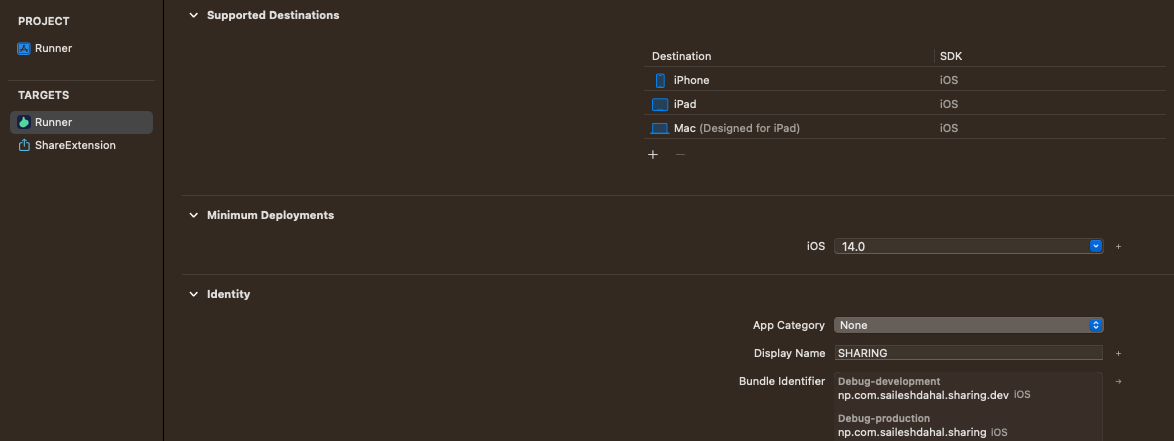
> **🚨 IMPORTANT:** Make sure the minimum deployment version of both targets is the same.
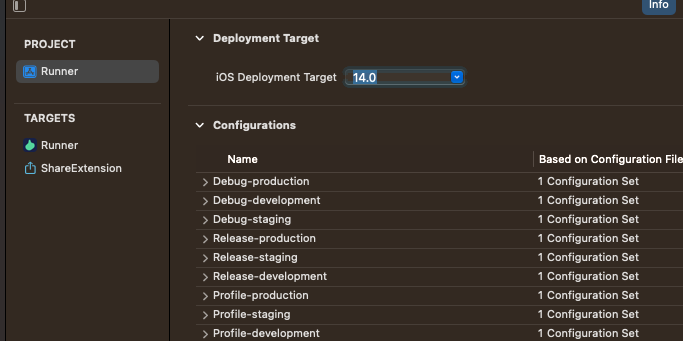
For `Target` -> `Runner`, set minimum deployment version to `14.0`.
Similarly for `Target`\-> `ShareExtension`, set minimum deployment version to `14.0`
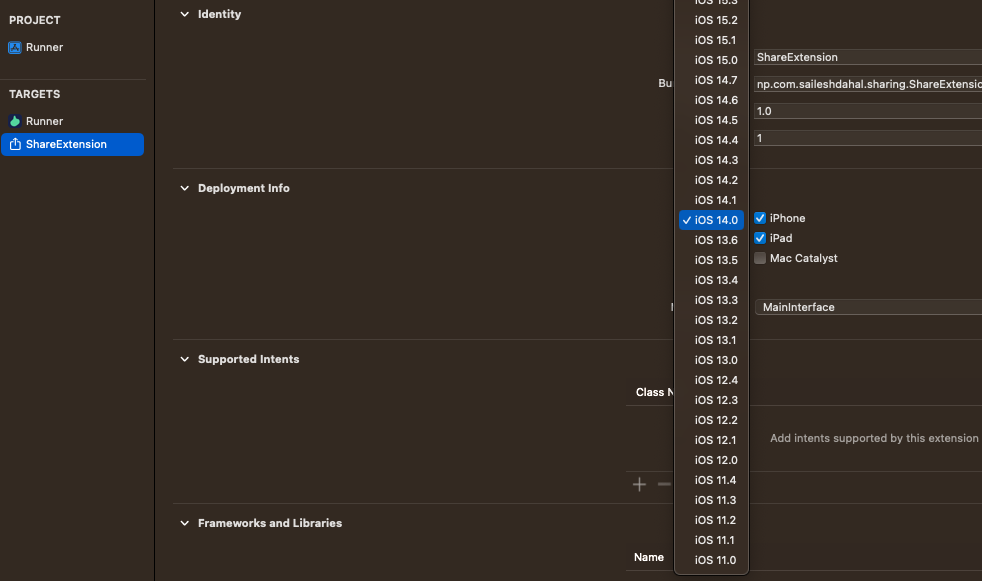
Once this is done, open `ios/ShareExtension/ShareViewController.swift` and replace everything with following
```swift
import share_handler_ios_models
class ShareViewController: ShareHandlerIosViewController {}
```
> **🚨 Note:** Make sure to run `flutter pub get` and `pod install --repo-update`
If you have multiple flavors set up then we will also have to create multiple flavors for our share extension. We will create 3 different schemes for share extension too.
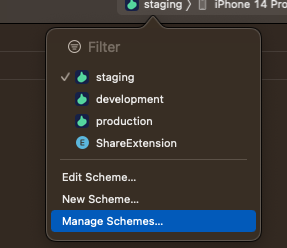
Go to `Manage Scheme`, and then we will duplicate and create 3 different schemes for `ShareExtension` as `ShareExtension-production`, `ShareExtension-development` and `ShareExtension-staging`.
Rename `ShareExtension` to `ShareExtension-production` that will handle one scheme, and then for staging, we can duplicate `ShareExtension-production` and rename it to `ShareExtension-staging` and assign the correct configuration.
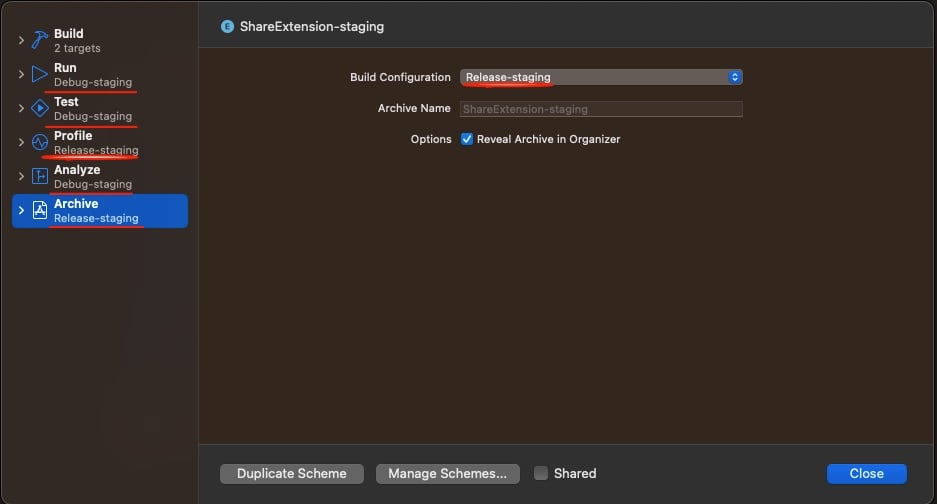
Similarly, we will create one scheme for `ShareExtension-development` as well.
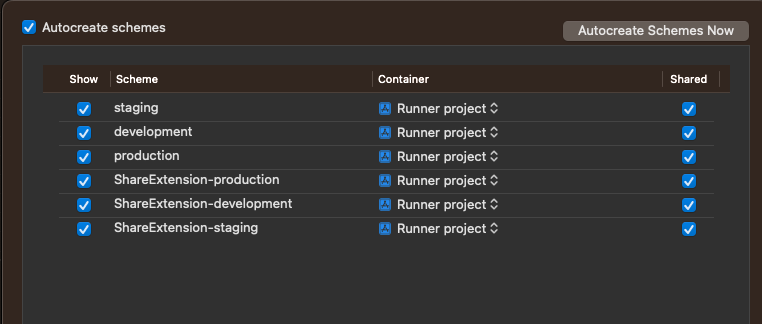
> 🚨 **Note: You don't have to duplicate the schemes if you are not using flavors**.
#### Share Extension `Info.plist` update
Once this is done, we will make some changes to `ios/ShareExtension/Info.plist`
```xml
CFBundleVersion
$(FLUTTER_BUILD_NUMBER)
NSExtension
NSExtensionAttributes
IntentsSupported
INSendMessageIntent
NSExtensionActivationRule
NSExtensionActivationSupportsWebURLWithMaxCount
999
NSExtensionActivationSupportsWebPageWithMaxCount
999
NSExtensionActivationSupportsMovieWithMaxCount
999
NSExtensionActivationSupportsImageWithMaxCount
999
NSExtensionActivationSupportsFileWithMaxCount
999
NSExtensionActivationSupportsAttachmentsWithMaxCount
999
NSExtensionActivationSupportsText
PHSupportedMediaTypes
Video
Image
NSExtensionMainStoryboard
MainInterface
NSExtensionPointIdentifier
com.apple.share-services
```
Here you can make changes to the `NSExtensionActivationRule` field based on your requirements.
> Note: Here we have set the maximum file-sharing count to 999, but you can disable or enable them based on your requirements.
Once this is done, make sure we have different bundle identifiers for each flavor and configuration for `Share Extension`. If you click `Target` -> `Share Extension` -> `Singing & Capabilities` -> `All`
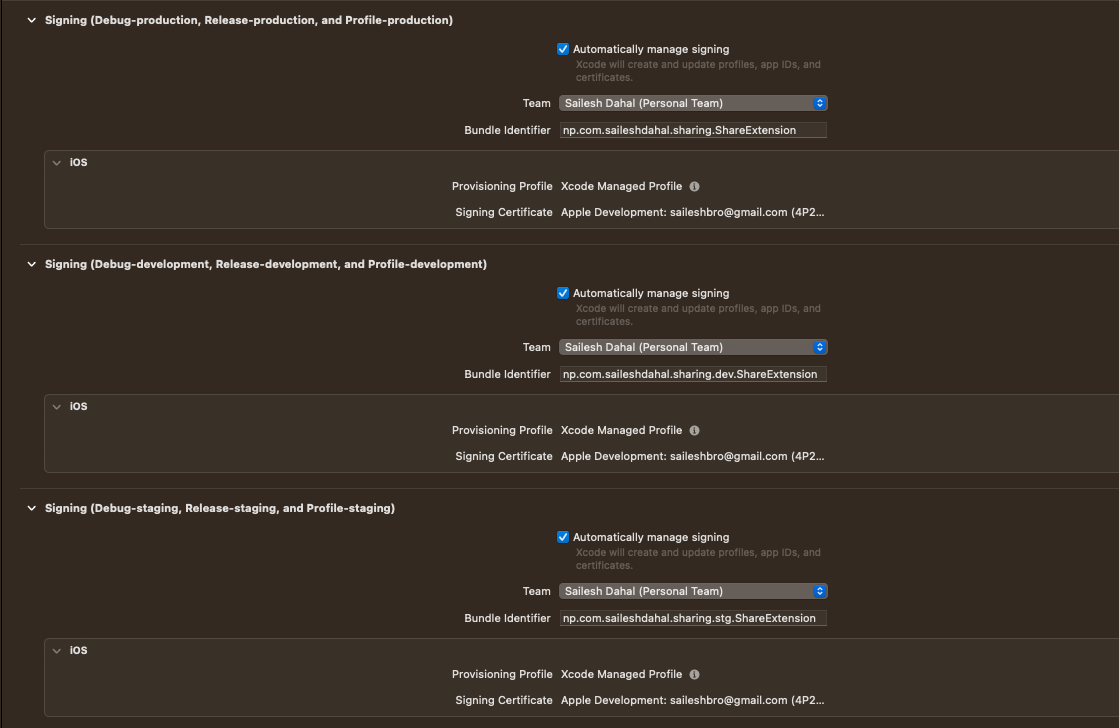
> **🚨 Note:** Make sure the `ShareExtension` bundle identifier for each config has a `.ShareExtension` prefix compared to the `Runner`.
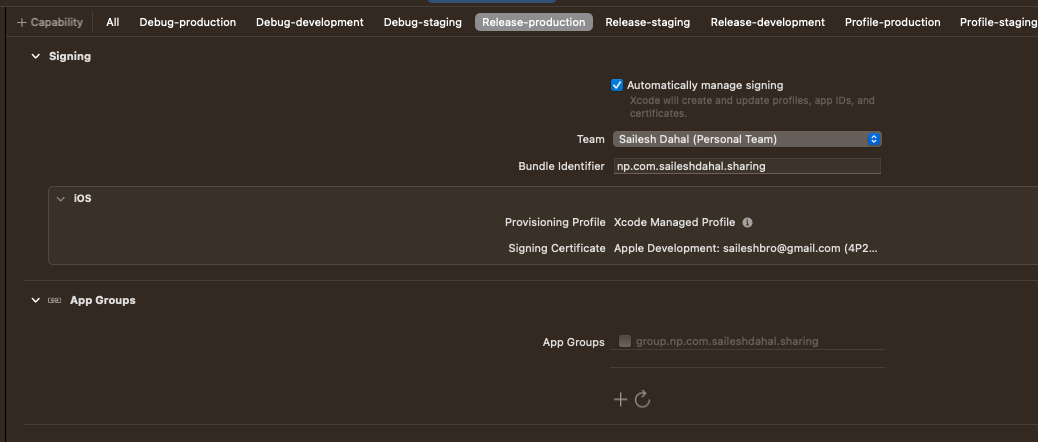
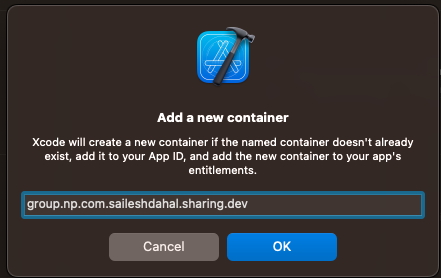
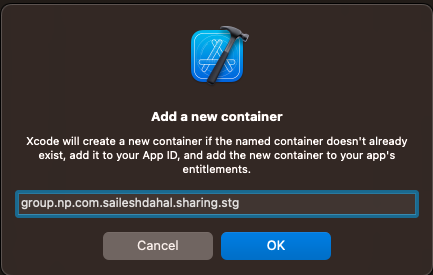
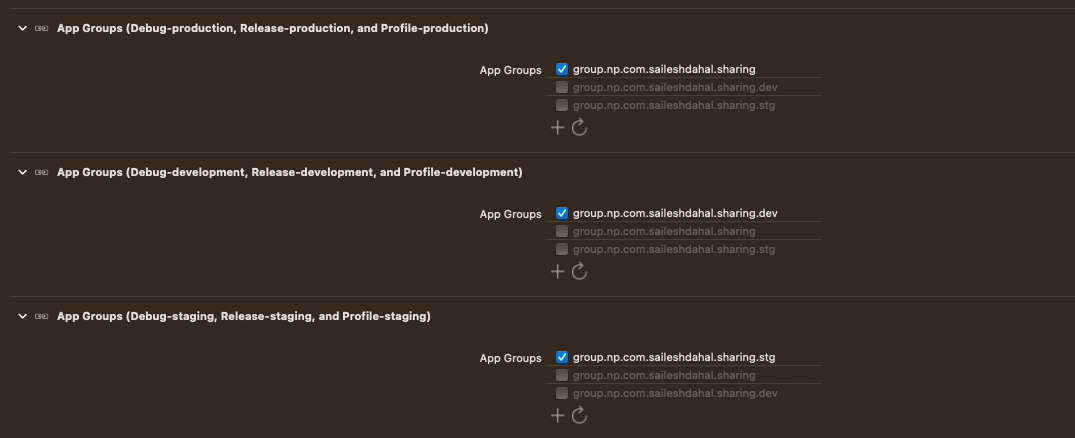
Once done, we need to assign both targets with a group identifier. For both `Runner` and `ShareExtension` target, go to `Signing & Capabilities`.
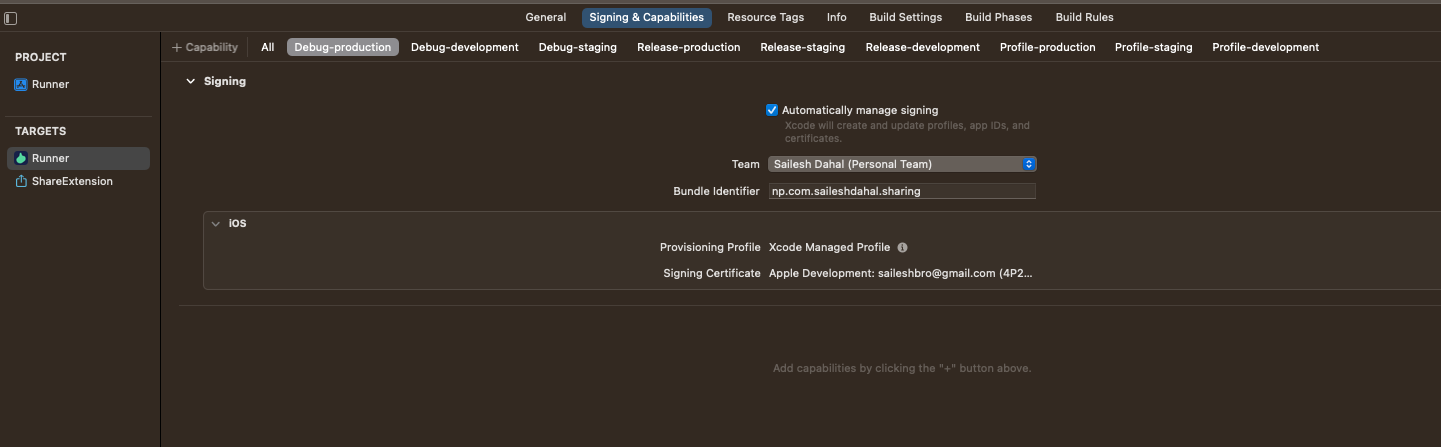
Now, for each flavor, we will add an app group.
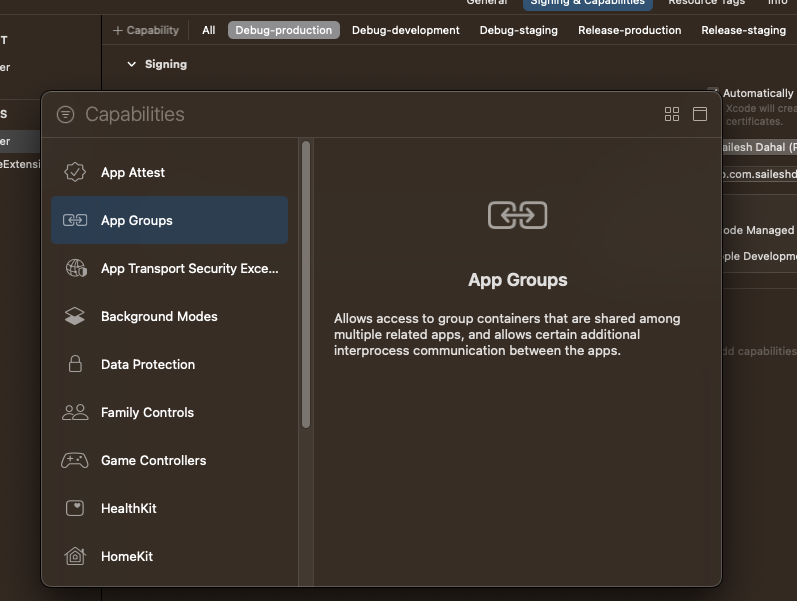
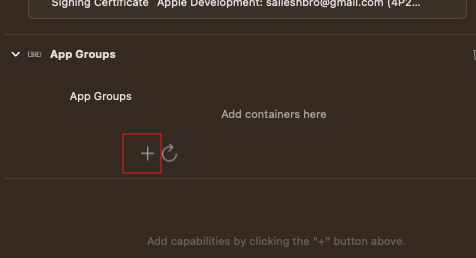
> 🚨 Note: Make sure to add the group id as `group.` for each flavor.
For `Debug-production`, `Release-production`, and `Profile-production`.
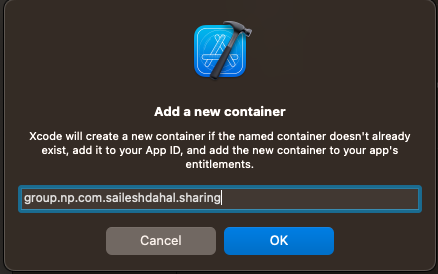
> 💡 Tip: For matching group, you can select the check box
For `Debug-development`, `Release-development`, and `Profile-development`.
Similarly for `Debug-staging`, `Release-staging`, and `Profile-staging`
If you click on `Target` -> `Runner` -> `Signing & Capabilities` -> `All`, you should see the following.
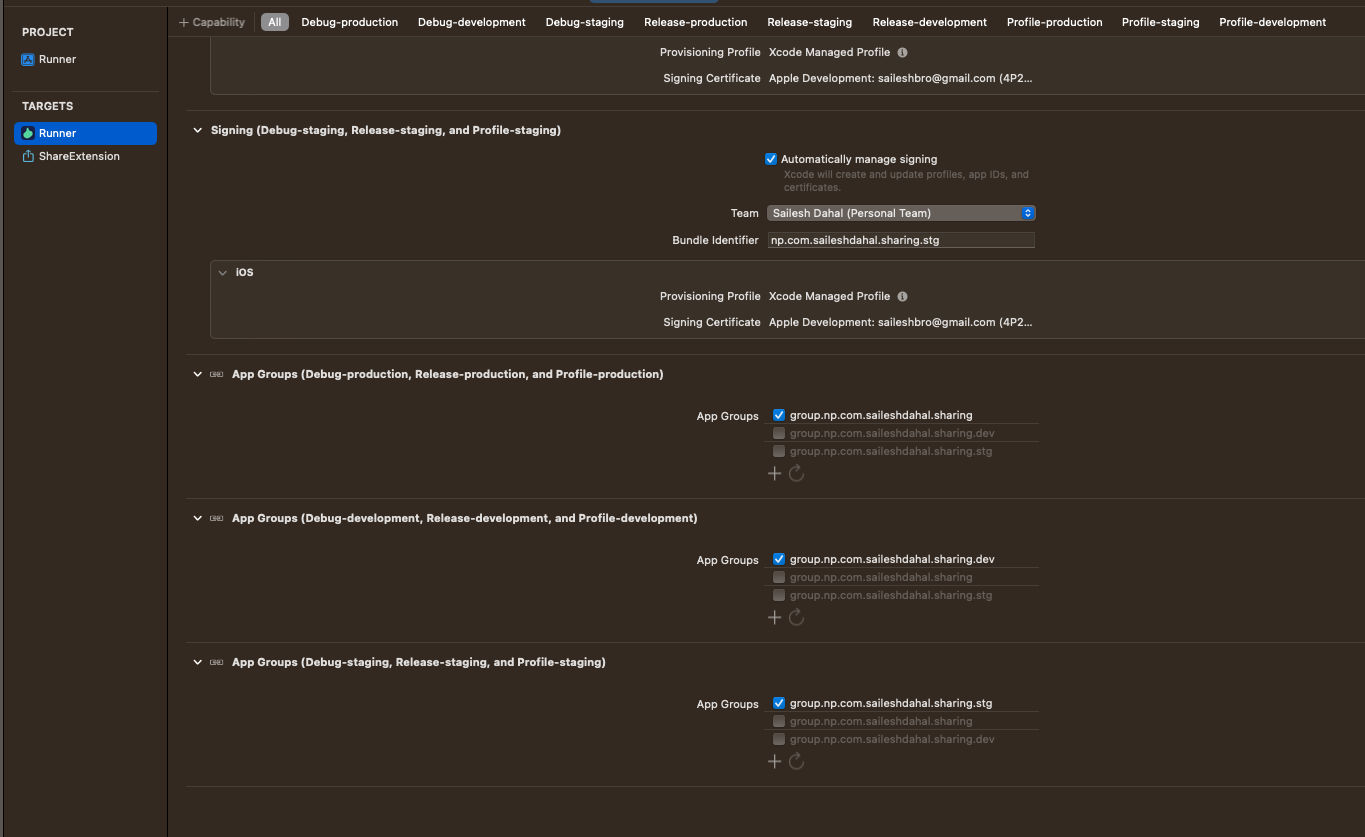
This will create `entitlements` files for each configuration.
Similarly for `ShareExtension` we can quickly create `.entitlements` files. In `ios/ShareExtension` we will create an entitlements file for each config and each flavor. We will create 9 entitlements files for each flavor (`production`, `development`, and `staging`), and `Debug`, `Release`, and `Profile` config.
For `Debug`, `Release`, and `Profile` configuration for `development` flavor, we will create three files `ShareExtensionRelease-development.entitlements`, `ShareExtensionDebug-development.entitlements`, and `ShareExtensionProfile-development.entitlements`, with the following contents.
```xml
com.apple.security.application-groups
group.np.com.saileshdahal.sharing.dev
```
Similarly, for each configuration of `production` and `staging` flavor, we will create three entitlements files.
By the end, we will have the following files
```apache
ShareExtensionDebug-development.entitlements
ShareExtensionDebug-production.entitlements
ShareExtensionDebug-staging.entitlements
ShareExtensionProfile-development.entitlements
ShareExtensionProfile-production.entitlements
ShareExtensionProfile-staging.entitlements
ShareExtensionRelease-development.entitlements
ShareExtensionRelease-production.entitlements
ShareExtensionRelease-staging.entitlements
```
Once this is done, link the entitlement files by clicking `+` button for app group capabilities for each flavor.
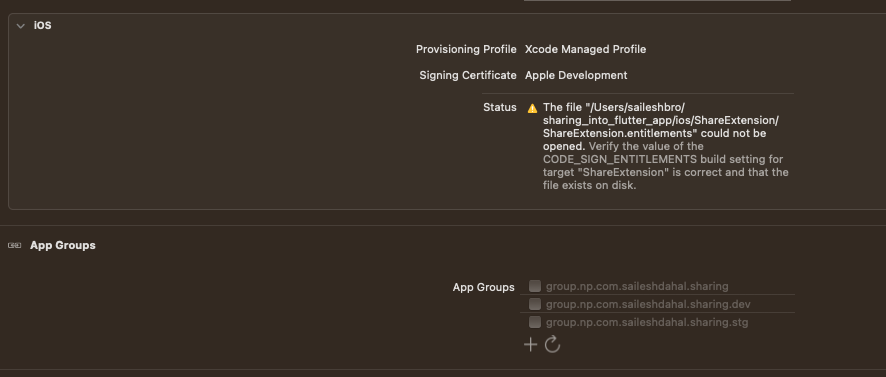
> **💡Tip:** Make sure the entitlements files are correctly linked, else this may not work properly for each flavor.
Make sure, we have all the entitlements files linked up correctly. If we do everything right we will see the following.
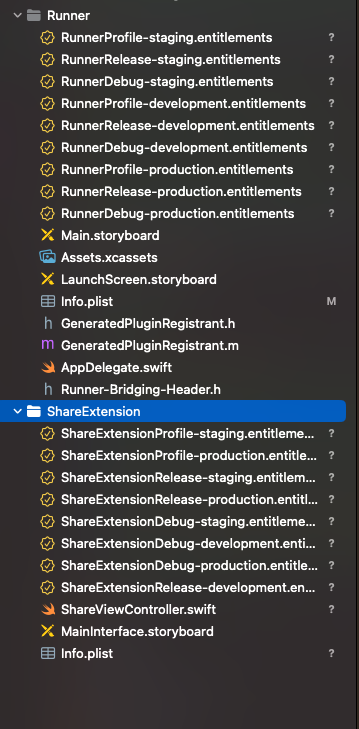
> 🚨 For iOS setup without flavors
All the setup above can be taken reference for the apps without flavors as well. The only difference here is, we can have single entitlements file for each target, that is `Runner.entitlements` and `ShareExtension.entitlements`.
The bundle id for the `Share Extension` will be `np.com.saileshdahal.sharing.ShareExtension`, and the group bundle id will be `group.np.com.saileshdahal.sharing`
Now, for the final setup, we will make some changes in `Podfile` and register the dependency.
```ruby
target 'Runner' do
use_frameworks!
use_modular_headers!
flutter_install_all_ios_pods File.dirname(File.realpath(__FILE__))
# Add this block
target 'ShareExtension' do
inherit! :search_paths
pod "share_handler_ios_models", :path => ".symlinks/plugins/share_handler_ios/ios/Models"
end
# End of block
end
```
Once this is done, run `pod install --repo-update` in `ios` directory.
> 🚨Note that `pod install --repo-update` gives an error: \[!\] No podspec found for `share_handler_ios_models` in `.symlinks/plugins/share_handler_ios/ios/Models`until the project has been built at least once, at which point Flutter has created the referenced symlink.
🥳 Thanks [Guyren Howe](https://hashnode.com/@gisborne) for mentioning this in the comments.
---
### 🧪 Testing time
Let's check if we can see our app when we share something.
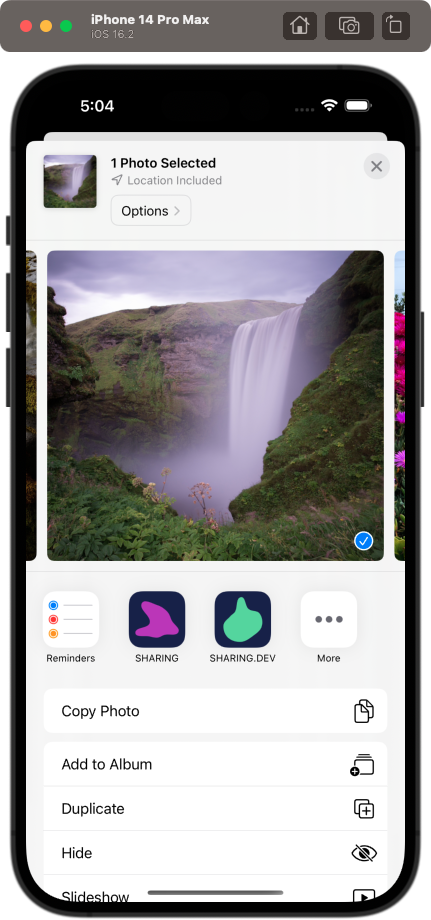
Here, we can see both flavors appear while we try to share images from photos.
---
### Getting shared media in Flutter
Now that we have both Android and iOS working, we can start implementing our share handler service to get the shared media.
The package exposes a stream of `SharedMedia`. We can subscribe to this stream and do side effects based on the shared media type.
Also, the package has a method to get the initial shared media. This will be helpful if the app is in terminated state, and we open the app from the share page.
I have added the code snippet from [`share_handler`](https://pub.dev/packages/share_handler)
```dart
class HomePage extends StatefulWidget {
const HomePage({super.key});
@override
State createState() => _HomePageState();
}
class _HomePageState extends State {
StreamSubscription? _streamSubscription;
SharedMedia? media;
@override
void initState() {
super.initState();
initPlatformState();
}
@override
void dispose() {
_streamSubscription?.cancel();
super.dispose();
}
Future initPlatformState() async {
final handler = ShareHandlerPlatform.instance;
media = await handler.getInitialSharedMedia();
_streamSubscription = handler.sharedMediaStream.listen((SharedMedia media) {
if (!mounted) return;
setState(() => this.media = media);
});
}
@override
Widget build(BuildContext context) {
return Scaffold(
appBar: AppBar(
title: const Text('Share Handler'),
),
body: ListView(
padding: const EdgeInsets.all(16),
children: [
Text(
'Shared to conversation identifier: ${media?.conversationIdentifier}',
),
const SizedBox(height: 10),
Text('Shared text: ${media?.content}'),
const SizedBox(height: 10),
Text('Shared files: ${media?.attachments?.length}'),
...(media?.attachments ?? []).map((attachment) {
final path = attachment?.path;
if (path != null &&
attachment?.type == SharedAttachmentType.image) {
return Column(
children: [
ElevatedButton(
onPressed: () {
ShareHandlerPlatform.instance.recordSentMessage(
conversationIdentifier:
'custom-conversation-identifier',
conversationName: 'John Doe',
conversationImageFilePath: path,
serviceName: 'custom-service-name',
);
},
child: const Text('Record message'),
),
const SizedBox(height: 10),
Image.file(File(path)),
],
);
}
return Text(
'${attachment?.type} Attachment: ${attachment?.path}',
);
}),
],
),
);
}
}
```
Now, if we run this code and try to share an image from Photos, we should see something like this 🥳.
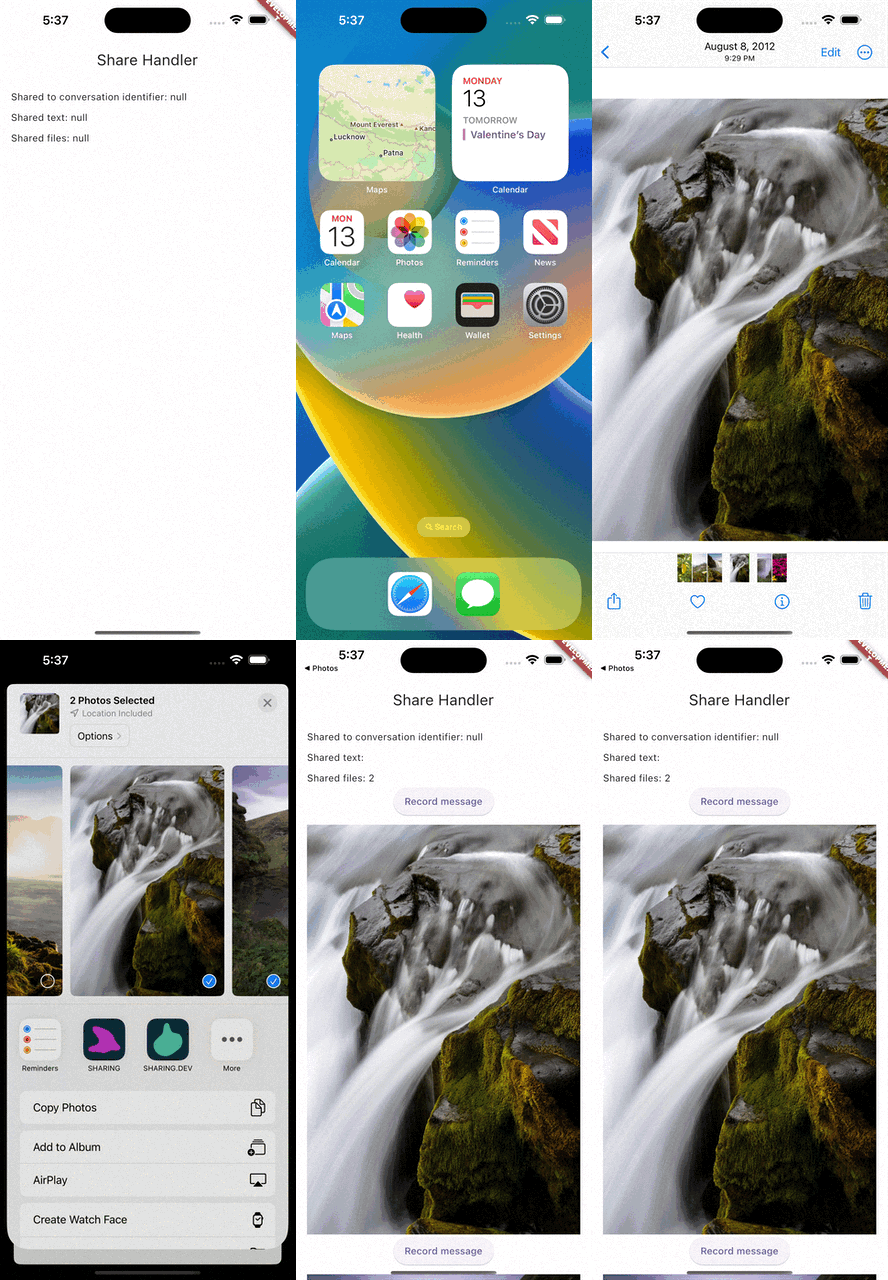
---
🎉 Congratulations, we've reached the end of this article on how to easily share content from external apps to your Flutter app using the share\_handler package! 🚀 Hopefully, you found this tutorial helpful and have learned a lot about effortless sharing in Flutter.
As always, the source code for this tutorial can be found on the GitHub repository at [`saileshbro/sharing_into_flutter_app`](https://github.com/saileshbro/sharing_into_flutter_app). If you found this article useful, don't forget to leave a ⭐️ and share it with others.
And if you're interested in learning more about setting up flavors in Flutter, be sure to check out [**🍰 Simplifying flavor setup in the existing Flutter app: A comprehensive guide**](/flavor-setup-flutter) to learn how to add different flavors to your app with unique configurations and build targets.
Thank you for joining me on this journey, and happy coding! 💻👨💻
### References
* [`share_handler`](https://pub.dev/packages/share_handler)
==============================================================================
# 🍰 Simplifying flavor setup in the existing Flutter app: A comprehensive guide
URL: https://saileshdahal.com.np/flavor-setup-flutter
Published: 2023-02-06
Tags: Flutter, Programming Blogs, Programming Tips, Dart
==============================================================================
Flavors are build configurations in Flutter apps that allow developers to create separate environments using the same code base. They allow for customization at runtime based on the defined compile-time configurations.
* Flavors allow efficient management of different development environments (development, staging, production)
* Enables creation of multiple versions of the same app (free and paid versions, separate environments for feature development)
* Simplifies setting different parameters (API endpoints, API keys, app icons) for each configuration
* Makes it easier to manage different app versions
> Apps created using the [`very_good_cli`](https://pub.dev/packages/very_good_cli) comes with three flavors - `development`, `staging`, and `production`.
---
## Adding Flavors to an Existing Flutter App
When it comes to adding flavors to an existing Flutter app, there are packages available that promise to automate the process, such as [`flutter_flavorizr`](https://pub.dev/packages/flutter_flavorizr).
It's common for these solutions to encounter issues when the app has already made extensive use of native plugins and custom configurations.
As a result, manually adding flavors to an app may be the best course of action. This process requires a bit of human touch, but it provides complete control over the configuration of your app's flavors.
---
## Setting Up Flavors 🛠️
To get a hands-on experience, we will be adding flavors to [**an existing app from here**](https://github.com/saileshbro/fitness_app_clone)
> We will be setting up `development`, `staging` and `production` flavors.
### Create Target Files 💻
We will start by creating three main files for each flavor, `main_.dart` and create a `main` function.
We can replace the outdated `main.dart` file with our new entry points. In the `bootstrap.dart file`, we'll create a new function called `bootstrap` which will accept the environment from each entry point and use it to launch the app.
* `main_production.dart`
```dart
void main() => bootstrap('production');
```
* `main_development.dart`
```dart
void main() => bootstrap('development');
```
* `main_staging.dart`
```dart
void main() => bootstrap('staging');
```
* `bootstrap.dart`
```dart
void bootstrap(String env) => runApp(MyApp(env: env));
class MyApp extends StatelessWidget {
const MyApp({super.key, required this.env});
final String env;
@override
Widget build(BuildContext context) {
return MaterialApp(
debugShowCheckedModeBanner: false,
builder: (context, child) {
if (env == 'production') return child!;
return Banner(
message: env.toUpperCase(),
location: BannerLocation.topEnd,
child: child,
);
},
theme: ThemeData(
fontFamily: 'Montserrat',
),
home: const HomePage(),
);
}
}
```
Since setting up flavors in android is pretty straightforward, we will start with it so we can test it quickly.
### Using flavors in Android 🤖
To add `production`, `staging` and `development` flavors, let's make some changes in the app level `build.gradle` in `android/app/build.gradle` file.
Here, let's specify a `flavorDimensions` and a `productFlavors` object.
```apache
flavorDimensions 'default'
productFlavors {
production {
dimension 'default'
resValue "string", "app_name", "FITNESS"
}
development {
dimension 'default'
applicationIdSuffix '.dev'
versionNameSuffix '.dev'
resValue "string", "app_name", "FITNESS.DEV"
}
staging {
dimension 'default'
applicationIdSuffix '.stg'
versionNameSuffix '.stg'
resValue "string", "app_name", "FITNESS.STG"
}
}
```
The `flavorDimensions` line defines the name of the flavor dimension, which is `default` in this case. Each flavor is defined within the `productFlavors` block. The `production` flavor is the base flavor of the app.
The `development` and `staging` flavors are similar, but with some differences. The `applicationIdSuffix` and `versionNameSuffix` lines add the `.dev` or `.stg` suffix to the application ID and version name, respectively. The `resValue` line sets the name of the app to `FITNESS.DEV` or `FITNESS.STG`, respectively.
> NOTE: Don't forget to add `android:label="@string/app_name"` to the `application` tag in `AndroidManifest.xml` file.
---
### Let's Test 🧪
Now, we can run the app using the following commands.
```bash
flutter run --flavor development --target lib/main_development.dart
flutter run --flavor staging --target lib/main_staging.dart
flutter run --flavor production --target lib/production.dart
```
Once done, you should have three different apps with different names, versions, and bundle identifiers.
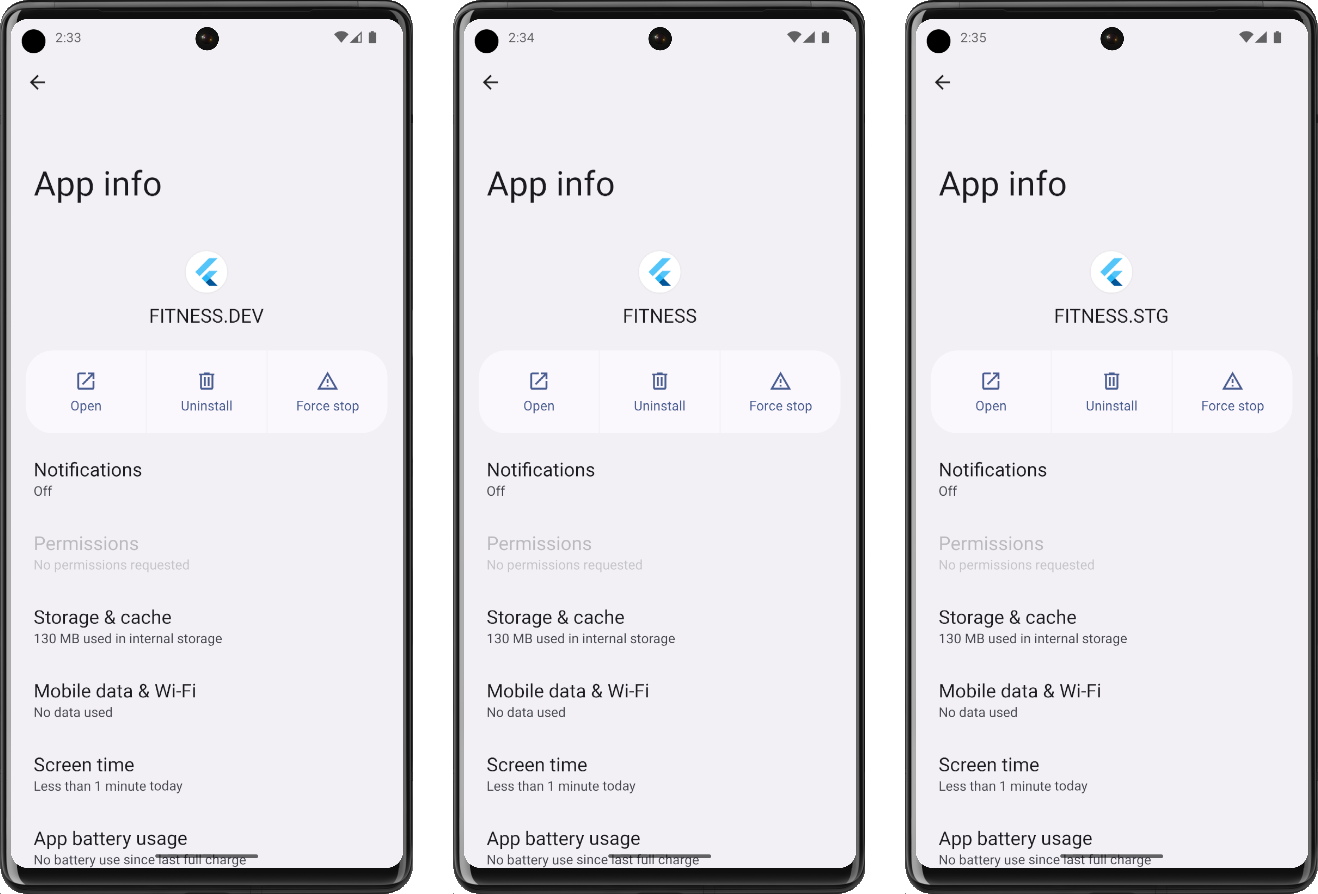
---
### iOS Schemas
We will now be creating schemas for each flavor in Xcode. We already have a `Runner` schema, which is the default schema. We will rename it to `production` and create two new schemas, `development` and `staging`.
* Open the ios folder in Xcode.
```bash
open ios/Runner.xcworkspace
```
* Let's make some changes to our configuration.
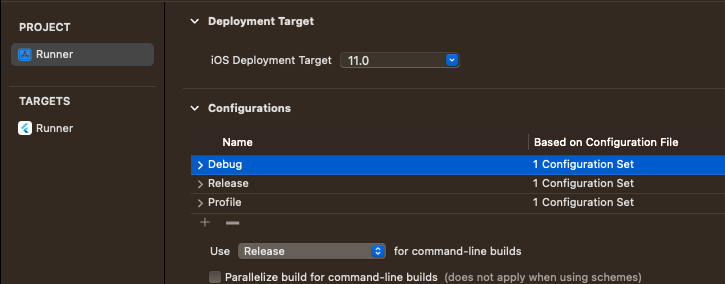
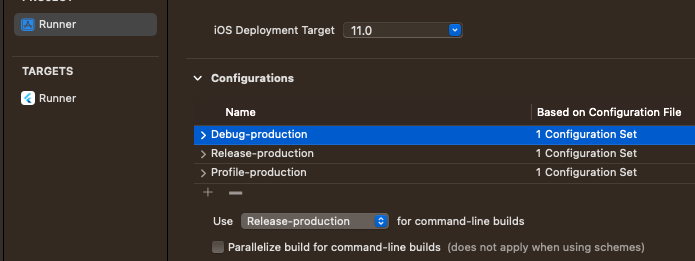
* In Project Runner, rename `Debug`, `Release`, and `Profile` adding `-production` suffixes to each.
* Once done, we will now create these 3 files for each `staging` and `development` as well. You can use duplicate.
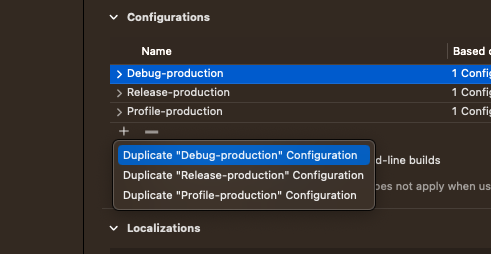
* Once done, we will have 9 configurations, 3 for each flavor.
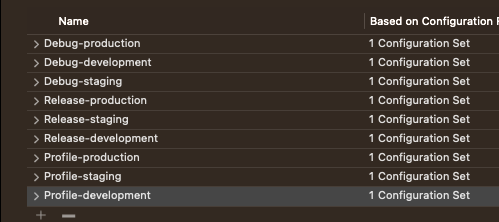
* Select the Runner scheme and click the Manage Schemes button.
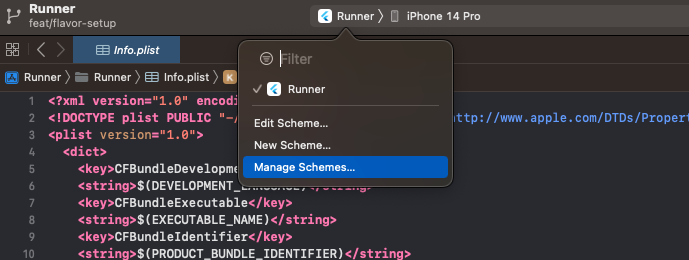
* Once, there rename `Runner` scheme to `production`, and duplicate `production` to two new `development` and `staging`.
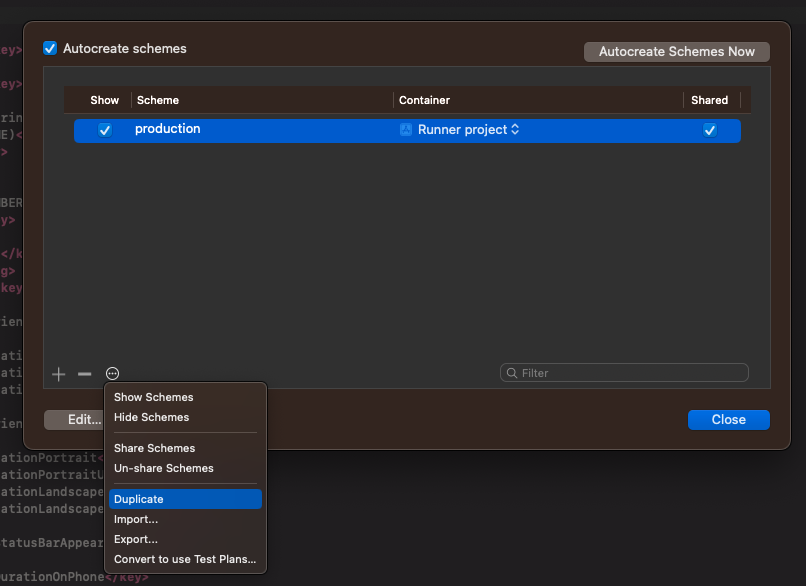
* Make sure to add the correct configuration while duplicating.
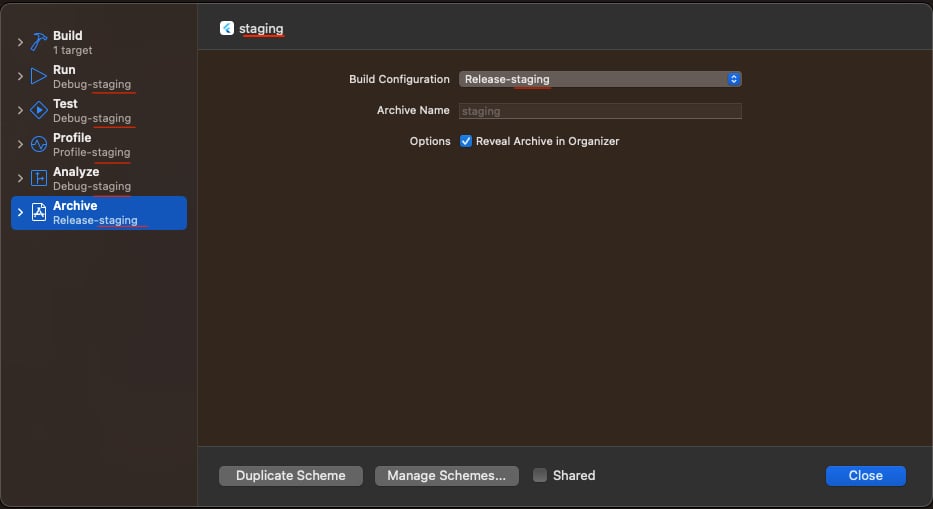
Similarly, create a `development` scheme with the correct configuration.
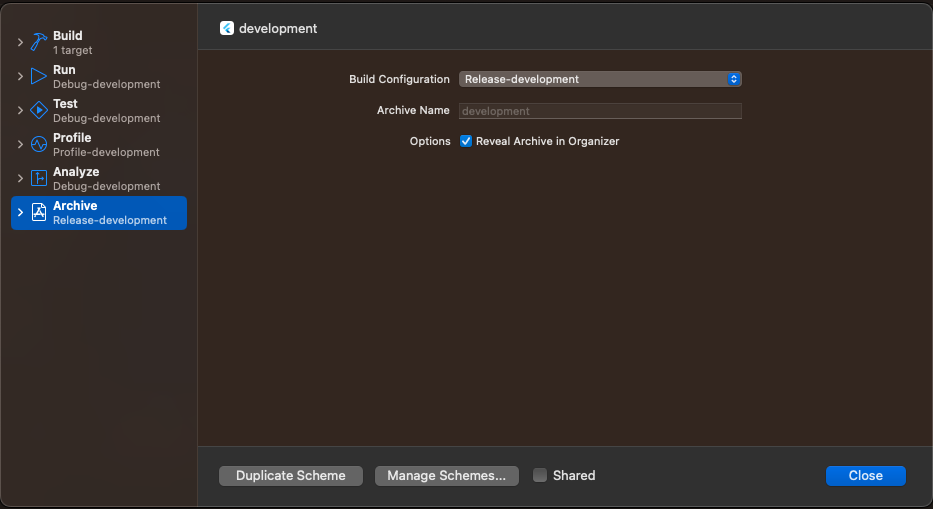
Once you are done with schemes, you will have something like this.
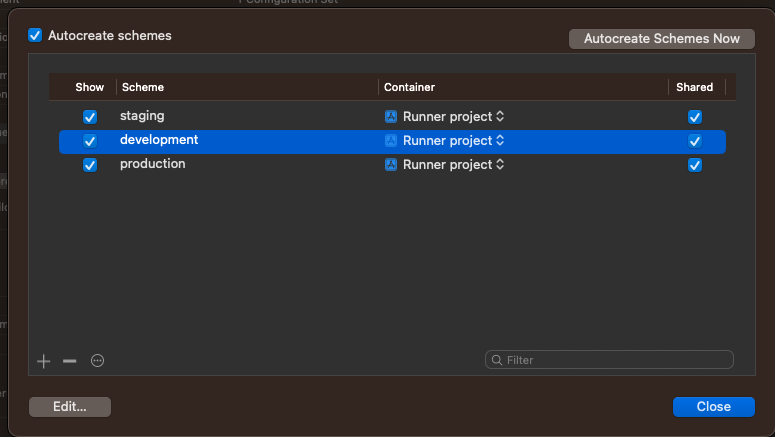
> **NOTE**: Make sure all three schemes have correct configuration, don't forget to recheck `production` scheme configuration.
* Now, let's add the bundle identifier for each configuration. In `Target`\-> `Runner`, click `Build Settings` and search for `Product Bundle Identifier`.
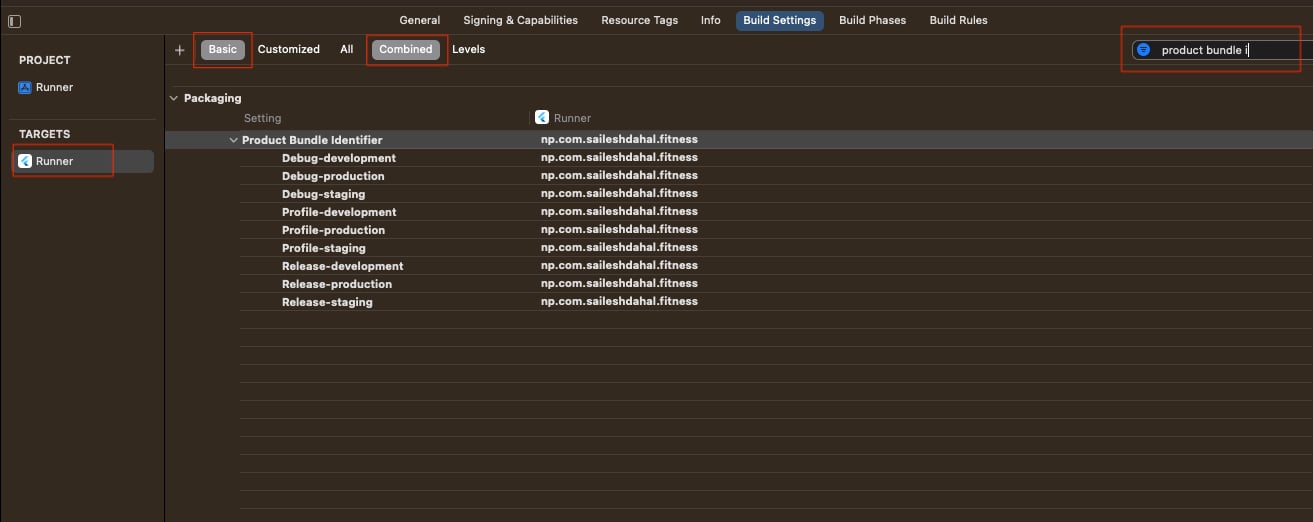
> Add the suffix as required.
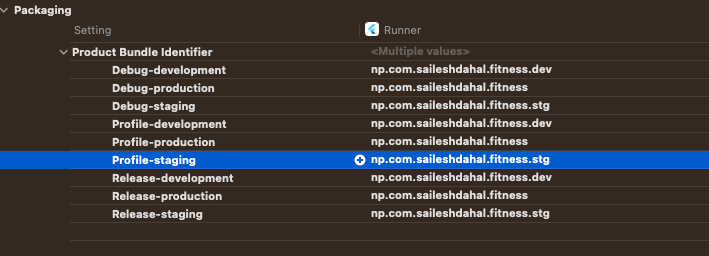
Once you are done, you will have something like this.
* Finally, we will create a new `User Defined Variable` called `APP_DISPLAY_NAME` which will have a different name for each configuration.
In same `Target` -> `Runner` -> `Build Settings`, click on the `+` button, and create a new user-defined variable.

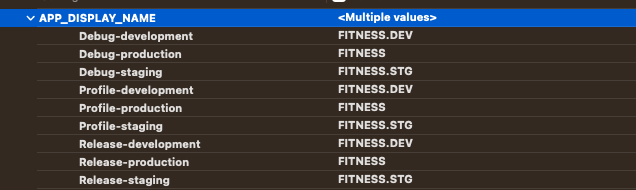
Once, you are done with the user-defined variable, you need to change the `Info.plist` to use this variable.
```xml
CFBundleName
$(APP_DISPLAY_NAME)
CFBundleDisplayName
$(APP_DISPLAY_NAME)
```
---
### Let's Test 🧪
Similar to android, we can test iOS by running the following commands.
```bash
flutter run --flavor development --target lib/main_development.dart
flutter run --flavor staging --target lib/main_staging.dart
flutter run --flavor production --target lib/production.dart
```
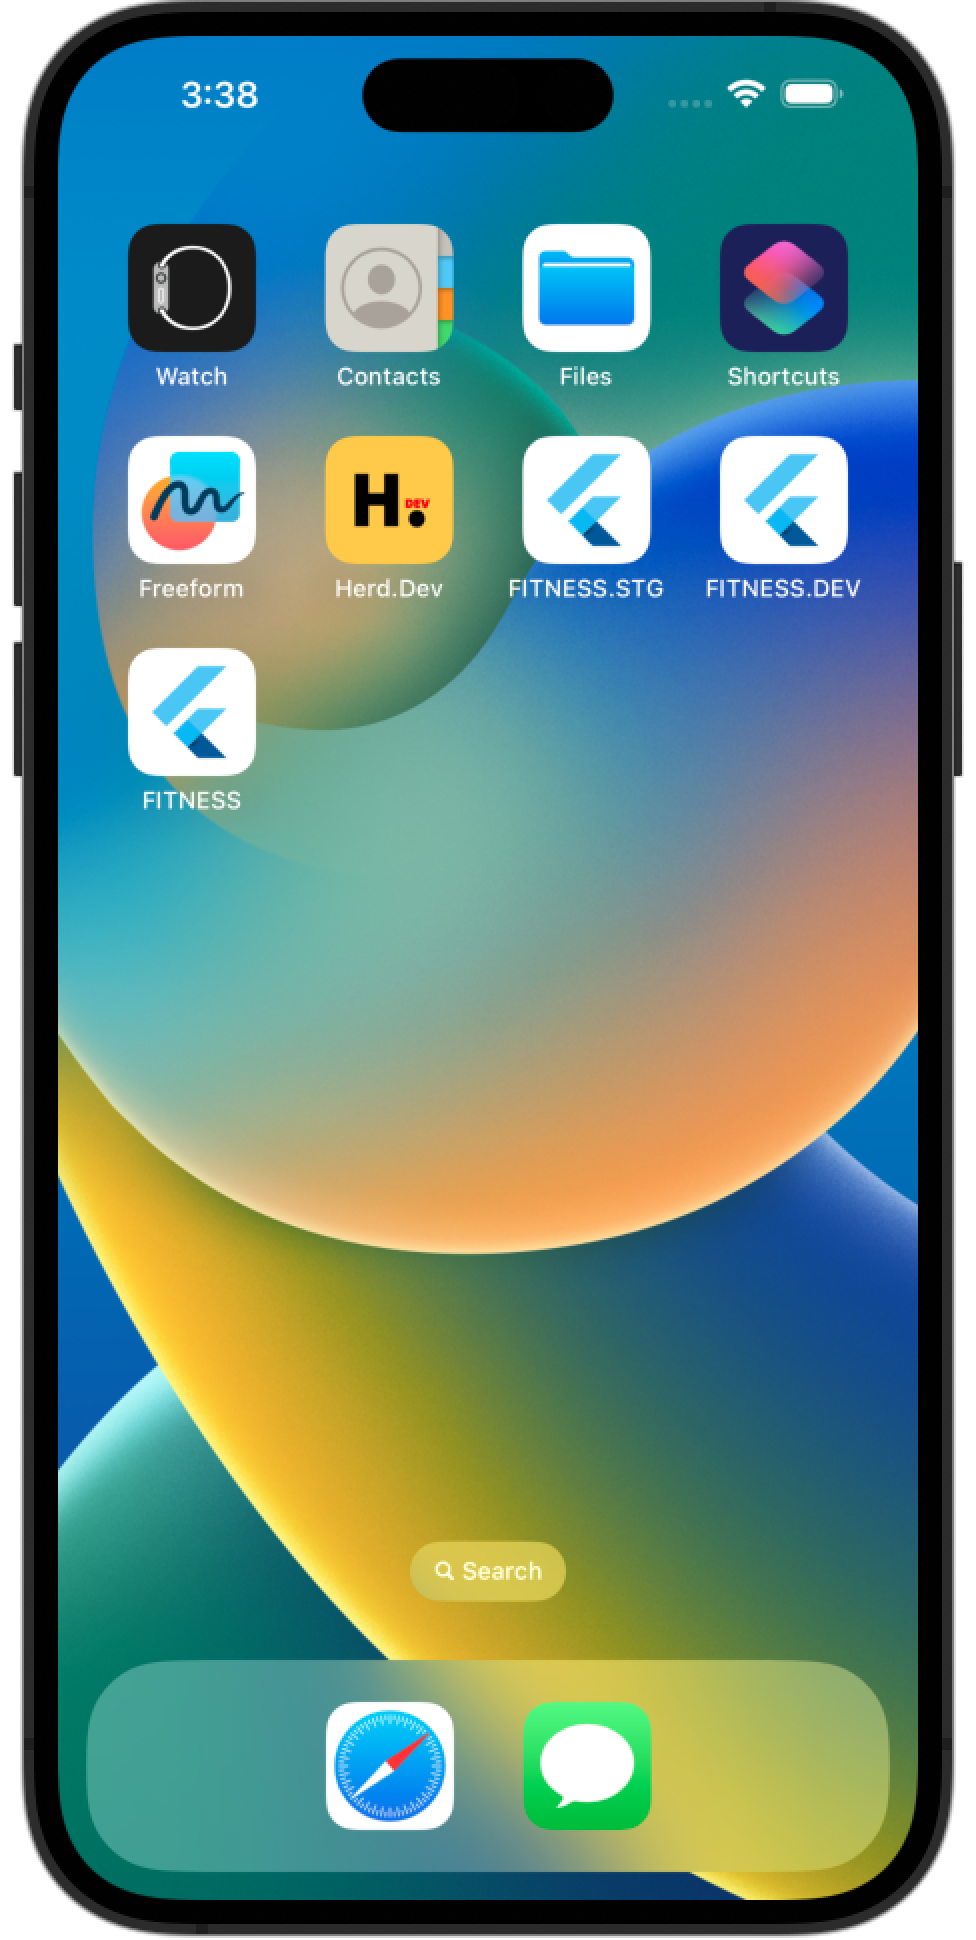
---
### App Icons for Android and iOS 🎨
> 🎆 Let's make it look pretty!
Now, let's have different icons based on the flavors. We will have 3 different icons for each flavor.

We will use [`flutter_launcher_icons`](https://pub.dev/packages/flutter_launcher_icons) to generate the launch icons. Install it as a dev dependency.
```bash
flutter pub add flutter_launcher_icons --dev
```
Once this is done, we will create `flutter_launcher_icons-.yaml` files for each flavor.
* `flutter_launcher_icons-development.yaml`
```yaml
flutter_icons:
android: true
ios: true
remove_alpha_ios: true
image_path: "assets/icons/dev-icon.png"
```
* `flutter_launcher_icons-staging.yaml`
```yaml
flutter_icons:
android: true
ios: true
remove_alpha_ios: true
image_path: "assets/icons/stg-icon.png"
```
* `flutter_launcher_icons-production.yaml`
```yaml
flutter_icons:
android: true
ios: true
remove_alpha_ios: true
image_path: "assets/icons/prod-icon.png"
```
Now to generate the launch icons we need to run
```bash
flutter pub run flutter_launcher_icons:main -f flutter_launcher_icons-*
```
This will generate all the icons.
Finally, we will set the icons to be dynamic in Xcode.
* In `Runner` -> `Assets.xcassets` we can see that we have all the required icons. We can remove the `AppIcon` , which is unused.
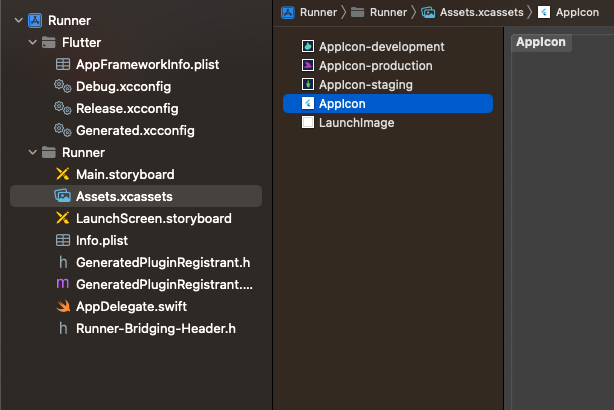
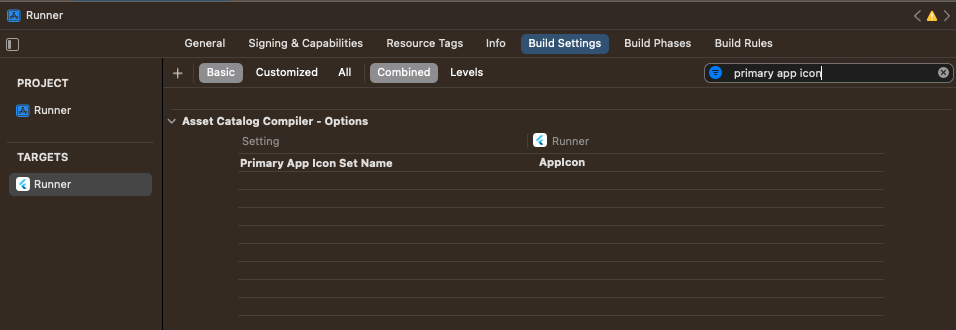
* Now, in `Target`\-> `Runner` -> `Build Settings`, search for `primary app icon`.
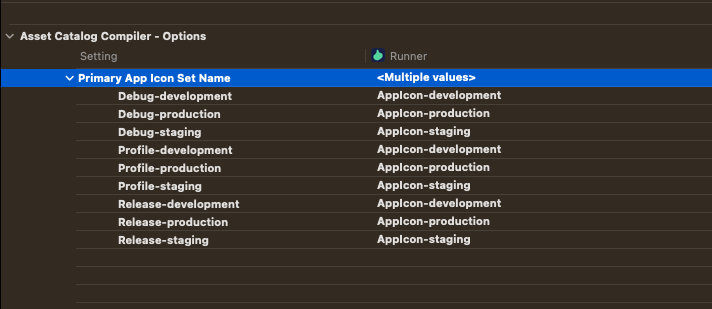
* Now, set the corresponding suffix to each one.
---
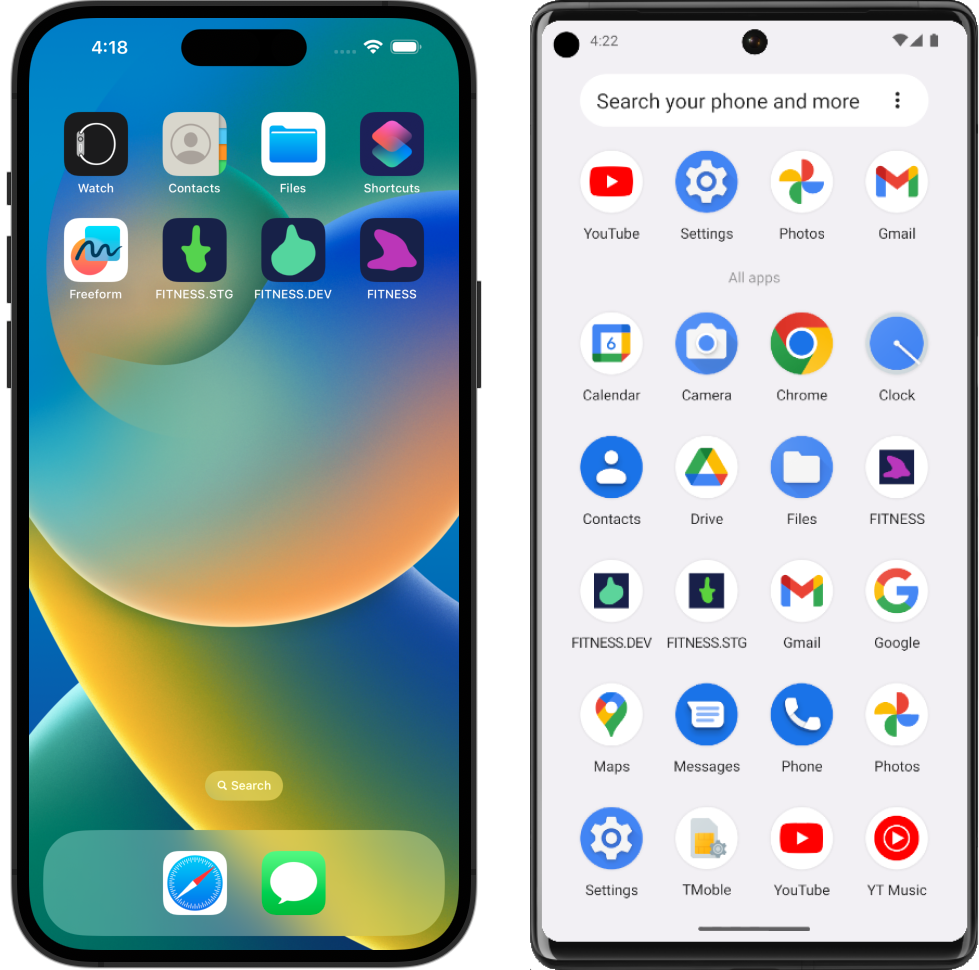
### Final Result 🎉
Now, if we run the app, for all the flavors, we will have different icons, names, versions, and bundle identifiers.
> NOTE: Make sure to uninstall the previous builds before running the app.
---
## 🎊 Bonus
For easy usage, we can create some launch configs for `Visual Studio Code` and `Android Studio`.
### For Visual Studio Code
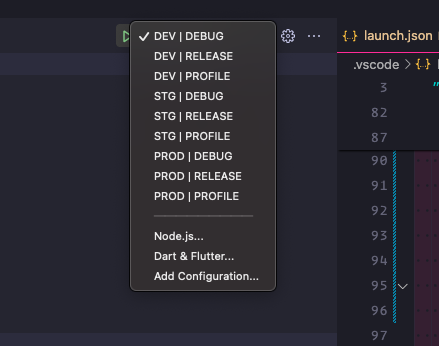
Create a new file in `.vscode/launch.json` with the following content.
```json
{
"version": "0.2.0",
"configurations": [
{
"name": "DEV | DEBUG",
"request": "launch",
"type": "dart",
"program": "lib/main_development.dart",
"args": [
"--flavor",
"development",
"--target",
"lib/main_development.dart"
],
"flutterMode": "debug"
},
{
"name": "DEV | RELEASE",
"request": "launch",
"type": "dart",
"program": "lib/main_development.dart",
"args": [
"--flavor",
"development",
"--target",
"lib/main_development.dart"
],
"flutterMode": "release"
},
{
"name": "DEV | PROFILE",
"request": "launch",
"type": "dart",
"program": "lib/main_development.dart",
"args": [
"--flavor",
"development",
"--target",
"lib/main_development.dart"
],
"flutterMode": "profile"
},
{
"name": "STG | DEBUG",
"request": "launch",
"type": "dart",
"program": "lib/main_staging.dart",
"args": [
"--flavor",
"staging",
"--target",
"lib/main_staging.dart"
],
"flutterMode": "debug"
},
{
"name": "STG | RELEASE",
"request": "launch",
"type": "dart",
"program": "lib/main_staging.dart",
"args": [
"--flavor",
"staging",
"--target",
"lib/main_staging.dart"
],
"flutterMode": "release"
},
{
"name": "STG | PROFILE",
"request": "launch",
"type": "dart",
"program": "lib/main_staging.dart",
"args": [
"--flavor",
"staging",
"--target",
"lib/main_staging.dart"
],
"flutterMode": "profile"
},
{
"name": "PROD | DEBUG",
"request": "launch",
"type": "dart",
"program": "lib/main_production.dart",
"args": [
"--flavor",
"production",
"--target",
"lib/main_production.dart"
],
"flutterMode": "debug"
},
{
"name": "PROD | RELEASE",
"request": "launch",
"type": "dart",
"program": "lib/main_production.dart",
"args": [
"--flavor",
"production",
"--target",
"lib/main_production.dart"
],
"flutterMode": "release"
},
{
"name": "PROD | PROFILE",
"request": "launch",
"type": "dart",
"program": "lib/main_production.dart",
"args": [
"--flavor",
"production",
"--target",
"lib/main_production.dart"
],
"flutterMode": "profile"
},
]
}
```
This will create the launch config with all the args.
### For Android Studio
For Android Studio, you can get the [configuration files from here](https://github.com/saileshbro/fitness_app_clone/tree/master/.idea/runConfigurations), for all the configs.
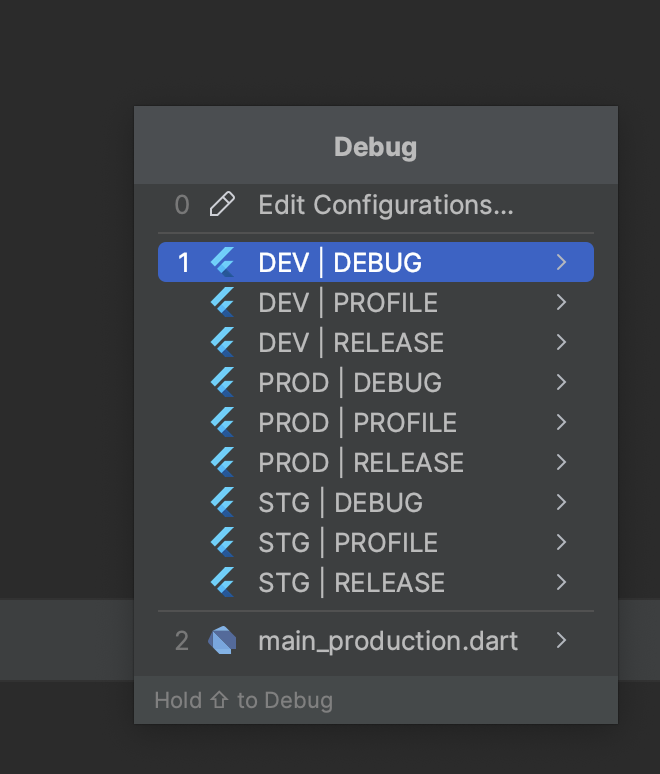
---
🎉 Congrats! We've made it to the end of our exploration of Flutter Flavors! 🚀 We've successfully learned how to add different flavors to our flutter application, each with its own unique configurations and build targets.
It's just the tip of the iceberg when it comes to the use cases of flavors in Flutter. For instance, you can inject dependencies based on the flavor you are using, which can entirely change the behavior of your app. The possibilities are endless!
As always, you can refer back to the Github repository for this tutorial at [https://github.com/saileshbro/fitness\_app\_clone](https://github.com/saileshbro/fitness_app_clone) if you need any help. Don't forget to give it a ⭐️ and help spread the word about this amazing project. If you get stuck or need assistance, feel free to submit an issue or contribute a pull request.
Thank you for joining me on this journey; let's create even more amazing applications together. Have fun coding! 💻👨💻
---
### References
* [Flutter Flavors, App Icons, and Firebase Tutorial - Marcus Ng](https://www.youtube.com/watch?v=Vhm1Cv2uPko)
* [Creating flavors for Flutter](https://docs.flutter.dev/deployment/flavors)
* [Android Developers - Build Variants: Flavor Dimensions](https://developer.android.com/studio/build/build-variants#flavor-dimensions)
==============================================================================
# 🚀 Building a Fullstack App with dart_frog and Flutter in a Monorepo - Part 6
URL: https://saileshdahal.com.np/building-a-fullstack-app-with-dartfrog-and-flutter-in-a-monorepo-part-6
Published: 2023-01-31
Tags: Flutter, Dart, Programming Blogs, full stack
Series: 🚀 Building a Fullstack App with dart_frog and Flutter in a Monorepo (part 6 of 6)
==============================================================================
In earlier sections of this tutorial series, we covered the fundamental stages for creating a to-do application with Flutter and Dart.
We've covered everything from bootstrapping an empty [Flutter](https://flutter.dev) project, importing necessary dependencies, setting up the folder structure, integrating the frontend with the backend, and implementing the Todo data sources, repositories, and view models.
In this part, we'll show you how to utilize dart frog to establish user authentication with [JSON Web Tokens (JWT)](https://jwt.io). By the end of this article, we will be able to:
* Implement user login and register.
* Create `User` model.
* Create and implement `UserRepository` and `UserDataSource`.
* Handle `UnauthorizedException`.
* Create a new authorization middleware.
* Implement user authentication using [JWT](https://jwt.io).
* Secure routes with `Authorization` headers.
Don't forget to check out the [GitHub](https://github.com/saileshbro/full_stack_todo_dart) repo for this article if you need any assistance along the way.
> Let's get started 🚀
---
## Overview 🔍
> 👀 Get a sneak peek of what's to come 🔮
When we're done, we should have an app that supports the following requests:
1. `/todos*` - Guard all to-do routes with `Authorization` header.
```bash
curl -s -L -X POST 'http://localhost:8080/todos' -H 'Authorization: Bearer eyJhbGciOiJIUzI1NiIsInR5cCI6IkpXVCJ9.eyJpZCI6IjY5ZWFkZTg3LWRhNWUtNDRjZC1iNTRlLTQ3NGE4NWQ4ZGVlNCIsIm5hbWUiOiJTYWlsZXNoIERhaGFsIiwiZW1haWwiOiJzYWlsZXNoYnJvQGdtYWlsLmNvbSIsImNyZWF0ZWRfYXQiOiIyMDIzLTAxLTIzVDIyOjU0OjM4Ljg2NDkxMloiLCJwYXNzd29yZCI6IiQyYSQxMCR6VjBTZlI3cUpHOHlCelJWWThtNkRlMWo0UUtHL2VRdXl6NzduQ1lBL1luZENtb1ZSbzB0RyIsImlhdCI6MTY3NDQ5Mzc3OX0.W36mHXKFrxZDhz0Hrxt0Cmrz3WNVexiAZe2KAjrWMaE' -H 'Content-Type: application/json' --data-raw '{
"title":"this is a title asdf",
"description":"Not so great description asdf"
}'
```
1. `/users/login` - Login user
```bash
curl -s -L -X POST 'http://localhost:8080/users/login' -H 'Content-Type: application/json' --data-raw '{
"email":"saileshbro@gmail.com",
"password":"6aMj@UBByu"
}'
```
1. `/users/signup` - Register new user
```bash
curl -s -L -X POST 'http://localhost:8080/users/signup' -H 'Content-Type: application/json' --data-raw '{
"email":"saileshbro@gmail.com",
"name":"Sailesh Dahal",
"password":"6aMj@UBByu%7BzN^C9tMe#Te4b!4cJrXwwFi#HgKrQ&g&"
}'
```
---
## Updating Database 🛠️
> 💾 Upgrading our database to its full potential 🚀
To begin, we will create a new table called `users` and add a [`foreign key`](https://www.postgresqltutorial.com/postgresql-tutorial/postgresql-foreign-key/) to our current `todos` table. This ensures that each to-do item is associated with a single user, and that data is accessible only to that person.
### Create `users` table
We will create a new `users` table with the following columns.
* `id` : unique `uuid`
* `name` : name of the user
* `email` : email of the user
* `password` : hashed password of the user
* `created_at` : timestamp of when the user was created
```sql
CREATE EXTENSION IF NOT EXISTS "uuid-ossp";
CREATE TABLE users(
id uuid DEFAULT uuid_generate_v4() PRIMARY KEY,
name VARCHAR(255) NOT NULL,
email TEXT NOT NULL,
password TEXT NOT NULL,
created_at timestamp default current_timestamp NOT NULL
);
```
> The [`uuid-ossp`](https://www.postgresql.org/docs/10/uuid-ossp.html) extension is used to generate unique IDs for each user.
### Updating `todos` table
We will update the `todos` table to include a foreign key to the `users` table.
```sql
TRUNCATE TABLE todos;
ALTER TABLE todos
ADD COLUMN user_id uuid NOT NULL,
ADD CONSTRAINT constraint_fk
FOREIGN KEY (user_id)
REFERENCES users (id)
ON DELETE CASCADE;
```
> The [`ON DELETE CASCADE`](https://www.commandprompt.com/education/postgresql-delete-cascade-with-examples/) clause ensures that when a user is deleted, all their to-do items will be deleted.
Once we are done with the changes, we can proceed to create a user schema in our `models` package.
> More about [`CONSTRAINTS`](https://www.postgresql.org/docs/current/ddl-constraints.html) here.
---
## Create `User` model
> 🧑💼 Defining our User Model 📝
We will start by creating a `UserId` in our `typedefs` package.
### Create `UserId` type
In `typedefs` package, we will make some changes. We will rename the older `src/typedefs.dart` file to `src/todo_types.dart` and create a new `src/user_types.dart` file.
```dart
typedef UserId = String;
```
> 💡 Make sure to update the exports.
```dart
library typedefs;
export 'src/todo_types.dart';
export 'src/user_types.dart';
```
### Update folder structure
In `models` package, we will create a new `user.dart` file. Since we are creating models for a different feature, we will mode the todo specific models to a new `todo` folder.
```apache
.
├── create_todo_dto
│ └── create_todo_dto.dart
├── todo.dart
└── update_todo_dto
└── update_todo_dto.dart
```
Also, make sure to export `create_todo_dto` and `update_todo_dto` from `todo.dart`
```dart
import 'package:freezed_annotation/freezed_annotation.dart';
import 'package:models/src/serializers/date_time_converter.dart';
import 'package:typedefs/typedefs.dart';
export './create_todo_dto/create_todo_dto.dart';
export './update_todo_dto/update_todo_dto.dart';
part 'todo.freezed.dart';
part 'todo.g.dart';
```
### Create `User` model
Now, we will create a `User` model in `src/user/user.dart` file.
```dart
import 'package:freezed_annotation/freezed_annotation.dart';
import 'package:models/src/serializers/date_time_converter.dart';
import 'package:typedefs/typedefs.dart';
part 'user.freezed.dart';
part 'user.g.dart';
@freezed
class User with _$User {
const factory User({
required UserId id,
required String name,
required String email,
@DateTimeConverter() required DateTime createdAt,
@Default('') @JsonKey(includeToJson: false) String password,
}) = _User;
factory User.fromJson(Map json) => _$UserFromJson(json);
}
```
> We are ignoring the `password` field when serializing the model to JSON. This is because we don't want to send the password to the client.
Similarly, we will create `CreateUserDto` and `LoginUserDto` for creating and logging in users.
In `src/user/create_user_dto/create_user_dto.dart` file,
```dart
import 'package:either_dart/either.dart';
import 'package:exceptions/exceptions.dart';
import 'package:failures/failures.dart';
import 'package:freezed_annotation/freezed_annotation.dart';
part 'create_user_dto.freezed.dart';
part 'create_user_dto.g.dart';
@freezed
class CreateUserDto with _$CreateUserDto {
factory CreateUserDto({
required String name,
required String email,
required String password,
}) = _CreateUserDto;
factory CreateUserDto.fromJson(Map json) =>
_$CreateUserDtoFromJson(json);
static Either validated(
Map json,
) {
try {
final errors = >{};
final name = json['name'] as String? ?? '';
final email = json['email'] as String? ?? '';
final password = json['password'] as String? ?? '';
if (name.isEmpty) {
errors['name'] = ['Name is required'];
}
if (email.isEmpty) {
errors['email'] = ['Email is required'];
}
if (!email.contains('@')) {
errors['email'] = ['Email is invalid'];
}
if (password.isEmpty) {
errors['password'] = ['Password is required'];
}
if (password.length < 6) {
errors['password'] = ['Password must be at least 6 characters'];
}
if (errors.isEmpty) return Right(CreateUserDto.fromJson(json));
throw BadRequestException(
message: 'Validation failed',
errors: errors,
);
} on BadRequestException catch (e) {
return Left(
ValidationFailure(
message: e.message,
errors: e.errors,
statusCode: e.statusCode,
),
);
}
}
}
```
Similarly, we will create a new `login_user_dto`.
```dart
import 'package:either_dart/either.dart';
import 'package:exceptions/exceptions.dart';
import 'package:failures/failures.dart';
import 'package:freezed_annotation/freezed_annotation.dart';
part 'login_user_dto.freezed.dart';
part 'login_user_dto.g.dart';
@freezed
class LoginUserDto with _$LoginUserDto {
factory LoginUserDto({
required String email,
required String password,
}) = _LoginUserDto;
factory LoginUserDto.fromJson(Map json) =>
_$LoginUserDtoFromJson(json);
static Either validated(
Map json,
) {
try {
final errors = >{};
final email = json['email'] as String? ?? '';
final password = json['password'] as String? ?? '';
if (email.isEmpty) {
errors['email'] = ['Email is required'];
}
if (password.isEmpty) {
errors['password'] = ['Password is required'];
}
if (errors.isEmpty) return Right(LoginUserDto.fromJson(json));
throw BadRequestException(
message: 'Validation failed',
errors: errors,
);
} on BadRequestException catch (e) {
return Left(
ValidationFailure(
message: e.message,
errors: e.errors,
statusCode: e.statusCode,
),
);
}
}
}
```
These data transfer objects will be used to send, receive and validate data from the client in the backend.
> 💡 Make sure to export `create_user_dto` and `login_user_dto` from `user.dart`, and `user.dart` from `models.dart`
```dart
import 'package:freezed_annotation/freezed_annotation.dart';
import 'package:models/src/serializers/date_time_converter.dart';
import 'package:typedefs/typedefs.dart';
export './create_user_dto/create_user_dto.dart';
export './login_user_dto/login_user_dto.dart';
part 'user.freezed.dart';
part 'user.g.dart';
```
```dart
library models;
export 'src/todo/todo.dart';
export 'src/user/user.dart';
```
> 💡 Make sure to run `flutter pub run build_runner build` to generate new files.
---
## Creating `UserDataSource`
> 📊 Building the foundation for user management with `UserDataSource` 🛠️
In `data_source` package, we will create a new interface called `UserDataSource` in `data_source/lib/src/user_data_source.dart`
```dart
import 'package:models/models.dart';
import 'package:typedefs/typedefs.dart';
abstract class UserDataSource {
Future getUserById(UserId id);
Future createUser(CreateUserDto user);
Future getUserByEmail(String email);
}
```
We will have methods to query and create users. We will do the implementation in our `backend`.
---
## Creating `UserRepository`
> 🔍 Designing our User Management System with UserRepository 🛠️
We will also create an interface called `UserRepository` which will return either a failure or valid data making use of `UserDataSource`.
In `repository` package, we will create a new interface called `UserRepository` in `repository/lib/src/user_repository.dart`
```dart
import 'package:either_dart/either.dart';
import 'package:failures/failures.dart';
import 'package:models/models.dart';
import 'package:typedefs/typedefs.dart';
abstract class UserRepository {
Future> getUserById(UserId id);
Future> createUser(CreateUserDto createUserDto);
Future> loginUser(LoginUserDto loginUserDto);
Future> getUserByEmail(String email);
}
```
We will have all the methods we need to create, query and login users. We will do the implementation in our backend.
> 💡 Make sure to export `UserRepository` from `repository.dart`
```dart
library repository;
export 'src/todo_repository.dart';
export 'src/user_repository.dart';
```
---
## Implementing `UserDataSource`
> 💻 Bringing `UserDataSource` to life 🔧
Now, we will implement `UserDataSource` in our backend. In `backend/lib/user/data_source/user_data_source_impl.dart`, we will create a new class called `UserDataSourceImpl` which will implement `UserDataSource`.
This is how an empty implementation of `UserDataSourceImpl` will look like.
```dart
import 'package:data_source/data_source.dart';
import 'package:models/models.dart';
import 'package:typedefs/typedefs.dart';
class UserDataSourceImpl implements UserDataSource {
UserDataSourceImpl(this._databaseConnection);
final DatabaseConnection _databaseConnection;
Future createUser(CreateUserDto user) {
throw UnimplementedError();
}
@override
Future getUserByEmail(String email) {
throw UnimplementedError();
}
@override
Future getUserById(UserId id) {
throw UnimplementedError();
}
}
```
### Implementing `createUser` method
Now, we will implement `createUser` method. We will use `DatabaseConnection` to connect to our database and create a new user from the dto we received.
```dart
@override
Future createUser(CreateUserDto user) async {
try {
await _databaseConnection.connect();
final result = await _databaseConnection.db.query(
'''
INSERT INTO users (name, email, password)
VALUES (@name, @email, @password) RETURNING *
''',
substitutionValues: user.toJson(),
);
if (result.affectedRowCount == 0) {
throw const ServerException('Failed to create todo');
}
final userMap = result.first.toColumnMap();
return User.fromJson(userMap);
} on PostgreSQLException catch (e) {
throw ServerException(e.message ?? 'Unexpected error');
} finally {
await _databaseConnection.close();
}
}
```
We will validate the DTO in the repository before passing it to the data source. The database will then be queried to generate a new user. We will throw a `ServerException` if the user is not created, else, we will return the user that was created.
### Implementing `getUserByEmail` method
```dart
@override
Future getUserByEmail(String email) async {
try {
await _databaseConnection.connect();
final result = await _databaseConnection.db.query(
'''
SELECT id, name, email, password, created_at
FROM users WHERE email = @email
''',
substitutionValues: {'email': email},
);
if (result.isEmpty) {
throw const NotFoundException('User not found');
}
return User.fromJson(result.first.toColumnMap());
} on PostgreSQLException catch (e) {
throw ServerException(e.message ?? 'Unexpected error');
} finally {
await _databaseConnection.close();
}
}
```
Here, we will query the database for the user with the given email. If the user is not found, we will throw a `NotFoundException`. We will handle this exception in the `UserController` and return a `404` response.
### Implementing `getUserById` method
```dart
@override
Future getUserById(UserId id) async {
try {
await _databaseConnection.connect();
final result = await _databaseConnection.db.query(
'SELECT id, name, email, created_at FROM users WHERE id = @id',
substitutionValues: {'id': id},
);
if (result.isEmpty) {
throw const NotFoundException('User not found');
}
return User.fromJson(result.first.toColumnMap());
} on PostgreSQLException catch (e) {
throw ServerException(e.message ?? 'Unexpected error');
} finally {
await _databaseConnection.close();
}
}
```
We will query the database for the user with the given id. If the user is not found, we will throw a `NotFoundException`. We will handle this exception in the `UserController` and return a `404` response.
---
## Creating `PasswordHasherService`
> 🔑 Keeping user passwords safe with `PasswordHasherService` 🔒
We will create a new service to hash and validate hashed passwords before going on to the `UserRepository` implementation. The `CreateUserDto` with the hashed password will be passed to the `UserRepository`.
In `backend/lib/services/password_hasher_service.dart`, we will create a new class called `PasswordHasherService`.
We will use [`bcrypt`](https://pub.dev/packages/bcrypt) package to hash and verify the password.
```bash
flutter pub add bcrypt
```
```dart
import 'package:bcrypt/bcrypt.dart';
class PasswordHasherService {
const PasswordHasherService();
String hashPassword(String password) {
return BCrypt.hashpw(password, BCrypt.gensalt());
}
bool checkPassword(String password, String hashedPassword) {
return BCrypt.checkpw(password, hashedPassword);
}
}
```
Now, we can pass this service as a dependency to `UserRepository` when we implement our repository.
---
## Implementing `UserRepository`
> 💻 Bringing `UserRepository` to life 🔧
Now, we will implement `UserRepository` in our backend. In `backend/lib/user/repository/user_repository_impl.dart`, we will create a new class called `UserRepositoryImpl` which will implement `UserRepository`.
```dart
import 'package:backend/services/password_hasher_service.dart';
import 'package:data_source/data_source.dart';
import 'package:either_dart/either.dart';
import 'package:failures/failures.dart';
import 'package:models/models.dart';
import 'package:repository/repository.dart';
import 'package:typedefs/typedefs.dart';
class UserRepositoryImpl implements UserRepository {
UserRepositoryImpl(this.dataSource, this.passwordHasherService);
final UserDataSource dataSource;
final PasswordHasherService passwordHasherService;
@override
Future> createUser(CreateUserDto createUserDto) {
throw UnimplementedError();
}
@override
Future> getUserByEmail(String email) {
throw UnimplementedError();
}
@override
Future> getUserById(UserId id) {
throw UnimplementedError();
}
@override
Future> loginUser(LoginUserDto loginUserDto) {
throw UnimplementedError();
}
}
```
### Implementing `getUserByEmail` method
We will start by implementing `getUserByEmail`. We will use the data source's `dataSource.getUserByEmail` method to see if we get a `User` object. If we get a `User` object, we shall wrap it in a `Right` object and return it. If an error occurs, we will return a `Left` object along with a `ServerFailure` object.
```dart
@override
Future> getUserByEmail(String email) async {
try {
final user = await dataSource.getUserByEmail(email);
return Right(user);
} catch (e) {
log(e.toString());
return const Left(
ServerFailure(
message: 'User with this email does not exist',
statusCode: HttpStatus.notFound,
),
);
}
}
```
### Implementing `getUserById` method
Similarly, we will call `dataSource.getUserById` method and see whether we get a `User` object. If we get a `User` object, we shall wrap it in a `Right` object and return it. If an error occurs, we will return a `Left` object along with a `ServerFailure` object.
```dart
@override
Future> getUserById(UserId id) async {
try {
final res = await dataSource.getUserById(id);
return Right(res);
} on NotFoundException catch (e) {
log(e.message);
return Left(
ServerFailure(
message: e.message,
statusCode: e.statusCode,
),
);
} on ServerException catch (e) {
log(e.message);
return Left(
ServerFailure(message: e.message),
);
}
}
```
### Implementing `loginUser` method
Now, we will implement `loginUser`. We will check if the user with the given email exists. If the user exists, we will check the password with `PasswordHasherService`. If they do not match, we will return a failure, else we will return the logged in user.
This method will be used by the `UserController` to create an access token for the user.
```dart
@override
Future> loginUser(LoginUserDto loginUserDto) async {
try {
final email = loginUserDto.email;
final userExists = await getUserByEmail(email);
if (userExists.isLeft) {
throw const ServerException('Invalid email or password');
}
final user = userExists.right;
final password = loginUserDto.password;
final isPasswordCorrect =
passwordHasherService.checkPassword(password, user.password);
if (!isPasswordCorrect) {
throw const ServerException('Invalid email or password');
}
return Right(user);
} catch (e) {
log(e.toString());
return const Left(
ServerFailure(
message: 'Invalid email or password',
statusCode: HttpStatus.unauthorized,
),
);
}
}
```
### Implementing `createUser` method
Similarly, we will implement `createUser`. We will check if the user with the given email exists. If the user exists, we will return an failure, else we will create the user and return it.
```dart
@override
Future> createUser(CreateUserDto createUserDto) async {
try {
final userExists = await getUserByEmail(createUserDto.email);
if (userExists.isRight) {
throw const ServerException('Email already in use');
}
// dto is already validated in the controller
// we will hash the password here
final hashedPassword = passwordHasherService.hashPassword(
createUserDto.password,
);
final user = await dataSource.createUser(
createUserDto.copyWith(
password: hashedPassword,
),
);
return Right(user);
} on ServerException catch (e) {
log(e.message);
return Left(
ServerFailure(message: e.message),
);
}
}
```
---
## Implementing `JwtService`
> 🔐 Securing User Login with JWT 🔒
Now, once we have all the necessary implementation of the repository and the data source, we will implement `JwtService` before implementing our `UserController`. This service will be used to create a JWT token for the user when they log in or signup.
In `backend/lib/user/service/jwt_service.dart`, we will create a new class called `JwtService`. We will use [`dart_jsonwebtoken`](https://pub.dev/packages/dart_jsonwebtoken) package to create and verify JWT tokens.
```bash
flutter pub add dart_jsonwebtoken
```
Now, we will implement the `JwtService` class.
```dart
import 'package:dart_jsonwebtoken/dart_jsonwebtoken.dart';
import 'package:dotenv/dotenv.dart';
class JWTService {
const JWTService(this._env);
final DotEnv _env;
String sign(Map payload) {
final secret = _env['JWT_SECRET']!;
final jwt = JWT(payload);
return jwt.sign(SecretKey(secret));
}
Map verify(String token) {
final secret = _env['JWT_SECRET']!;
final jwt = JWT.verify(token, SecretKey(secret));
return jwt.payload as Map;
}
}
```
> 💡 NOTE: We are using `dotenv` package to get the `JWT_SECRET` from the `.env` file. 💡 Make sure you have added the `JWT_SECRET` to the `.env` file.
```apache
...
JWT_SECRET=verycomplexsupersecret
```
Once this is done, we will implement the `UserController`.
---
## Tidy Up Time 🧹
> Make Room for Improvement 🧠
### Remove duplicates
We have multiple routes that are not implemented and are returning the same response. We will remove these routes and create a new `Handler` to handle these requests.
We will create a new `Handler` called `notAllowedRequestHandler` in `backend/lib/request_handlers/not_allowed_request_handler.dart` to handle these requests.
```dart
Future notAllowedRequestHandler(RequestContext context) async {
return Response.json(
body: {'error': '👀 Looks like you are lost 🔦'},
statusCode: HttpStatus.methodNotAllowed,
);
}
```
Then, we will replace the routes with this handler.
* `backend/routes/index.dart`
```dart
import 'package:backend/request_handlers/not_allowed_request_handler.dart';
import 'package:dart_frog/dart_frog.dart';
Handler onRequest = notAllowedRequestHandler;
```
* `backend/routes/todos/index.dart`
* `backend/routes/todos/[id].dart`
```diff
+ return notAllowedRequestHandler(context);
- return Response.json(
- body: {'error': '👀 Looks like you are lost 🔦'},
- statusCode: HttpStatus.methodNotAllowed,
- );
```
### Refactor `HttpController`
Right now, if we have to implement `HttpController`, we will have to override all the methods. We will refactor the `HttpController` to make it optional to override all the methods.
we will create a new handler called `unimplementedHandler` in `backend/lib/request_handlers/unimplemented_handler.dart` to handle the unimplemented methods.
```dart
import 'dart:io';
import 'package:dart_frog/dart_frog.dart';
Future unimplementedHandler([RequestContext? context]) async {
return Response.json(
body: {'error': '👀 Not implemented yet'},
statusCode: HttpStatus.notImplemented,
);
}
```
Then, we will refactor the `HttpController` to use this handler. In `backend/lib/controller/http_controller.dart`, we will change the methods to call and return `unimplementedHandler`.
```dart
abstract class HttpController {
FutureOr index(Request request) => unimplementedHandler();
FutureOr store(Request request) => unimplementedHandler();
FutureOr show(Request request, String id) => unimplementedHandler();
FutureOr update(Request request, String id) =>
unimplementedHandler();
FutureOr destroy(Request request, String id) =>
unimplementedHandler();
}
```
---
## Implementing `UserController`
> Adding magic with `UserController` Implementation 🧙♀️
Now, we will implement `UserController` in `user/controller/user_controller.dart`.
```dart
import 'dart:async';
import 'package:backend/controller/http_controller.dart';
import 'package:backend/services/jwt_service.dart';
import 'package:dart_frog/dart_frog.dart';
import 'package:repository/repository.dart';
class UserController extends HttpController {
UserController(this._repo, this._jwtService);
final UserRepository _repo;
final JWTService _jwtService;
@override
FutureOr store(Request request) async {
throw UnimplementedError();
}
FutureOr login(Request request) async {
throw UnimplementedError();
}
}
```
We will override `store` method, which will responsible for creating and storing the user, and then another `login` method, to log in the user.
Also, we will create a new private method called `_signAndSendToken` which will take the user, and then sign and send the user along with the JWT token.
### Implement `_signAndSendToken` method
We will use this method once `login` and `store` method are successful and when we want to send a response to the user.
```dart
Response _signAndSendToken(User user, [int? httpStatus]) {
final token = _jwtService.sign(user.toJson());
return Response.json(
body: {
'token': token,
'user': user.toJson()..remove('password'),
},
statusCode: httpStatus ?? HttpStatus.ok,
);
}
```
### Implement `store` method
We will parse the JSON body, and validate the body with `CreateUserDto`. Once validated, we will call `repository.createUser` which will hash the password and create a new user if not already there.
Once this is done, we will call `_signAndSendToken` and return with `201` status code.
```dart
@override
FutureOr store(Request request) async {
final parsedBody = await parseJson(request);
if (parsedBody.isLeft) {
return Response.json(
body: {'message': parsedBody.left.message},
statusCode: parsedBody.left.statusCode,
);
}
final json = parsedBody.right;
final createTodoDto = CreateUserDto.validated(json);
if (createTodoDto.isLeft) {
return Response.json(
body: {
'message': createTodoDto.left.message,
'errors': createTodoDto.left.errors,
},
statusCode: createTodoDto.left.statusCode,
);
}
final res = await _repo.createUser(createTodoDto.right);
return res.fold(
(left) => Response.json(
body: {'message': left.message},
statusCode: left.statusCode,
),
(right) => _signAndSendToken(right, HttpStatus.created),
);
}
```
### Implement `login`
Similar to `store`, we will parse and verify `LoginUserDto`, and call `repository.loginUser` which will verify the password and return the user.
```dart
FutureOr login(Request request) async {
final parsedBody = await parseJson(request);
if (parsedBody.isLeft) {
return Response.json(
body: {'message': parsedBody.left.message},
statusCode: parsedBody.left.statusCode,
);
}
final json = parsedBody.right;
final loginUserDto = LoginUserDto.validated(json);
if (loginUserDto.isLeft) {
return Response.json(
body: {
'message': loginUserDto.left.message,
'errors': loginUserDto.left.errors,
},
statusCode: loginUserDto.left.statusCode,
);
}
final res = await _repo.loginUser(loginUserDto.right);
return res.fold(
(left) => Response.json(
body: {'message': left.message},
statusCode: left.statusCode,
),
_signAndSendToken,
);
}
```
---
## Adding Dependency Injections 🧰
> Making sure our ducks are in a row 🦆
In our global middleware `backend/routes/_middleware.dart`, we will register the dependencies.
```dart
import 'package:backend/db/database_connection.dart';
import 'package:backend/services/jwt_service.dart';
import 'package:backend/services/password_hasher_service.dart';
import 'package:backend/user/controller/user_controller.dart';
import 'package:backend/user/data_source/user_data_source_impl.dart';
import 'package:backend/user/repositories/user_repository_impl.dart';
import 'package:dart_frog/dart_frog.dart';
import 'package:data_source/data_source.dart';
import 'package:dotenv/dotenv.dart';
import 'package:repository/repository.dart';
final env = DotEnv()..load();
final _db = DatabaseConnection(env);
final _userDs = UserDataSourceImpl(_db);
const _passwordHasher = PasswordHasherService();
final _userRepo = UserRepositoryImpl(_userDs, _passwordHasher);
final _jwtService = JWTService(env);
final _userController = UserController(_userRepo, _jwtService);
Handler middleware(Handler handler) {
return handler
.use(requestLogger())
.use(provider((_) => _db))
.use(provider((_) => _jwtService))
.use(provider((_) => _userDs))
.use(provider((_) => _userRepo))
.use(provider((_) => _userController))
.use(provider((_) => _passwordHasher));
}
```
---
## Setting up routes
> Connecting the dots 🔗️ - defining API endpoints
We will now setup the routes for `UserController` in `backend/routes/user` we will create three new files `index.dart`, `login.dart`, and `signup.dart`.
Doing this we will have three different routes:
* `/user` - `index.dart`
* `/user/login` - `login.dart`
* `/user/signup` - `signup.dart`
### `index.dart`
This route does nothing. We will just return `unimplementedHandler`.
```dart
import 'package:backend/request_handlers/not_allowed_request_handler.dart';
import 'package:dart_frog/dart_frog.dart';
Handler onRequest = notAllowedRequestHandler;
```
### `login.dart`
We will get the `UserController` from the `RequestContext` and call `login` method for `POST` requests.
```dart
import 'dart:async';
import 'package:backend/request_handlers/not_allowed_request_handler.dart';
import 'package:backend/user/controller/user_controller.dart';
import 'package:dart_frog/dart_frog.dart';
FutureOr onRequest(RequestContext context) {
final userController = context.read();
if (context.request.method != HttpMethod.post) {
return notAllowedRequestHandler(context);
}
return userController.login(context.request);
}
```
### `signup.dart`
Similar to `login.dart`, we will get the `UserController` from the `RequestContext` and call `store` method for `POST` requests.
```dart
import 'dart:async';
import 'package:backend/request_handlers/not_allowed_request_handler.dart';
import 'package:backend/user/controller/user_controller.dart';
import 'package:dart_frog/dart_frog.dart';
FutureOr onRequest(RequestContext context) {
final userController = context.read();
if (context.request.method != HttpMethod.post) {
return notAllowedRequestHandler(context);
}
return userController.store(context.request);
}
```
> 💡 NOTE: Recheck your `.env` file before testing the routes.
---
## Testing routes
> Testing Time 🧪 - Verify Your Routes!
Once we have set up the routes, we can test them using `curl` or `postman`.
### `/users/login`
#### When the email and password match
* `REQUEST`
```bash
curl -s -L -X POST 'http://localhost:8080/users/login' -H 'Content-Type: application/json' --data-raw '{
"email":"saileshbro@gmail.com",
"password":"6aMj@UBByu%7BzN^C9tMe#Te4b!4cJrXwwFi#HgKrQ&g&ddNN6eHQ94vd5SuJtEc%7^H6L^xews8soG@R7GnW*RvfJVMaKEuBXNtVtbP5!3^qs*n!Z%87q8eRJmKFUHg"
}'
```
* `RESPONSE`
```json
{
"token": "eyJhbGciOiJIUzI1NiIsInR5cCI6IkpXVCJ9.eyJpZCI6IjQ4ODY5Yjc4LWEwMjgtNGMwNS1hN2QzLTQ5OTQ2Mzk4NDI2NSIsIm5hbWUiOiJTYWlsZXNoIERhaGFsIiwiZW1haWwiOiJzYWlsZXNoQGdtYWlsLmNvbSIsImNyZWF0ZWRfYXQiOiIyMDIzLTAxLTMwVDA5OjU3OjQ5LjExODM2MVoiLCJwYXNzd29yZCI6IiQyYSQxMCRGSDVDc2N1Y0VuLlNwWlZmSWFtRGwuZzRMaDFhd2ltbVRMS05yU2NORW1qT25lSFZHOE4wLiIsImlhdCI6MTY3NTA2MDA0MH0.qvzLWgAEphlYqZztoBf7Bvag6hO1qkp44hUwl78CMVo",
"user": {
"id": "48869b78-a028-4c05-a7d3-499463984265",
"name": "Sailesh Dahal",
"email": "saileshbro@gmail.com",
"created_at": "2023-01-30T09:57:49.118361Z"
}
}
```
#### When the email or password does not match.
* `REQUEST`
```bash
curl -s -L -X POST 'http://localhost:8080/users/login' -H 'Content-Type: application/json' --data-raw '{
"email":"sa@gmail.com",
"name":"Sailesh Dahal",
"password":"6aMj@UBByu%7BzN^C9tMe#Te4b!4cJrXwwFi#HgKrQ&g&ddNN6eHQ94vd5SuJtEc%7^H6L^xews8soG@R7GnW*RvfJVMaKEuBXNtVtbP5!3^qs*n!Z%87q8eRJmKFUHg"
}'
```
* `RESPONSE`
```json
{ "message": "Invalid email or password" }
```
### `/users/signup`
#### When the data is not valid
* `REQUEST`
```bash
curl -s -L -X POST 'http://localhost:8080/users/signup' -H 'Content-Type: application/json' --data-raw '{
"email":"sailes@gmail.com",
"password":"6aMj@UBByu"
}'
```
* `RESPONSE`
```json
{
"message": "Validation failed",
"errors": {
"name": ["Name is required"]
}
}
```
#### When there is no user with the given email, it will create a new user and return the same response as `/users/login`.
* `REQUEST`
```bash
curl -s -L -X POST 'http://localhost:8080/users/signup' -H 'Content-Type: application/json' --data-raw '{
"email":"sailesh12@gmail.com",
"name":"Sailesh Dahal",
"password":"6aMj123"
}'
```
* `RESPONSE`
```json
{
"token": "eyJhbGciOiJIUzI1NiIsInR5cCI6IkpXVCJ9.eyJpZCI6ImM1ODE2YWQ0LTNkODctNDUzZC1hZmFkLTUwMzljY2YxZjdjNyIsIm5hbWUiOiJTYWlsZXNoIERhaGFsIiwiZW1haWwiOiJzYWlsZXNoMTJAZ21haWwuY29tIiwiY3JlYXRlZF9hdCI6IjIwMjMtMDEtMzBUMDY6Mjg6MzUuMzkyMjM4WiIsInBhc3N3b3JkIjoiJDJhJDEwJHRuTllGM3FHQmlPT1dKeHVacm1MaU91SHhBMU1HQlNMcmoxYS5ndHY2TTNCMHpmRW5Dc1dLIiwiaWF0IjoxNjc1MDYwMTE0fQ.aUpo9HXTFmdmkTsfGoTp0mcK0OJ_fFuwZArqyNFpKvQ",
"user": {
"id": "c5816ad4-3d87-453d-afad-5039ccf1f7c7",
"name": "Sailesh Dahal",
"email": "sailesh12@gmail.com",
"created_at": "2023-01-30T06:28:35.392238Z"
}
}
```
#### When there is a user with the given email, it will return the following response.
* `REQUEST`
```bash
curl -s -L -X POST 'http://localhost:8080/users/signup' -H 'Content-Type: application/json' --data-raw '{
"email":"sailesh12@gmail.com",
"name":"Sailesh Dahal",
"password":"6aMj123"
}'
```
* `RESPONSE`
```json
{
"message": "Email already in use"
}
```
---
## Protecting Routes
> Locking Down: Secure Your Endpoints 🔒
Now, we can protect our routes by adding middleware to the routes. We will check for the `Authorization` header and verify the token. We can intercept all the requests going to `/todos/*` and check for the token.
We can do this by creating a new authorization middleware. We will create a new file `backend/lib/middlewares/authorization_middleware.dart`. Before that, let's create a new exception for unauthorized requests.
### Creating `UnauthorizedException`
When the token is not valid, we will throw an `UnauthorizedException` which will be handled by the `ExceptionHandlerMiddleware`.
In `exceptions` package, we will create a new exception called `UnauthorizedException` in `exceptions/lib/src/http_exception/unauthorized_exception.dart`
```dart
import 'dart:io';
import 'package:exceptions/src/http_exception/http_exception.dart';
class UnauthorizedException extends HttpException {
const UnauthorizedException({
String message = 'Unauthorized',
this.errors = const {},
}) : super(message, HttpStatus.unauthorized);
final Map> errors;
}
```
> 💡 Make sure to export the exception in `http_exception.dart` file.
```dart
export './bad_request_exception.dart';
export './not_found_exception.dart';
export './unauthorized_exception.dart';
```
> 💡 Make sure to run `flutter pub run build_runner build` to generate the code.
### Creating `AuthorizationMiddleware`
> 🔒 Securing Endpoints with AuthorizationMiddleware 🛡️
Now, we can create the `AuthorizationMiddleware` in `backend/lib/middlewares/authorization_middleware.dart`.
```dart
import 'dart:io';
import 'package:backend/db/database_connection.dart';
import 'package:backend/services/jwt_service.dart';
import 'package:backend/todo/controller/todo_controller.dart';
import 'package:backend/todo/data_source/todo_data_source_impl.dart';
import 'package:backend/todo/repositories/todo_repository_impl.dart';
import 'package:dart_frog/dart_frog.dart';
import 'package:data_source/data_source.dart';
import 'package:exceptions/exceptions.dart';
import 'package:models/models.dart';
import 'package:repository/repository.dart';
Handler authorizationMiddleware(Handler handler) {
return (context) async {
try {
final request = context.request;
final authHeader = request.headers[HttpHeaders.authorizationHeader] ?? '';
final token = authHeader.replaceFirst('Bearer ', '');
if (token.isEmpty) throw const UnauthorizedException();
final jwtService = context.read();
final decoded = jwtService.verify(token);
final decodedUser = User.fromJson(decoded);
final userRepo = context.read();
final user = await userRepo.getUserById(decodedUser.id);
if (user.isLeft) throw const UnauthorizedException();
context = _handleAuthDependencies(context, user.right);
return handler(context);
} on UnauthorizedException catch (e) {
return Response.json(
body: {'message': e.message},
statusCode: e.statusCode,
);
}
};
}
RequestContext _handleAuthDependencies(
RequestContext context,
User user,
) {
late RequestContext updatedContext;
updatedContext = context.provide(() => user);
return updatedContext;
}
```
Here, we are checking for the `Authorization` header and verifying the token. If the token is valid, we are adding the `User` object to the context, so that we can get the logged-in user later from the provider.
> If the token is invalid, we will return a `401` response.
### Updating auth dependencies
Now, since we will have to add a `user_id` whenever, we will create a todo, we will have to pass the logged-in user to the TodoDataSource. We will update the `TodoDataSourceImpl` to accept the `User` object from the constructor.
```dart
class TodoDataSourceImpl implements TodoDataSource {
/// {@macro todo_data_source_impl}
const TodoDataSourceImpl(this._databaseConnection, this.user);
final DatabaseConnection _databaseConnection;
final User user;
}
```
Also, we will update `createTodo` and `updateTodo` methods to add the `user_id`.
#### Update `createTodo` method
```diff
@override
Future createTodo(CreateTodoDto todo) async {
try {
await _databaseConnection.connect();
final result = await _databaseConnection.db.query(
'''
- INSERT INTO todos (title, description, completed)
+ INSERT INTO todos (title, description, completed, user_id)
- VALUES (@title, @description, @completed) RETURNING *
+ VALUES (@title, @description, @completed, @user_id) RETURNING *
''',
substitutionValues: {
'title': todo.title,
'description': todo.description,
'completed': false,
+ 'user_id': _user.id,
},
);
if (result.affectedRowCount == 0) {
throw const ServerException('Failed to create todo');
}
final todoMap = result.first.toColumnMap();
return Todo(
id: todoMap['id'] as int,
+ userId: todoMap['user_id'] as String,
title: todoMap['title'] as String,
description: todoMap['description'] as String,
createdAt: todoMap['created_at'] as DateTime,
);
} on PostgreSQLException catch (e) {
throw ServerException(e.message ?? 'Unexpected error');
} finally {
await _databaseConnection.close();
}
}
```
#### Update `updateTodo` method
```diff
final result = await _databaseConnection.db.query(
'''
UPDATE todos
SET title = COALESCE(@new_title, title),
description = COALESCE(@new_description, description),
completed = COALESCE(@new_completed, completed),
updated_at = current_timestamp
WHERE id = @id
+ AND user_id = @user_id
RETURNING *
''',
substitutionValues: {
'id': id,
+ 'user_id': _user.id,
'new_title': todo.title,
'new_description': todo.description,
'new_completed': todo.completed,
},
);
```
#### Update `Todo` model to add `userId`
We will also add the missing `userId` from `Todo` model.
```diff
factory Todo({
required TodoId id,
+ required UserId userId,
required String title,
@Default('') String description,
@Default(false) bool completed,
@DateTimeConverter() required DateTime createdAt,
@DateTimeConverterNullable() DateTime? updatedAt,
}) = _Todo;
```
Now, once this is done, we will update the `_handleAuthDependencies` method in `authorization_middleware.dart` as
```dart
RequestContext _handleAuthDependencies(
RequestContext context,
User user,
) {
final db = context.read();
final todoDs = TodoDataSourceImpl(db, user);
final todoRepo = TodoRepositoryImpl(todoDs);
final todoController = TodoController(todoRepo);
late RequestContext updatedContext;
updatedContext = context.provide(() => user);
updatedContext = updatedContext.provide(() => todoController);
updatedContext = updatedContext.provide(() => todoRepo);
updatedContext = updatedContext.provide(() => todoDs);
return updatedContext;
}
```
### Using `AuthorizationMiddleware`
> Applying `AuthorizationMiddleware` to routes
Let's create a new middleware in `backend/routes/todos/_middleware.dart` and add the following code.
```dart
import 'package:backend/middlewares/authorization_middleware.dart';
import 'package:dart_frog/dart_frog.dart';
Handler middleware(Handler handler) => authorizationMiddleware(handler);
```
Since this middleware lies inside `routes/todos`, all the `/todos/*` routes will be intercepted by this middleware. This means that all the `/todos/*` routes will be protected and if the user tries to access these routes without a valid token, it will return a `401` response.
---
## Testing protected `/todos/*` routes
> Putting updated routes to the Test 🧪
If we try to access the `/todos/*` routes without a valid token, it will return a `401` response. We can test this by running the following command.
### GET /todos
* `REQUEST`
```bash
curl -s -L -X GET 'http://localhost:8080/todos'
```
* `RESPONSE`
```json
{
"message": "Unauthorized"
}
```
* `REQUEST`
```bash
curl -s -L -X GET 'http://localhost:8080/todos' -H 'Authorization: Bearer eyJhbGciOiJIUzI1NiIsInR5cCI6IkpXVCJ9.eyJpZCI6IjY5ZWFkZTg3LWRhNWUtNDRjZC1iNTRlLTQ3NGE4NWQ4ZGVlNCIsIm5hbWUiOiJTYWlsZXNoIERhaGFsIiwiZW1haWwiOiJzYWlsZXNoYnJvQGdtYWlsLmNvbSIsImNyZWF0ZWRfYXQiOiIyMDIzLTAxLTIzVDIyOjU0OjM4Ljg2NDkxMloiLCJwYXNzd29yZCI6IiQyYSQxMCR6VjBTZlI3cUpHOHlCelJWWThtNkRlMWo0UUtHL2VRdXl6NzduQ1lBL1luZENtb1ZSbzB0RyIsImlhdCI6MTY3NDQ5Mzc3OX0.W36mHXKFrxZDhz0Hrxt0Cmrz3WNVexiAZe2KAjrWMaE'
```
* `RESPONSE`
```json
[
{
"id": 76,
"user_id": "69eade87-da5e-44cd-b54e-474a85d8dee4",
"title": "this is a title asdf",
"description": "Not so great description asdf",
"completed": false,
"created_at": "2023-01-23T22:56:31.686023Z",
"updated_at": "2023-01-30T04:08:06.349549Z"
}
]
```
### POST /todos
* `REQUEST`
```bash
curl -s -L -X POST 'http://localhost:8080/todos' -H 'Content-Type: application/json' --data-raw '{
"title":"this is a title asdf",
"description":"Not so great description asdf"
}'
```
* `RESPONSE`
```json
{
"message": "Unauthorized"
}
```
* `REQUEST`
```bash
curl -s -L -X POST 'http://localhost:8080/todos' -H 'Authorization: Bearer eyJhbGciOiJIUzI1NiIsInR5cCI6IkpXVCJ9.eyJpZCI6IjY5ZWFkZTg3LWRhNWUtNDRjZC1iNTRlLTQ3NGE4NWQ4ZGVlNCIsIm5hbWUiOiJTYWlsZXNoIERhaGFsIiwiZW1haWwiOiJzYWlsZXNoYnJvQGdtYWlsLmNvbSIsImNyZWF0ZWRfYXQiOiIyMDIzLTAxLTIzVDIyOjU0OjM4Ljg2NDkxMloiLCJwYXNzd29yZCI6IiQyYSQxMCR6VjBTZlI3cUpHOHlCelJWWThtNkRlMWo0UUtHL2VRdXl6NzduQ1lBL1luZENtb1ZSbzB0RyIsImlhdCI6MTY3NDQ5Mzc3OX0.W36mHXKFrxZDhz0Hrxt0Cmrz3WNVexiAZe2KAjrWMaE' -H 'Content-Type: application/json' --data-raw '{
"title":"this is a title asdf",
"description":"Not so great description asdf"
}'
```
* `RESPONSE`
```json
{
"id": 79,
"user_id": "69eade87-da5e-44cd-b54e-474a85d8dee4",
"title": "this is a title asdf",
"description": "Not so great description asdf",
"completed": false,
"created_at": "2023-01-30T07:10:10.102358Z",
"updated_at": null
}
```
Similarly, we can test the other routes as well 🥳
---
🎉 Congrats, we've made it to the end of Part 6! 🚀 We've successfully added user authentication with JWT to our [dart\_frog](https://dartfrog.vgv.dev/) backend.
It's been an incredible adventure, and we've gone a long way since Part 1. Using Dart and Flutter, we created a full-stack to-do application. But our task does not end there. We haven't addressed testing yet in this course, but it's an important aspect of developing any program. Let us know in the comments if you'd want to learn more about testing your code in all of the modules we've written in this series.
As always, you can refer back to the GitHub repo for this tutorial at [https://github.com/saileshbro/full\_stack\_todo\_dart](https://github.com/saileshbro/full_stack_todo_dart) if you need any help. Don't forget to give it a ⭐ and help spread the word about the initiative. Also, if you get stuck or want assistance, please submit an issue or, better yet, contribute a pull request.
Thank you for joining me on this journey; let's create even more wonderful applications together. Have fun coding! 💻
==============================================================================
# 🚀 Building a Fullstack App with dart_frog and Flutter in a Monorepo - Part 5
URL: https://saileshdahal.com.np/building-a-fullstack-app-with-dartfrog-and-flutter-in-a-monorepo-part-5
Published: 2023-01-13
Tags: Programming Blogs, Flutter, full stack, Dart, backend
Series: 🚀 Building a Fullstack App with dart_frog and Flutter in a Monorepo (part 5 of 6)
==============================================================================
In the previous part of this series, we set up the foundation for our full-stack to-do application by creating models, data sources, repositories, exceptions and handling failures. In this part, we will take it to the next level by:
* Scaffolding an empty [`flutter`](https://flutter.dev) project
* Importing necessary dependencies
* Creating a folder structure
* Connecting our front end with the backend using `TodosHttpClient`
* Setting up dependency injection using [`injectable`](https://pub.dev/packages/injectable) and [`get_it`](https://pub.dev/packages/get_it)
* Implementing `TodosRemoteDataSource` and `TodoRepository`
* Handling errors as `NetworkFailure`
* Creating `NetworkException` and `DioNetworkException`
* Creating `NetworkErrorInterceptor`
* Creating `ShowTodosView` and `ShowTodosViewModel` to show the fetched todos
* Creating `MaintainTodoView` and `MaintainTodoViewModel` to maintain the todos
* Adding linting with [`very_good_analysis`](https://pub.dev/packages/very_good_analysis) to make sure our code is clean.
We will be diving deeper into the world of flutter making use of the best practices, packages and libraries available for flutter. And by the end of this part, we will have a fully functional front end for our to-do application.
[▶ Watch on YouTube](https://www.youtube.com/shorts/7XJHrpCpzUo?feature=share)
Don't forget to check the GitHub repo for this tutorial at [GitHub](https://github.com/saileshbro/full_stack_todo_dart) if you need a little help along the way. Let's get started 🚀
## 🚀 Scaffolding Frontend
> 🌟 Frontend is about to shine.
We will begin by scaffolding an empty Flutter project using the command:
```bash
flutter create --project-name fullstack_todo --org np.com.saileshdahal frontend
```
This will create an empty flutter project in `frontend` directory. We will then do some initial setup, and add some dependencies.
### Importing necessary dependencies 📦
> Time to bring in the big guns! 💪 Let's import those dependencies
We will import the necessary dependencies in the `pubspec.yaml` file. The dependencies that we are using are as follows.
* [`dio`](https://pub.dev/packages/dio)
* [`either_dart`](https://pub.dev/packages/either_dart)
* [`flutter_hooks`](https://pub.dev/packages/flutter_hooks)
* [`get_it`](https://pub.dev/packages/get_it)
* [`injectable`](https://pub.dev/packages/injectable)
* [`stacked`](https://pub.dev/packages/stacked)
* [`stacked_services`](https://pub.dev/packages/stacked_services)
* [`build_runner`](https://pub.dev/packages/build_runner)
* [`very_good_analysis`](https://pub.dev/packages/very_good_analysis)
* [`retrofit`](https://pub.dev/packages/retrofit)
These dependencies will allow us to easily handle communication with the backend, handle state management, and implement a clean and maintainable codebase for our application.
To install you can use the following command:
```bash
flutter pub add dio either_dart flutter_hooks get_it injectable stacked stacked_services retrofit
flutter pub add --dev build_runner very_good_analysis stacked_generator injectable_generator retrofit_generator
```
We will also include the packages that we have built, once done `pubspec.yaml` should look something like this.
```yaml
dependencies:
data_source:
path: ../data_source
dio: ^4.0.6
either_dart: ^0.3.0
exceptions:
path: ../exceptions
failures:
path: ../failures
flutter:
sdk: flutter
flutter_hooks: ^0.18.5+1
get_it: ^7.2.0
injectable: ^2.1.0
models:
path: ../models
repository:
path: ../repository
retrofit: ^3.3.1
stacked: ^3.0.1
stacked_services: ^0.9.9
typedefs:
path: ../typedefs
dev_dependencies:
build_runner: ^2.3.3
flutter_test:
sdk: flutter
injectable_generator: ^2.1.3
integration_test:
sdk: flutter
mockito: ^5.3.2
retrofit_generator: ^4.2.0
stacked_generator: ^0.8.3
very_good_analysis: ^3.1.0
```
### Folder Structure 📂
This is how we will architect our folder structures.
```apache
.
├── constants
├── core
│ ├── app
│ ├── di
│ └── network
│ ├── exceptions
│ └── interceptors
├── data
│ ├── data_source
│ │ ├── todo_http_client
│ │ └── todo_remote_data_source
│ └── repositories
├── data_services
└── presentation
```
* `constants`: This folder will include all the hard-coded constants in our project, such as API endpoints or keys.
* `core`: This directory will include all the core functionalities of our app, which are common for all the features. This includes routing, dependency injection, and network interceptors.
* `data`: This directory will include all the implementations related to data sources and repositories.
* `data_services`: This will include the implementation of services that will be shared across different view models.
* `presentation`: This will include the views and view models for creating and listing
The `data_source` and `repositories` folders contain the implementation of the abstract contracts defined in the `data_sources` and `repository` packages, respectively. This allows for the separation of concerns and easier maintenance of the codebase.
## Connecting with the backend 🔌
> Let's get this party started 🎉
Let's start by connecting with the [dart\_frog](https://pub.dev/packages/dart_frog) backend using [dio](https://pub.dev/packages/dio). For this, we will create a new class `TodosHttpClient`
### Create `TodosHttpClient`
`TodosHttpClient` will be responsible for calling our backend. We will be using [`retrofit`](https://pub.dev/packages/retrofit) to generate the necessary codes to call the backend.
Retrofit allows us to define our API endpoints as interfaces with annotated methods, and it will automatically generate the necessary code to handle the network requests and convert the JSON responses to Dart objects.
We will create a new file in `data/data_source/todo_http_client/todos_http_client.dart` with the following code.
```dart
import 'package:dio/dio.dart';
import 'package:injectable/injectable.dart';
import 'package:models/models.dart';
import 'package:retrofit/retrofit.dart';
import 'package:typedefs/typedefs.dart';
part 'todos_http_client.g.dart';
@RestApi()
@lazySingleton
abstract class TodosHttpClient {
@factoryMethod
factory TodosHttpClient(Dio _dio) = _TodosHttpClient;
@GET('/todos')
Future> getAllTodo();
@GET('/todos/{id}')
Future getTodoById(@Path('id') TodoId id);
@POST('/todos')
Future createTodo(@Body() CreateTodoDto todo);
@PATCH('/todos/{id}')
Future updateTodo(@Path('id') TodoId id, @Body() UpdateTodoDto todo);
@DELETE('/todos/{id}')
Future deleteTodoById(@Path('id') TodoId id);
}
```
After completing the steps, we will execute [`build_runner`](https://pub.dev/packages/build_runner) to generate the necessary code. This will create an implementation of `TodosHttpClient` and we will link the generated `_TodosHttpClient` to the factory method of this abstract class. The Dio object will be passed as a dependency through the constructor. Since we are using [`get_it`](https://pub.dev/packages/get_it) and [`injectable`](https://pub.dev/packages/injectable), it will be necessary to manage the injection of this dependency.
### Setup `injectable` 🔧
Injectable is a package for Dart that allows for dependency injection in our application. It provides a simple and easy-to-use API for managing dependencies and injecting them into our classes. By using Injectable, we can easily swap out dependencies for different environments, like testing, and make our code more modular and testable.
> 👉 Read more about [`injectable`](https://pub.dev/packages/injectable#registering-third-party-types).
To handle how we inject the `Dio` instance, we will create some files to inject third-party modules. In the `core` directory, we will create a new directory called `di`, short for Dependency Injection.
Here, create a new file called `locator.dart`, and add the following code.
```dart
import 'package:fullstack_todo/core/di/locator.config.dart';
import 'package:get_it/get_it.dart';
import 'package:injectable/injectable.dart';
final locator = GetIt.instance;
@injectableInit
void setupLocator() => locator.init();
```
Now, we will create another file called `third_party_modules.dart`, this file will have a getter which will resolve the instance of `Dio`.
```dart
import 'package:dio/dio.dart';
import 'package:injectable/injectable.dart';
@module
abstract class ThirdPartyModules {
@lazySingleton
Dio get dio => Dio(BaseOptions(baseUrl: kBaseUrl));
}
```
Then, we will create the missing `kBaseUrl` constant in `constants/constants.dart` file.
```dart
const String kBaseUrl = 'http://localhost:8080';
```
> Note: The port for you may be different, please check what port your backend will run by running `dart_frog dev` in the `backend` folder.
If you check the generated code in `locator.config.dart`, it creates the instance of `dio` and passes it to our `TodosHttpClient`.
### Implement `TodosRemoteDataSource` 💻
We will now use `TodosHttpClient` to implement our `TodosDataSource`. For this, we will create `data_source/todos_remote_data_source.dart` file, and we will implement `TodosDataSource` as follows.
```dart
import 'package:data_source/data_source.dart';
import 'package:fullstack_todo/data/data_source/todos_http_client/todos_http_client.dart';
import 'package:injectable/injectable.dart';
import 'package:models/models.dart';
import 'package:typedefs/typedefs.dart';
@LazySingleton(as: TodoDataSource)
class TodosRemoteDataSource implements TodoDataSource {
const TodosRemoteDataSource(this.httpClient);
final TodosHttpClient httpClient;
@override
Future createTodo(CreateTodoDto todo) => httpClient.createTodo(todo);
@override
Future deleteTodoById(TodoId id) => httpClient.deleteTodoById(id);
@override
Future> getAllTodo() => httpClient.getAllTodo();
@override
Future getTodoById(TodoId id) => httpClient.getTodoById(id);
@override
Future updateTodo({required TodoId id, required UpdateTodoDto todo}) =>
httpClient.updateTodo(id, todo);
}
```
Here, we are passing the `TodosHttpClient` as a dependency. This will help us to test the implementation by passing a mock implementation of `HttpClient` to the data source implementation.
### Handling errors as `NetworkFailure` 🛑
We need to handle the errors that we send from the backend as failures, and other possible errors as well. One possible way to do this is, when we implement our `TodoRepository`, we will catch all the exceptions as `NetworkException`, and then resolve the exception to the `Failure` and handle the failures in the UI.
The way we do this is can create an `interceptor`, that we can plug into our `dio` instance, and then handle the errors from there.
By creating a new `NetworkException` class in our `exceptions` package, we will be able to effectively handle network errors that may occur while communicating with the backend. This is especially important when implementing the `TodoRepository` class in the front end, as it ensures that any network errors that occur are caught and handled in a consistent and efficient manner.
However, it is important to note that when working with APIs, we will encounter errors that are returned in the form of `DioError`. To handle these errors, we will use an `ErrorInterceptorHandler` to continue the Dio request-response cycle, while also rejecting any errors that occur.
To ensure that we are able to catch `NetworkException` in the repository, we will create a new class called `DioNetworkException` which extends `DioError` and implements `NetworkException`. This allows us to create a new instance of `DioNetworkException` and reject it from the handler.
### Create `NetworkException` 🌐
In our `exceptions` package, we will create a new exception called `NetworkExeption`. We are doing this because we don't want any external dependencies on our packages, as much as we can. Let's create a new file `exceptions/lib/src/network_exception/network_exception.dart` in `exceptions` package with the following contents.
```dart
class NetworkException implements Exception {
NetworkException({
required this.message,
required this.statusCode,
this.errors = const {},
});
final String message;
final int statusCode;
final Map> errors;
}
```
> 👉 Make sure to export this from `exceptions.dart` library.
```dart
library exceptions;
export 'src/http_exception/http_exception.dart';
export 'src/network_exception/network_exception.dart';
export 'src/server_exception/server_exception.dart';
```
Once this is done, let's come back to `frontend` and create a new class called `DioNetworkException`.
### Create `DioNetworkException`
Let's create a new file in `lib/core/network/exceptions/dio_network_exception.dart` in the `frontend` package.
```dart
import 'package:dio/dio.dart';
import 'package:exceptions/exceptions.dart';
class DioNetworkException extends DioError implements NetworkException {
DioNetworkException({
required this.message,
required this.statusCode,
required this.errors,
required super.requestOptions,
});
@override
final int statusCode;
@override
final String message;
@override
final Map> errors;
}
```
This exception is created to convert the `DioError` we get while implementing the error interceptor, to our `NetworkException` so that we only care about the `NetworkException` we implemented in our package, and catch it.
### Create `NetworkErrorInterceptor` 🔒
We will now implement `NetworkErrorInterceptor` extending `Interceptor` from `dio`. Here we will have to override `onError` method, which will give us `DioError` object and a handler.
> 👉 Read more [about interceptors](https://pub.dev/packages/dio#interceptors) from here.
Create a new file `frontend/lib/core/network/interceptors/dio_error_interceptor.dart`
```dart
import 'package:dio/dio.dart';
import 'package:failures/failures.dart';
import 'package:fullstack_todo/core/network/exceptions/dio_network_exception.dart';
class NetworkErrorInterceptor extends Interceptor {
@override
void onError(DioError err, ErrorInterceptorHandler handler) {
const genericInternetIssue =
'Please check your internet connection and try again';
try {
if (err.response == null) {
throw DioNetworkException(
message: genericInternetIssue,
statusCode: 500,
requestOptions: err.requestOptions,
errors: {},
);
}
final errorJson = err.response!.data as Map;
final failureFromServer = NetworkFailure.fromJson(
{
...errorJson,
'status_code': err.response!.statusCode,
},
);
throw DioNetworkException(
message: failureFromServer.message,
statusCode: err.response!.statusCode ?? failureFromServer.statusCode,
errors: failureFromServer.errors,
requestOptions: err.requestOptions,
);
} on DioNetworkException catch (e) {
handler.reject(e);
} catch (e) {
handler.reject(
DioNetworkException(
message: genericInternetIssue,
statusCode: 500,
requestOptions: err.requestOptions,
errors: {},
),
);
}
}
}
```
> Note: we may need to make a small change to our `NetworkFailure` class and run `build_runner`
```diff
const factory NetworkFailure({
required String message,
required int statusCode,
- @Default([]) List errors,
+ @Default({}) Map> errors,
}) = _NetworkFailure;
```
Now once, we have implemented the `NetworkErrorInterceptor`, we will attach this interceptor to our dio object.
Open `third_party_modules.dart` and add the following line.
```diff
abstract class ThirdPartyModules {
@lazySingleton
Dio get dio => Dio(BaseOptions(baseUrl: kBaseUrl));
+ ..interceptors.add(NetworkErrorInterceptor());
}
```
### Implement `TodoRepository` 📚
Now we will implement the todo repository at `lib/data/repositories/todo_repository_impl.dart` in the following way.
```dart
import 'package:data_source/data_source.dart';
import 'package:either_dart/either.dart';
import 'package:exceptions/exceptions.dart';
import 'package:failures/failures.dart';
import 'package:injectable/injectable.dart';
import 'package:models/models.dart';
import 'package:repository/repository.dart';
import 'package:typedefs/typedefs.dart';
@LazySingleton(as: TodoRepository)
class TodoRepositoryImpl implements TodoRepository {
const TodoRepositoryImpl(this._todoDataSource);
final TodoDataSource _todoDataSource;
@override
Future> createTodo(CreateTodoDto createTodoDto) =>
handleError(() => _todoDataSource.createTodo(createTodoDto));
@override
Future> deleteTodo(TodoId id) =>
handleError(() => _todoDataSource.deleteTodoById(id));
@override
Future> getTodoById(TodoId id) =>
handleError(() => _todoDataSource.getTodoById(id));
@override
Future>> getTodos() =>
handleError(_todoDataSource.getAllTodo);
@override
Future> updateTodo({
required TodoId id,
required UpdateTodoDto updateTodoDto,
}) =>
handleError(
() => _todoDataSource.updateTodo(id: id, todo: updateTodoDto),
);
Future> handleError(
Future Function() callback,
) async {
try {
final res = await callback();
return Right(res);
} on NetworkException catch (e) {
return Left(
NetworkFailure(
message: e.message,
statusCode: e.statusCode,
errors: e.errors,
),
);
}
}
}
```
Here, we are passing the data source as a dependency and calling methods from the data source for each implementation. In addition to that, we have created a `handleError` generic method, which takes a caller method, and checks if there is a `NetworkException`.
The `NetworkException` will be caught here which was thrown from the interceptor as `DioNetworkException`.
Now, let's do some UI, and connect our view model to the repository.
## Creating `ShowTodosView` 📋
Next, we will move on to creating the user interface and retrieving data from our repositories. To do this, we will perform some initial setup. We will be utilizing [stacked](https://pub.dev/packages/stacked) to implement a Model-View-ViewModel (MVVM) architecture. The necessary dependencies have already been imported. Let's begin by creating the views and adding them to the routes.
### Create `ShowTodosView` and `ShowTodosViewModel`
In `lib/presentation//show_todos` we will create two new files called `show_todos_view.dart` and `show_todos_viewmodel.dart`.
We will begin by creating an empty implementation of the view and view model.
In `show_todos_viewmodel.dart`
```dart
import 'package:stacked/stacked.dart';
import 'package:injectable/injectable.dart';
@injectable
class ShowTodosViewModel extends BaseViewModel {}
```
Similarly in `show_todos_view.dart`.
```dart
import 'package:flutter/material.dart';
import 'package:fullstack_todo/core/di/locator.dart';
import 'package:fullstack_todo/presentation/show_todos/show_todos_viewmodel.dart';
import 'package:stacked/stacked.dart';
class ShowTodosView extends StatelessWidget {
const ShowTodosView({Key? key}) : super(key: key);
@override
Widget build(BuildContext context) {
return ViewModelBuilder.nonReactive(
viewModelBuilder: () => locator(),
builder: (
BuildContext context,
ShowTodosViewModel model,
Widget? child,
) {
return Scaffold(
body: Center(
child: Text(
'ShowTodosView',
),
),
);
},
);
}
}
```
We will also take advantage of the routing system provided by [`stacked`](https://pub.dev/packages/stacked). This system uses context-less routing, allowing us to easily navigate within our application from the view model.
We will create a `NavigationService` that can be injected as a dependency, which will enable us to handle routing in a consistent and efficient manner.
> 👉 Read [more about `NavigationService`](https://pub.dev/packages/stacked_services#navigation-service) from here.
Let's create a new `core/app/routes.dart` file with the following contents.
```dart
import 'package:fullstack_todo/presentation/show_todos/show_todos_view.dart';
import 'package:stacked/stacked_annotations.dart';
@StackedApp(
routes: routes,
)
const List> routes = [
AdaptiveRoute(page: ShowTodosView, initial: true),
];
```
Here, the `@StackedApp` decorator does the magic. Once this is done, we run `build_runner` to run code generation. We will get a new file `routes.router.dart`
> 👉 Read more [about `@StackedApp`](https://pub.dev/packages/stacked#router)
Now, in `main.dart` file, let's remove all the comments and make these changes.
```dart
import 'package:flutter/material.dart';
import 'package:fullstack_todo/core/app/routes.router.dart';
import 'package:fullstack_todo/core/di/locator.dart';
import 'package:stacked_services/stacked_services.dart';
void main() {
setupLocator();
runApp(const MyApp());
}
class MyApp extends StatelessWidget {
const MyApp({super.key});
@override
Widget build(BuildContext context) {
return MaterialApp(
title: 'Fullstack Todo App',
theme: ThemeData(
primarySwatch: Colors.blue,
),
navigatorKey: StackedService.navigatorKey,
onGenerateRoute: StackedRouter().onGenerateRoute,
);
}
}
```
Before calling `runApp()`, we are invoking `setupLocator()` from `locator.dart`. This function will handle all the logic related to dependency injection. We are also providing `navigatorKey` and `onGenerateRoute` parameters, which come from `stacked` and `routes.router.dart`, respectively.
We also need to take an extra step, which is to manage the injection of the `NavigationService`. For this, we need to add a getter to the `third_party_modules.dart` file.
```dart
@module
abstract class ThirdPartyModules {
@lazySingleton
Dio get dio => Dio(BaseOptions(baseUrl: kBaseUrl))
..interceptors.add(NetworkErrorInterceptor());
@lazySingleton
NavigationService get navigationService;
}
```
Once this is done, if you build the app you should see the first visual output.
#### Implement `ShowTodosViewModel`
This view model will utilize the `TodoRepository` to retrieve data from the backend.
Similar to `initState` method used when working with `StatefulWidgets`, we can create a new method in our ViewModel called `init` to handle initialization logic.
Within this method, we can call the repository to fetch all the todos. We will also create a `refresh` method to handle pull-to-refresh functionality.
```dart
@injectable
class ShowTodosViewModel extends BaseViewModel {
final TodoRepository _todoRepository;
ShowTodosViewModel(this._todoRepository);
void handleFailure(Failure failure) {
setError(failure.message);
log(failure.message);
}
void init() => runBusyFuture(refresh());
Future refresh() async {
final response = await _todoRepository.getTodos();
response.fold(handleFailure, print);
}
}
```
Here, we have three methods, `init` `refresh` and `handleFailure`.
* `init` This method is ideally run on `initState` state. This will call the `refresh` method, but in addition to that, this will mark the ViewModel as `busy` before calling the method. This will be helpful when we want to show a loading indicator when we first fetch the todos.
* `refresh` This method will call the `TodoRepository` and than handle re response accordingly.
* `handleFailure` Ideally, this is the place where we would handle the failure and show the UI accordingly. The `setError` is storing the failure message in the view model, which will be accessible by `modelError` getter from `BaseViewModel`.
Now we are getting the todos from the backend. We will also be marking todos as completed and deleting the todo from this same view model.
> Where should we put the todos once we fetch them?
We will also have another view called `MaintainTodoView` which will be responsible for creating and updating the todos. We will come across a problem, where we will have to update the state of the created and updated todo. We can do this by passing the todo down the routes once it is created or updated.
Another way to do this is by creating a data service, which will be shared across different view models. This service will be reactive, meaning if the data changes, it will rebuild all the view models listening to this data. This will help us avoid passing down the problem of the route.
#### Implement `TodosDataService`
We will create a `TodosDataService` which will be shared across the view models. This will have some helper methods that will be used to maintain the state of all the todos. We will create a new file `lib/data_services/todos_data_service.dart`
```dart
import 'package:flutter/material.dart';
import 'package:injectable/injectable.dart';
import 'package:models/models.dart';
import 'package:stacked/stacked.dart';
@lazySingleton
class TodosDataService with ReactiveServiceMixin {
TodosDataService() {
listenToReactiveValues([_todos]);
}
late final ReactiveValue> _todos = ReactiveValue>([]);
List get todos => _todos.value;
void add(Todo todo) {
final index = _todos.value.indexWhere((element) => element.id == todo.id);
if (index == -1) {
_todos.value.insert(0, todo);
} else {
_todos.value[index] = todo;
}
notifyListeners();
}
void addAll(List todos) {
_todos.value
..clear()
..insertAll(0, todos);
notifyListeners();
}
void remove(Todo todo) {
_todos.value.removeWhere((element) => element.id == todo.id);
notifyListeners();
}
}
```
Here, we are using `ReactiveServiceMixin` and `ReactiveValue` objects. When we call `add` method, it checks if the todo is present already, if so, it will update the existing one, or else it will add it to the top, so that we can see the latest one at the top.
Similarly, there is `addAll` which will clear all todos and then add them to the top.
> 👉 Read more about [reactivity in stacked](https://pub.dev/packages/stacked#reactivity) from here.
#### Updating `ShowTodosViewModel`
Now we will inject `TodosDataService` from the constructor and make some changes to the view model to handle reactivity.
```dart
@injectable
class ShowTodosViewModel extends ReactiveViewModel {
ShowTodosViewModel(
this._todoRepository,
this._todosDataService,
);
final TodoRepository _todoRepository;
final TodosDataService _todosDataService;
List get todos => _todosDataService.todos;
Future init() => runBusyFuture(refresh());
void handleFailure(Failure failure) {
setError(failure.message);
log(failure.message);
}
Future refresh() async {
final response = await _todoRepository.getTodos();
response.fold(handleFailure, _todosDataService.addAll);
}
@override
List get reactiveServices => [_todosDataService];
}
```
If you noticed, we are extending from [`ReactiveViewModel`](https://pub.dev/packages/stacked#reactiveviewmodel) and also overriding `reactiveServices`. We are listening to the `_todosDataService` and will be reflecting the UI whenever the data is changed in the reactive service.
#### Update `ShowTodosView` to show fetched todos
Now we can update the `show_todos_view.dart` to show the fetched todos.
```dart
class ShowTodosView extends StatelessWidget {
const ShowTodosView({super.key});
@override
Widget build(BuildContext context) {
return ViewModelBuilder.reactive(
viewModelBuilder: locator,
onModelReady: (model) => model.init(),
builder: (
BuildContext context,
ShowTodosViewModel model,
Widget? child,
) {
return Scaffold(
appBar: AppBar(
title: const Text('Todos'),
),
floatingActionButton: FloatingActionButton(
onPressed: () {},
child: const Icon(Icons.add),
),
body: Builder(
builder: (context) {
if (model.isBusy) {
return const Center(child: CircularProgressIndicator());
}
if (model.hasError) {
return Center(child: Text(model.modelError.toString()));
}
if (model.todos.isEmpty) {
return Center(
child: Text(
'No todos found!',
style: Theme.of(context).textTheme.titleLarge,
),
);
}
return RefreshIndicator(
onRefresh: model.refresh,
child: ListView.builder(
physics: const AlwaysScrollableScrollPhysics(),
itemCount: model.todos.length,
itemBuilder: (context, index) {
final todo = model.todos[index];
return ListTile(
title: Text(todo.title),
subtitle: Text(todo.description),
leading: Checkbox(
value: todo.completed,
onChanged: (val) {},
),
trailing: Row(
mainAxisSize: MainAxisSize.min,
children: [
IconButton(
icon: const Icon(
Icons.edit,
color: Colors.blue,
),
onPressed: () {},
),
IconButton(
icon: const Icon(
Icons.delete,
color: Colors.red,
),
onPressed: () {},
),
],
),
);
},
),
);
},
),
);
},
);
}
}
```
This view will get all the lists from the view model with `init` method.
> Notice the `onModelReady` in the `ViewModelBuilder` where we are calling `init` method from the view model.
We are using the `Builder` to check the different states of the view model and show the UI accordingly.
We show a `CircularProgressIndicator` when the view model is `isBusy`. This value is set by `runBusyFuture` method in the view model.
Also if the model has an error, we can check `hasError` and show the error message accordingly. We will also show the todos with a `ListView.builder`, when there are todos, and an empty message as well.
Now let's build the app, and check out the progress.
> Tip: If you are using macOS, make sure to allow [network access in the entitlements file](https://stackoverflow.com/a/61201109/9611399).
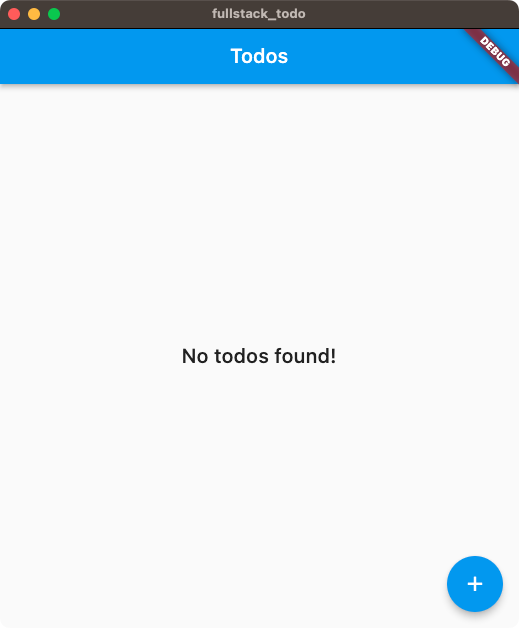
And, if you create one using postman, you should see something like this.
[▶ Watch on YouTube](https://youtube.com/shorts/hcz457pUcZ0?feature=share)
#### Create `TodoListTile`
Once this is done, let's do some refactoring. We can create a `TodoListTile` widget as a separate stateless widget in `show_todos/widgets/todo_list_tile.dart`
```dart
class TodoListTile extends ViewModelWidget {
const TodoListTile({
super.key,
required this.todo,
});
final Todo todo;
@override
Widget build(BuildContext context, ShowTodosViewModel viewModel) {
return ListTile(
title: Text(todo.title),
subtitle: Text(todo.description),
leading: Checkbox(
value: todo.completed,
onChanged: (val) => viewModel.markCompleted(todo),
),
trailing: Row(
mainAxisSize: MainAxisSize.min,
children: [
IconButton(
icon: const Icon(
Icons.edit,
color: Colors.blue,
),
onPressed: () => viewModel.handleTodo(todo),
),
IconButton(
icon: const Icon(
Icons.delete,
color: Colors.red,
),
onPressed: () => viewModel.deleteTodo(todo),
),
],
),
);
}
}
```
Here, we have missing view model methods, which we will implement later. Also, we are not using a `StatelessWidget` here, but it's a `ViewModelWidget`. This is a wrapper around `StatelessWidget` which will also provide us with the view model. This works with `Provider` under the hood.
Let's use this `TodoListTile` widget in `ShowTodosView`. We can update the `ListView.builder` as follows.
```dart
ListView.builder(
physics: const AlwaysScrollableScrollPhysics(),
itemCount: model.todos.length,
itemBuilder: (context, index) =>
TodoListTile(todo: model.todos[index]),
),
```
#### Implement `delete` and `markCompleted` methods.
We will now implement `deleteTodo` and `markCompleted` methods as follows.
```dart
Future deleteTodo(Todo todo) async {
final response = await _todoRepository.deleteTodo(todo.id);
response.fold(
handleFailure,
(_) => _todosDataService.remove(todo),
);
}
```
Here, we are calling the `deleteTodo` method from the repository, and if it's successful, we will remove the todo from the data service, that in turn will remove it from the UI.
```dart
Future markCompleted(Todo todo) async {
if (busy('updating')) return;
final completed = !todo.completed;
_todosDataService.add(todo.copyWith(completed: completed));
final updateDto = UpdateTodoDto(
completed: !todo.completed,
);
final update = await runBusyFuture(
_todoRepository.updateTodo(id: todo.id, updateTodoDto: updateDto),
busyObject: 'updating',
);
update.fold(
(failure) {
_todosDataService.add(todo.copyWith(completed: !completed));
handleFailure(failure);
},
(_) {},
);
}
```
Here, in `markCompleted` method, we are first negating the state, and then adding it to the data service, and then calling the API. This is to show the update in an instantaneous manner. If the update fails, we will revert the checkbox state.
We will add an empty implementation for the `handleTodo` method as follows.
```dart
Future? handleTodo([Todo? todo]) {
return null;
}
```
This method will take an optional Todo object, and we will pass it to `MaintainTodoView`, which will create or update the todo based on the value provided.
Once these methods are completed, we will have these functionalities.
[▶ Watch on YouTube](https://www.youtube.com/shorts/sY-5NN8GC8I?feature=share)
## Creating `MaintainTodoView`📝
This view will be able to create and update the todos. We will create the view and the view model. Also, we will create a route for this, and implement `handleTodo` method in `ShowTodosViewModel`.
We will create `maintain_todo_view.dart` and `maintain_todo_viewmomdel.dart` in `presentstion/main_todo` directory.
We will create the view model as follows.
```dart
@injectable
class MaintainTodoViewModel extends ReactiveViewModel {
MaintainTodoViewModel(this._todosDataService);
final TodosDataService _todosDataService;
Todo? _todo;
void init(Todo? todo) {
if (todo == null) return;
_todo = todo;
}
@override
List get reactiveServices => [_todosDataService];
}
```
Similarly, we will create an empty view, as follows
```dart
class MaintainTodoView extends StatelessWidget {
const MaintainTodoView(this.todo, {super.key});
final Todo? todo;
@override
Widget build(BuildContext context) {
return ViewModelBuilder.nonReactive(
onModelReady: (model) => model.init(todo),
viewModelBuilder: () => locator(),
builder: (
BuildContext context,
MaintainTodoViewModel model,
Widget? child,
) {
return Scaffold(
body: Center(
child: Text(
'MaintainTodoView',
),
),
);
},
);
}
}
```
Now, we can add this view to the route, and handle routing from `ShowTodosViewModel`. In `lib/core/app/routes.dart` add the following route entry:
```dart
const List> routes = [
AdaptiveRoute(page: ShowTodosView, initial: true),
AdaptiveRoute(page: MaintainTodoView),
];
```
Once you run the `build_runner`, open the `ShowTodosViewModel`, and make the following change.
We will have to register `NavigationService` in our third-party modules as follows.
```dart
@module
abstract class ThirdPartyModules {
@lazySingleton
Dio get dio => Dio(BaseOptions(baseUrl: kBaseUrl));
@lazySingleton
NavigationService get navigationService;
}
```
Now, we will inject the `NavigationService` from the `ShowTodosViewModel` constructor and implement the `handleTodo` as follows.
```diff
ShowTodosViewModel(
this._todoRepository,
this._todosDataService,
+ this._navigationService,
);
final TodoRepository _todoRepository;
final TodosDataService _todosDataService;
+ final NavigationService _navigationService;
Future? handleTodo([Todo? todo]) {
+ return _navigationService.navigateTo(
+ Routes.maintainTodoView,
+ arguments: MaintainTodoViewArguments(todo: todo),
+ );
}
```
> Make sure to run `build_runner`.
Now, you should be able to navigate to `MaintainTodoView`.
[▶ Watch on YouTube](https://www.youtube.com/shorts/Ua27jp70j2s?feature=share)
### Implementing `MaintainTodoViewModel`
We will create three state variables for handling `title`, `description`, and `completed` value. We will also expose the getters for these variables. Also, we will create `onChanged` methods for these variables.
We will also create an `init` method, which will take an optional `Todo` object and populate these state variables. Here if we pass this optional todo, we will be updating that todo.
```dart
@injectable
class MaintainTodoViewModel extends BaseViewModel {
MaintainTodoViewModel(
this._todosDataService,
this._repository,
this._navigationService,
);
final TodosDataService _todosDataService;
final TodoRepository _repository;
final NavigationService _navigationService;
String _title = '';
String get title => _title;
String _description = '';
String get description => _description;
bool _completed = false;
bool get completed => _completed;
bool get isValidated {
final empty = _title.isEmpty || _description.isEmpty;
if (empty) return false;
final errors = error('title') != null || error('description') != null;
if (errors) return false;
return true;
}
void onTitleChanged(String value) {
_title = value;
if (value.isEmpty) {
setErrorForObject('title', 'Title is required');
} else {
setErrorForObject('title', null);
}
notifyListeners();
}
void onDescriptionChanged(String value) {
_description = value;
if (value.isEmpty) {
setErrorForObject('description', 'Description is required');
} else {
setErrorForObject('description', null);
}
notifyListeners();
}
Todo? _todo;
void init(Todo? todo) {
if (todo == null) return;
_title = todo.title;
_description = todo.description;
_todo = todo;
_completed = todo.completed;
}
void onCompletedChanged({bool? value}) {
_completed = value ?? false;
notifyListeners();
}
void handleTodo() {}
}
```
In change handlers, we are also validating the values, and setting the errors for each state on change, and then we have a `isValidated` getter which would return if the values are validated or not.
### Implementing `MaintainTodoView`
```dart
class MaintainTodoView extends HookWidget {
const MaintainTodoView(this.todo, {super.key});
final Todo? todo;
@override
Widget build(BuildContext context) {
final titleController = useTextEditingController(text: todo?.title);
final descriptionController =
useTextEditingController(text: todo?.description);
final titleFocusNode = useFocusNode();
final descriptionFocusNode = useFocusNode();
final checkBoxFocusNode = useFocusNode();
final buttonFocusNode = useFocusNode();
return ViewModelBuilder.nonReactive(
onModelReady: (model) => model.init(todo),
viewModelBuilder: locator,
builder: (
BuildContext context,
MaintainTodoViewModel model,
Widget? child,
) {
return Scaffold(
appBar: AppBar(
title: Text('${todo == null ? 'Create' : 'Edit'} Todo'),
),
body: Padding(
padding: const EdgeInsets.all(16),
child: Column(
crossAxisAlignment: CrossAxisAlignment.stretch,
children: [
TextFormField(
controller: titleController,
focusNode: titleFocusNode,
decoration: const InputDecoration(
hintText: 'Title',
border: OutlineInputBorder(),
),
onChanged: model.onTitleChanged,
onEditingComplete: descriptionFocusNode.requestFocus,
),
const SizedBox(height: 14),
TextFormField(
controller: descriptionController,
focusNode: descriptionFocusNode,
decoration: const InputDecoration(
hintText: 'Description',
border: OutlineInputBorder(),
),
onChanged: model.onDescriptionChanged,
onEditingComplete: checkBoxFocusNode.requestFocus,
),
if (todo != null) const SizedBox(height: 14),
if (todo != null)
SelectorViewModelBuilder(
selector: (model) => model.completed,
builder: (context, val, _) {
return CheckboxListTile(
focusNode: checkBoxFocusNode,
contentPadding: EdgeInsets.zero,
title: const Text('Mark Completed'),
value: val,
onChanged: (v) => model.onCompletedChanged(value: v),
);
},
),
const Spacer(),
SelectorViewModelBuilder(
selector: (model) => model.isValidated,
builder: (context, validated, child) {
if (validated) return child!;
return const SizedBox.shrink();
},
child: SizedBox(
height: 50,
child: ElevatedButton(
focusNode: buttonFocusNode,
onPressed: model.handleTodo,
child:
SelectorViewModelBuilder(
selector: (model) => model.isBusy,
builder: (context, isBusy, child) {
if (isBusy) return child!;
return Row(
mainAxisSize: MainAxisSize.min,
children: const [
Icon(
Icons.save,
size: 30,
),
SizedBox(width: 10),
Text(
'Save',
style: TextStyle(
fontSize: 20,
),
),
],
);
},
child: const CircularProgressIndicator(
valueColor:
AlwaysStoppedAnimation(Colors.white),
),
),
),
),
)
],
),
),
);
},
);
}
}
```
This form includes crucial text fields for the `title` and `description` of the to-do task. The optional check box is displayed only when an existing to-do task is provided for updating. If a to-do task is provided, the form will be populated with the previous values and the check box will be visible for updating.
To handle the form's input, we utilize the `flutter_hooks` library for managing `TextEditingControllers` and `FocusNodes`. The `ElevatedButton` takes care of the create/update action.
We are also using `SelectorViewModelBuilder` with a `selector` to rebuild only when the value returned from the selector is changed, resulting in partial rebuilds. For example, we are only showing the `ElevatedButton` when the form is validated.
> 👉 Read [more about `SelectorViewModelBuilder`](https://pub.dev/packages/stacked#selectorviewmodelbuilder)
With this, we have a functional form UI something like this.
[▶ Watch on YouTube](https://www.youtube.com/shorts/SOUH1t2RdbY?feature=share)
In the final part, let's implement `handleTodo` method in `MaintainTodoViewmodel` like this.
```dart
Future handleTodo() {
if (!isValidated) return Future.value();
if (_todo == null) {
return _createTodo();
}
return _updateTodo();
}
Future _createTodo() async {
final dto = CreateTodoDto(title: title, description: description);
final response = await runBusyFuture(_repository.createTodo(dto));
return response.fold(
(failure) {
setError(failure.message);
},
(todo) {
_todosDataService.add(todo);
_navigationService.back();
},
);
}
Future _updateTodo() async {
if (_todo == null) return;
final dto = UpdateTodoDto(
title: title,
description: description,
completed: completed,
);
final response = await runBusyFuture(
_repository.updateTodo(id: _todo!.id, updateTodoDto: dto),
);
return response.fold(
(failure) {
setError(failure.message);
},
(todo) {
_todosDataService.add(todo);
_navigationService.back();
},
);
}
```
The `handleTodo` method is responsible for creating or updating a to-do task based on the optional `Todo` provided in the `init` method.
It calls the private methods `_createTodo` and `_updateTodo` internally. `_createTodo` creates a data transfer object, passes it to the repository, and navigates back upon successful creation.
Similarly, `_updateTodo` updates the provided to-do task and navigates back upon successful update.
Finally, we have a fully functional app.
[▶ Watch on YouTube](https://www.youtube.com/shorts/oy4_PN1cbyI?feature=share)
---
## Bonus 🎉
To ensure our code follows best practices and is consistent throughout our project, let's add some linting with [very\_good\_analysis](https://pub.dev/packages/very_good_analysis) in `analysis_options.yaml`.
Linting is an important step in the development process as it helps catch potential errors and enforces a set of coding standards. This results in more readable and maintainable code, making it easier for both you and other developers to understand and work with the codebase.
```yaml
include: package:very_good_analysis/analysis_options.yaml
analyzer:
exclude:
- '**/*.router.dart'
- '**/*.locator.dart'
- '**/*.config.dart'
- '**/*.g.dart'
linter:
rules:
public_member_api_docs: false
```
---
🎉 Congrats, we've made it to the end of Part 5! 🚀 We've successfully built the front end of our full-stack to-do application using Flutter. From importing necessary dependencies to connecting with the backend, we've covered it all. We've even implemented features such as creating and updating todos, handling errors and creating a reactive data service.
It's been an amazing journey, and we've come a long way since Part 1. We've built a complete full-stack to-do application using Dart and Flutter. But our work doesn't stop here. In this series, we haven't covered testing yet, but it's a crucial part of building any application. If you're interested in learning more about testing your code in all the modules we've built in this series, let us know in the comments.
As always, you can refer back to the GitHub repo for this tutorial at [https://github.com/saileshbro/full\_stack\_todo\_dart](https://github.com/saileshbro/full_stack_todo_dart) if you need any help. Don't forget to give it a ⭐ and spread the love for the project. Also, if you're stuck or need help, feel free to open an issue or better yet, send a pull request.
Thank you for joining me in this adventure, let's make more amazing apps together. Happy coding! 💻
==============================================================================
# 🚀 Building a Fullstack App with dart_frog and Flutter in a Monorepo - Part 4
URL: https://saileshdahal.com.np/building-a-fullstack-app-with-dartfrog-and-flutter-in-a-monorepo-part-4
Published: 2023-01-02
Tags: Flutter, Dart, Programming Blogs, General Programming
Series: 🚀 Building a Fullstack App with dart_frog and Flutter in a Monorepo (part 4 of 6)
==============================================================================
In the previous part, we set up models, data sources, repositories, exceptions and failures for the full-stack to-do application. We also made some changes to our packages. In this part, we will:
* Connect to a [Postgres](https://www.postgresql.org/) database
* Complete the backend routes
* Add a new controller to handle HTTP requests
* Add necessary failures and exceptions
* Fully implement CRUD operations for the to-do application
## 🚀 Implementing the Backend
It's time to tackle the backend of our to-do app! 💪 Let's get coding! 💻
### Importing necessary dependencies 📦
> Time to bring in the big guns! 💪 Let's import those dependencies
We will import all the necessary dependencies in the `pubspec.yaml` file.
```yaml
dependencies:
dart_frog: ^0.3.0
data_source:
path: ../data_source
dotenv: ^4.0.1
either_dart: ^0.3.0
exceptions:
path: ../exceptions
failures:
path: ../failures
http: ^0.13.5
models:
path: ../models
postgres: ^2.5.2
repository:
path: ../repository
typedefs:
path: ../typedefs
```
### 🛠️ Setting up the Postgres database
> 💾 Let's create a database
We will be using the [PostgreSQL](https://www.postgresql.org/) database for this tutorial. To use the [PostgreSQL](https://www.postgresql.org/) database for this tutorial, we can set up a test database on [elephantsql.com](http://elephantsql.com). Simply sign up on the website and click on the option to create a new instance. You should see something similar to this.
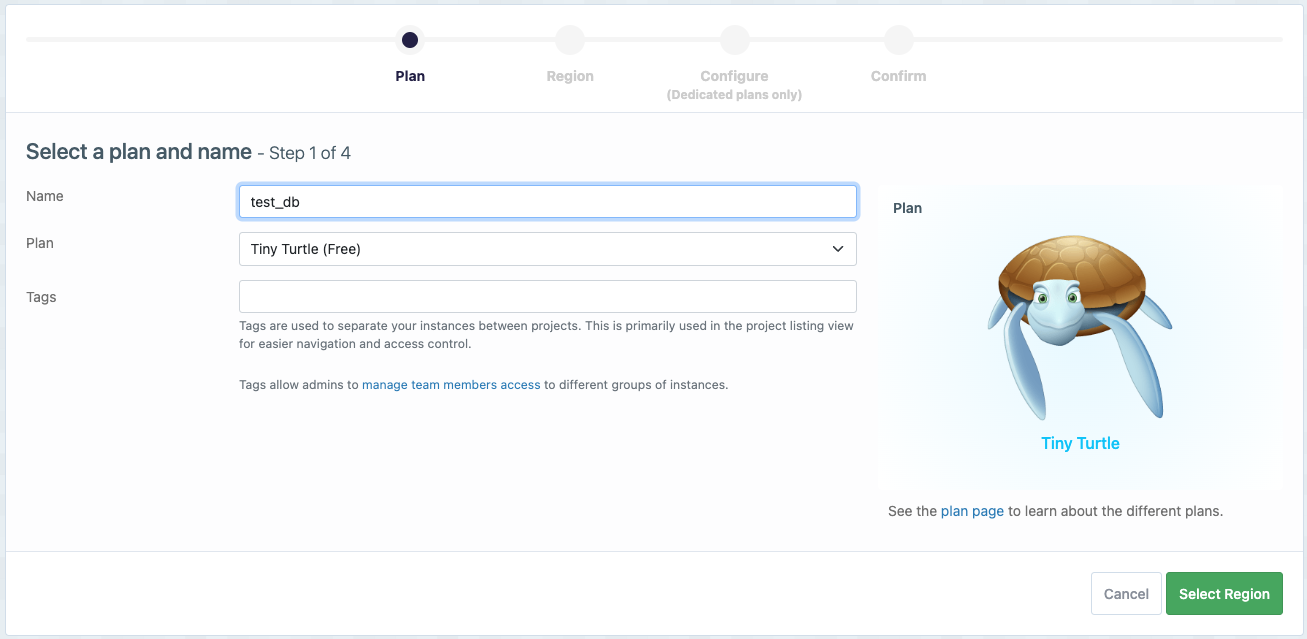
Once you add a name, you will be prompted to choose a name for your instance and a region that is nearest to you. I have selected the `AP-East-1` region, but you can choose any region that you prefer.
Once you have chosen a name and selected a region, click the `Create Instance` button. This will redirect you to a dashboard where you can click on the instance name to access the credentials for the database you have just created. The credentials should look similar to this.
### Connecting to the Database 🔌
> 💻 Setting up our database connection like a boss
#### Setting up environment 🌿
Now that we have created a database, we can connect to it from our application. To do this, we will create a new file `.env` at the root of the `backend` directory. This file will contain the credentials for the database that we have just created. The `.env` file should look similar to this.
Once this is done, we will use the [dotenv](https://pub.dev/packages/dotenv) package to load the environment variables from the `.env` file. We will also use the [postgres](https://pub.dev/packages/postgres) package to connect to the database. You can run the following command in the backend directory to add the necessary dependencies.
```bash
dart pub add dotenv postgres
```
This is how `.env` file should look. Make sure to use your database credentials
```apache
DB_HOST=tiny.db.elephantsql.com
DB_PORT=5432
DB_DATABASE=asztgqfq
DB_USERNAME=asztgqfq
DB_PASSWORD=PcIXbvXQLwpEON61GVPzqs0zHyzHyHZc
```
#### Creating database connection 🔗
Now, create a `backend/lib/db/database_connection.dart` file and add the following code.
```dart
import 'dart:developer';
import 'package:dotenv/dotenv.dart';
import 'package:postgres/postgres.dart';
class DatabaseConnection {
DatabaseConnection(this._dotEnv) {
_host = _dotEnv['DB_HOST'] ?? 'localhost';
_port = int.tryParse(_dotEnv['DB_PORT'] ?? '') ?? 5432;
_database = _dotEnv['DB_DATABASE'] ?? 'test';
_username = _dotEnv['DB_USERNAME'] ?? 'test';
_password = _dotEnv['DB_PASSWORD'] ?? 'test';
}
final DotEnv _dotEnv;
late final String _host;
late final int _port;
late final String _database;
late final String _username;
late final String _password;
PostgreSQLConnection? _connection;
PostgreSQLConnection get db =>
_connection ??= throw Exception('Database connection not initialized');
Future connect() async {
try {
_connection = PostgreSQLConnection(
_host,
_port,
_database,
username: _username,
password: _password,
);
log('Database connection successful');
return _connection!.open();
} catch (e) {
log('Database connection failed: $e');
}
}
Future close() => _connection!.close();
}
```
Whenever we want to query, we will open a connection to the database and close it once we are done. This will ensure that we are not keeping the connection open for too long.
#### 💉Injecting `DatabaseConnection` through `provider`
Create a new file `routes/_middleware.dart` and add the following code.
```dart
import 'package:backend/db/database_connection.dart';
import 'package:dart_frog/dart_frog.dart';
import 'package:dotenv/dotenv.dart';
final env = DotEnv()..load();
final _db = DatabaseConnection(env);
Handler middleware(Handler handler) {
return handler.use(provider((_) => _db));
}
```
This middleware is used to provide the `DatabaseConnection` instance to other parts of the application through a `provider`.
#### Fetching `DatabaseConnection` from `provider` 🔍
Now in `routes/index.dart` you can get this `DatabaseConnection` from `RequestContext` and use it to query the database.
```dart
import 'package:backend/db/database_connection.dart';
import 'package:dart_frog/dart_frog.dart';
Future onRequest(RequestContext context) async {
final connection = context.read();
await connection.connect();
final response =
await connection.db.query('select * from information_schema.tables');
await connection.close();
return Response.json(body: response.map((e) => e.toColumnMap()).toList());
}
```
If you run `dart_frog dev`, then you should be able to open `http://localhost:8080` and see the following output.
We have successfully connected to the database.
#### Create Database Table 📝
> 🗃️ Let's build our database table
Before implementing the `TodoDataSource`, we will need to create the table in the database. To do this, open the [elephantsql.com](elephantsql.com) dashboard and click on the `BROWSER` tab.
Then, execute the following query:
```sql
CREATE TABLE todos(
id SERIAL PRIMARY KEY NOT NULL,
title VARCHAR(255) NOT NULL,
description TEXT NOT NULL,
completed BOOL DEFAULT FALSE,
created_at timestamp default current_timestamp NOT NULL,
updated_at timestamp null
);
```
This [PostgreSQL query](https://www.tutorialspoint.com/postgresql/postgresql_create_table.htm) creates a new table called todos with the following columns:
* `id`: an integer column that is the table's primary key and is generated automatically by the database (using the [`SERIAL`](https://www.educba.com/postgresql-serial/) type). The [`NOT NULL`](https://www.tutorialspoint.com/postgresql/postgresql_constraints.htm) constraint ensures that this column cannot contain a `NULL` value.
* `title`: a string column with a maximum length of 255 characters. The [`NOT NULL`](https://www.tutorialspoint.com/postgresql/postgresql_constraints.htm) constraint ensures that this column cannot contain a `NULL` value.
* `description`: a text column. The `NOT NULL` constraint ensures that this column cannot contain a `NULL` value.
* `completed`: a boolean column with a default value of `FALSE`.
* `created_at`: a [`timestamp`](https://www.educba.com/postgresql-timestamp/) column with a default value of the current timestamp. The `NOT NULL` constraint ensures that this column cannot contain a `NULL` value.
* `updated_at`: a [`timestamp`](https://www.educba.com/postgresql-timestamp/) column that can contain a `NULL` value.
The `todos` table will be used to store the to-do items in our application. Each row in the table represents a single to-do item, and the table's columns store the data for that to-do item.
Once you run the query, you should see a toast message at the top.
### Implementing `TodoDataSource` 💪
> Cooking up some `TodoDataSource` magic 🔮
We will implement the todo data source in `backend/lib/todo/data_source/todo_data_source_impl.dart`. This file will contain the implementation of the `TodoDataSource` interface. We will pass a `DatabaseConnection` as a dependency to this class.
Create `TodoDataSourceImpl` and implement `TodoDataSource` interface, and override necessary methods. The empty implementation should look like this.
#### Empty `TodoDataSource` implementation
```dart
import 'package:backend/db/database_connection.dart';
import 'package:data_source/data_source.dart';
import 'package:models/models.dart';
import 'package:typedefs/typedefs.dart';
class TodoDataSourceImpl implements TodoDataSource {
const TodoDataSourceImpl(this._databaseConnection);
final DatabaseConnection _databaseConnection;
@override
Future createTodo(CreateTodoDto todo) {
throw UnimplementedError();
}
@override
Future deleteTodoById(TodoId id) {
throw UnimplementedError();
}
@override
Future> getAllTodo() {
throw UnimplementedError();
}
@override
Future getTodoById(TodoId id) {
throw UnimplementedError();
}
@override
Future updateTodo({required TodoId id, required UpdateTodoDto todo}) {
throw UnimplementedError();
}
}
```
#### 💉Injecting `TodoDataSource` through `provider`
> Let's add this to our global middleware in `routes/_middleware.dart` file
```dart
import 'package:backend/db/database_connection.dart';
import 'package:backend/todo/data_source/todo_data_source_impl.dart';
import 'package:dart_frog/dart_frog.dart';
import 'package:dotenv/dotenv.dart';
final env = DotEnv()..load();
final _db = DatabaseConnection(env);
final _ds = TodoDataSourceImpl(_db);
Handler middleware(Handler handler) {
return handler
.use(requestLogger())
.use(provider((_) => _db))
.use(provider((_) => _ds));
}
```
#### `createTodo` implementation
Now we will implement the `createTodo` method.
```dart
@override
Future createTodo(CreateTodoDto todo) async {
try {
await _databaseConnection.connect();
final result = await _databaseConnection.db.query(
'''
INSERT INTO todos (title, description, completed, created_at)
VALUES (@title, @description, @completed, @created_at) RETURNING *
''',
substitutionValues: {
'title': todo.title,
'description': todo.description,
'completed': false,
'created_at': DateTime.now(),
},
);
if (result.affectedRowCount == 0) {
throw const ServerException('Failed to create todo');
}
final todoMap = result.first.toColumnMap();
return Todo(
id: todoMap['id'] as int,
title: todoMap['title'] as String,
description: todoMap['description'] as String,
createdAt: todoMap['created_at'] as DateTime,
);
} on PostgreSQLException catch (e) {
throw ServerException(e.message ?? 'Unexpected error');
} finally {
await _databaseConnection.close();
}
}
```
First, the method establishes a connection to the database using the `_databaseConnection` object. Then, it uses the query method on the `db` object to execute an `INSERT` statement The `substitutionValues` parameter is used to bind the values from the `CreateTodoDto` .
If the `INSERT` statement is successful, the method retrieves the inserted row from the database using the `RETURNING *` clause and converts it to a map using the `toColumnMap` method. The method then uses this map to create and return a new `Todo` object.
#### `getAllTodo` implementation
Now we will implement the `getAllTodo` method.
```dart
@override
Future> getAllTodo() async {
try {
await _databaseConnection.connect();
final result = await _databaseConnection.db.query(
'SELECT * FROM todos',
);
final data =
result.map((e) => e.toColumnMap()).map(Todo.fromJson).toList();
return data;
} on PostgreSQLException catch (e) {
throw ServerException(e.message ?? 'Unexpected error');
} finally {
await _databaseConnection.close();
}
}
```
This `getAllTodo` method is used to retrieve a list of all the to-do items stored in the database. This executes a `SELECT` query to retrieve all rows from the `todos` table, maps each row to a `Todo` object using the `Todo.fromJson` function, and returns the list of `Todo` objects.
#### `getTodoById` implementation 🔍
Now we will implement the `getTodoById` method.
```dart
@override
Future getTodoById(TodoId id) async {
try {
await _databaseConnection.connect();
final result = await _databaseConnection.db.query(
'SELECT * FROM todos WHERE id = @id',
substitutionValues: {'id': id},
);
if (result.isEmpty) {
throw const NotFoundException('Todo not found');
}
return Todo.fromJson(result.first.toColumnMap());
} on PostgreSQLException catch (e) {
throw ServerException(e.message ?? 'Unexpected error');
} finally {
await _databaseConnection.close();
}
}
```
We execute a `SELECT` query that selects from `todos` table where the id equals the provided id. If the query returns an empty result set, we throw a `NotFoundException`, indicating that the requested to-do item could not be found, else it returns the mapped todo object.
#### `updateTodo` implementation 🔧
Here is the implementation of the `updateTodo` method.
```dart
@override
Future updateTodo({
required TodoId id,
required UpdateTodoDto todo,
}) async {
try {
await _databaseConnection.connect();
final result = await _databaseConnection.db.query(
'''
UPDATE todos
SET title = COALESCE(@new_title, title),
description = COALESCE(@new_description, description),
completed = COALESCE(@new_completed, completed),
updated_at = current_timestamp
WHERE id = @id
RETURNING *
''',
substitutionValues: {
'id': id,
'new_title': todo.title,
'new_description': todo.description,
'new_completed': todo.completed,
},
);
if (result.isEmpty) {
throw const NotFoundException('Todo not found');
}
return Todo.fromJson(result.first.toColumnMap());
} on PostgreSQLException catch (e) {
throw ServerException(e.message ?? 'Unexpected error');
} finally {
await _databaseConnection.close();
}
}
```
It executes an `UPDATE` query on the todos table. If no value is provided for a column, then the `COALESCE` function is used to keep the existing value in the database unchanged. The `updated_at` column is set to the `current_timestamp`. If the result set is empty, it means that no row with the given id was found, so a `NotFoundException` is thrown.
#### `deleteTodoById` implementation 🗑️
Now, we will implement the `deleteTodoById` method.
```dart
@override
Future deleteTodoById(TodoId id) async {
try {
await _databaseConnection.connect();
await _databaseConnection.db.query(
'''
DELETE FROM todos
WHERE id = @id
''',
substitutionValues: {'id': id},
);
} on PostgreSQLException catch (e) {
throw ServerException(e.message ?? 'Unexpected error');
} finally {
await _databaseConnection.close();
}
}
```
If the delete statement is successful, the method does not return anything.
#### `PostgresSQLException` handling 🚨
In all of the methods above, if there is an exception while querying, like `PostgresSQLException`, it is caught and a `ServerException` is thrown with a more general error message. Finally, the database connection is closed before the method finishes executing.
### Implementing `TodoRepository` 💪
> 💪 Time to make that `TodoRepository` do some work!
We will implement the todo repository in `backend/lib/todo/repositories/todo_repository_impl.dart`. This file will contain the implementation of the `TodoRepository` interface. We will pass a `TodoDataSource` as a dependency to this class.
#### Empty `TodoRepository` implementation
Create `TodoRepositoryImpl` and implement `TodoRepository` interface, and override necessary methods. The empty implementation should look like this.
```dart
import 'package:data_source/data_source.dart';
import 'package:either_dart/either.dart';
import 'package:failures/failures.dart';
import 'package:models/models.dart';
import 'package:repository/repository.dart';
import 'package:typedefs/src/typedefs.dart';
class TodoRepositoryImpl implements TodoRepository {
TodoRepositoryImpl(this.dataSource);
final TodoDataSource dataSource;
@override
Future> createTodo(CreateTodoDto createTodoDto) {
throw UnimplementedError();
}
@override
Future> deleteTodo(TodoId id) {
throw UnimplementedError();
}
@override
Future> getTodoById(TodoId id) {
throw UnimplementedError();
}
@override
Future>> getTodos() {
throw UnimplementedError();
}
@override
Future> updateTodo({
required TodoId id,
required UpdateTodoDto updateTodoDto,
}) {
throw UnimplementedError();
}
}
```
#### 💉Injecting `TodoRepository` through `provider`
Before implementing the methods of `TodoRepository`, we will add it to our global middleware so that we can access it from our routes.
```dart
import 'package:backend/db/database_connection.dart';
import 'package:backend/todo/data_source/todo_data_source_impl.dart';
import 'package:backend/todo/repositories/todo_repository_impl.dart';
import 'package:dart_frog/dart_frog.dart';
import 'package:data_source/data_source.dart';
import 'package:dotenv/dotenv.dart';
import 'package:repository/repository.dart';
final env = DotEnv()..load();
final _db = DatabaseConnection(env);
final _ds = TodoDataSourceImpl(_db);
final _repo = TodoRepositoryImpl(_ds);
Handler middleware(Handler handler) {
return handler
.use(requestLogger())
.use(provider((_) => _db))
.use(provider((_) => _ds))
.use(provider((_) => _repo));
}
```
#### `createTodo` implementation
Now we will implement the `createTodo` method.
```dart
@override
Future> createTodo(CreateTodoDto createTodoDto) async {
try {
final todo = await dataSource.createTodo(createTodoDto);
return Right(todo);
} on ServerException catch (e) {
log(e.message);
return Left(
ServerFailure(message: e.message),
);
}
}
```
In this code, we are implementing the `createTodo` method which is part of the `TodoRepository` interface using `dataSource.createTodo` method. The `dataSource.createTodo` method is responsible for inserting the todo into the database. If the insertion is successful, it returns the todo object.
#### `getTodoById` implementation
Now we will implement the `getTodoById` method.
```dart
@override
Future> getTodoById(TodoId id) async {
try {
final res = await dataSource.getTodoById(id);
return Right(res);
} on NotFoundException catch (e) {
log(e.message);
return Left(
ServerFailure(
message: e.message,
statusCode: e.statusCode,
),
);
} on ServerException catch (e) {
log(e.message);
return Left(
ServerFailure(message: e.message),
);
}
}
```
The method calls the `dataSource.getTodoById` method, which is responsible for querying the database and returning the todo object. If the todo is found, it returns the value. A `NotFoundException` is thrown when the todo with the given id is not found in the database.
#### `getTodos` implementation
Here, we will implement the `getTodos` method.
```dart
@override
Future>> getTodos() async {
try {
return Right(await dataSource.getAllTodo());
} on ServerException catch (e) {
log(e.message);
return Left(
ServerFailure(message: e.message),
);
}
}
```
We call the `dataSource.getAllTodo` method. If the method execution is successful, we return the list of todo items.
#### `updateTodo` implementation 🔧
Now we will implement the `updateTodo` method.
```dart
@override
Future> updateTodo({
required TodoId id,
required UpdateTodoDto updateTodoDto,
}) async {
try {
return Right(
await dataSource.updateTodo(
id: id,
todo: updateTodoDto,
),
);
} on NotFoundException catch (e) {
log(e.message);
return Left(
ServerFailure(
message: e.message,
statusCode: e.statusCode,
),
);
} on ServerException catch (e) {
log(e.message);
return Left(
ServerFailure(message: e.message),
);
}
}
```
The method updates the todo using the `dataSource.updateTodo` method. If the update is successful, it returns the updated todo. If the update fails and a `NotFoundException` is thrown, it logs the error message and returns a `ServerFailure` object with the appropriate status code.
#### `deleteTodo` implementation
Finally, we will implement the `deleteTodo` method.
```dart
@override
Future> deleteTodo(TodoId id) async {
try {
final exists = await getTodoById(id);
if (exists.isLeft) return exists;
final todo = await dataSource.deleteTodoById(id);
return Right(todo);
} on ServerException catch (e) {
log(e.message);
return Left(
ServerFailure(message: e.message),
);
}
}
```
We check if a todo exists by calling the `this.getTodoById` method. If it does not exist, we return a `Failure`. If the todo does exist, we delete it by calling the `dataSource.deleteTodoById`.
#### Handling `Exception` 🛑
The `dataSource` methods throw exceptions like `ServerException` and `NotFoundException`. We catch these exceptions and log the error message. We then return a `Left` object containing a `ServerFailure` object. The `ServerFailure` object is a custom failure type that we can use to indicate that a server error occurred.
### Building the `TodoController` 🔨
> Bringing it all together with our fancy new controller 🎉
The controller will be responsible for handling HTTP requests and sending back the appropriate response. We will implement five methods in the controller:
* **index** `GET /resource` 🔍
* **show** `GET /resource/{id}` 📖
* **store** `POST /resource` 📤
* **update** `PUT/PATCH /resource/{id}` 🔗
* **delete** `DELETE /resource/{id}` 🗑️
These methods will correspond to the standard HTTP methods for retrieving, creating, updating, and deleting data. By using these methods, we can keep our code clean and organized. This approach is inspired by the [Laravel framework's API controller](https://laravel.com/docs/9.x/controllers) methods.
#### Abstract `HttpController` 🔮
We will create a new abstract class in the `backend/lib/controller/http_controller.dart` called `HttpController` and which will have five methods.
```dart
import 'dart:async';
import 'package:dart_frog/dart_frog.dart';
abstract class HttpController {
FutureOr index(Request request);
FutureOr store(Request request);
FutureOr show(Request request, String id);
FutureOr update(Request request, String id);
FutureOr destroy(Request request, String id);
}
```
#### Empty `TodoController` implementation
Now for the implementation of this contract, we will create a new class `TodoController` in the `backend/lib/controller/todo_controller.dart` file. We will implement each method in the `TodoController` class.
```dart
import 'dart:async';
import 'dart:convert';
import 'dart:io';
import 'package:backend/controller/http_controller.dart';
import 'package:dart_frog/dart_frog.dart';
import 'package:either_dart/either.dart';
import 'package:exceptions/exceptions.dart';
import 'package:failures/failures.dart';
import 'package:models/models.dart';
import 'package:repository/repository.dart';
import 'package:typedefs/typedefs.dart';
class TodoController extends HttpController {
TodoController(this._repo);
final TodoRepository _repo;
@override
FutureOr index(Request request) async {
throw UnimplementedError();
}
@override
FutureOr show(Request request, String id) async {
throw UnimplementedError();
}
@override
FutureOr destroy(Request request, String id) async {
throw UnimplementedError();
}
@override
FutureOr store(Request request) async {
throw UnimplementedError();
}
@override
FutureOr update(Request request, String id) async {
throw UnimplementedError();
}
Future>> parseJson(
Request request,
) async {
throw UnimplementedError();
}
}
```
#### Parse request body 🔬
Before we implement the methods, we will create a new helper method in `HttpController` which will be responsible to parse the request body.
If the request body is not a valid JSON, it will return a `Left` object containing a `BadRequestFailure` object. If the request body is a valid JSON, it will return a `Right` object containing the parsed JSON.
Add the following method to the `HttpController` class.
```dart
Future>> parseJson(
Request request,
) async {
try {
final body = await request.body();
if (body.isEmpty) {
throw const BadRequestException(message: 'Invalid body');
}
late final Map json;
try {
json = jsonDecode(body) as Map;
return Right(json);
} catch (e) {
throw const BadRequestException(message: 'Invalid body');
}
} on BadRequestException catch (e) {
return Left(
ValidationFailure(
message: e.message,
errors: {},
),
);
}
}
```
#### 💉Injecting `TodoController` through `provider`
> Let's add this to our global middleware `routes/_middleware.dart` file.
```dart
import 'package:backend/db/database_connection.dart';
import 'package:backend/todo/controller/todo_controller.dart';
import 'package:backend/todo/data_source/todo_data_source_impl.dart';
import 'package:backend/todo/repositories/todo_repository_impl.dart';
import 'package:dart_frog/dart_frog.dart';
import 'package:data_source/data_source.dart';
import 'package:dotenv/dotenv.dart';
import 'package:repository/repository.dart';
final env = DotEnv()..load();
final _db = DatabaseConnection(env);
final _ds = TodoDataSourceImpl(_db);
final _repo = TodoRepositoryImpl(_ds);
final _todoController = TodoController(_repo);
Handler middleware(Handler handler) {
return handler
.use(requestLogger())
.use(provider((_) => _db))
.use(provider((_) => _ds))
.use(provider((_) => _repo))
.use(provider((_) => _todoController));
}
```
> Note: We are using `requestLogger` middleware to log the request and response.
### Implementing `TodoController` 🚀
We will implement the `TodoController` methods as follows:
#### `index` implementation
The `index` method will be responsible for retrieving all todo items from the database. We will implement it as follows:
```dart
@override
FutureOr index(Request request) async {
final res = await _repo.getTodos();
return res.fold(
(left) => Response.json(
body: {'message': left.message},
statusCode: left.statusCode,
),
(right) => Response.json(
body: right.map((e) => e.toJson()).toList(),
),
);
}
```
We will call the `getTodos` method and map the response. If the failure case is returned, we will return a response with an error status code and the error message. Else, we will return a `200` status code and the list of todos.
#### `show` implementation
`show` method will be responsible for retrieving a single to-do item from the database. We will implement it as follows:
```dart
@override
FutureOr show(Request request, String id) async {
final todoId = mapTodoId(id);
if (todoId.isLeft) {
return Response.json(
body: {'message': todoId.left.message},
statusCode: todoId.left.statusCode,
);
}
final res = await _repo.getTodoById(todoId.right);
return res.fold(
(left) => Response.json(
body: {'message': left.message},
statusCode: left.statusCode,
),
(right) => Response.json(
body: right.toJson(),
),
);
}
```
We will first call `mapTodoId` method to validate the `id` parameter. If it returns a failure, we will return a failure response with the status code. Then we will get the todo item from the repository and return the todo item if it is found. Else, we will return a failure response with the status code.
#### `store` implementation
`store` method is as follows
```dart
@override
FutureOr store(Request request) async {
final parsedBody = await parseJson(request);
if (parsedBody.isLeft) {
return Response.json(
body: {'message': parsedBody.left.message},
statusCode: parsedBody.left.statusCode,
);
}
final json = parsedBody.right;
final createTodoDto = CreateTodoDto.validated(json);
if (createTodoDto.isLeft) {
return Response.json(
body: {
'message': createTodoDto.left.message,
'errors': createTodoDto.left.errors,
},
statusCode: createTodoDto.left.statusCode,
);
}
final res = await _repo.createTodo(createTodoDto.right);
return res.fold(
(left) => Response.json(
body: {'message': left.message},
statusCode: left.statusCode,
),
(right) => Response.json(
body: right.toJson(),
statusCode: HttpStatus.created,
),
);
}
```
If `parseJson` resolves to a failure, we will return a response with an error status code and message.
We will pass the JSON object to the `CreateTodoDto.validated` method. If this returns a failure, we will return a response with an error status code and message, here it will be `ValidationFailure`.
We will pass the DTO to `createTodo` method of the `TodoRepository`. If creating fails we will return a response with an error status code and message.
If everything goes right, we will return a response with a `201` status code and the to-do item.
#### `destroy` implementation
`destroy` method is as follows
```dart
@override
FutureOr destroy(Request request, String id) async {
final todoId = mapTodoId(id);
if (todoId.isLeft) {
return Response.json(
body: {'message': todoId.left.message},
statusCode: todoId.left.statusCode,
);
}
final res = await _repo.deleteTodo(todoId.right);
return res.fold(
(left) => Response.json(
body: {'message': left.message},
statusCode: left.statusCode,
),
(right) => Response.json(body: {'message': 'OK'}),
);
}
```
We will first call `mapTodoId` method to validate the `id` parameter. If it returns a failure, we will return a failure response with the status code. Then we will get the delete todo item from the repository and return OK with 200 status code if. If there is a failure, we will return a failure response with the status code.
#### `update` implementation
`update` method will be responsible for updating a single to-do item from the database. We will implement it as follows:
```dart
@override
FutureOr update(Request request, String id) async {
final parsedBody = await parseJson(request);
final todoId = mapTodoId(id);
if (todoId.isLeft) {
return Response.json(
body: {'message': todoId.left.message},
statusCode: todoId.left.statusCode,
);
}
if (parsedBody.isLeft) {
return Response.json(
body: {'message': parsedBody.left.message},
statusCode: parsedBody.left.statusCode,
);
}
final json = parsedBody.right;
final updateTodoDto = UpdateTodoDto.validated(json);
if (updateTodoDto.isLeft) {
return Response.json(
body: {
'message': updateTodoDto.left.message,
'errors': updateTodoDto.left.errors,
},
statusCode: updateTodoDto.left.statusCode,
);
}
final res = await _repo.updateTodo(
id: todoId.right,
updateTodoDto: updateTodoDto.right,
);
return res.fold(
(left) => Response.json(
body: {'message': left.message},
statusCode: left.statusCode,
),
(right) => Response.json(
body: right.toJson(),
),
);
}
```
This method is similar to the `store` method. We will first validate the `id` parameter and then the JSON body. If both are valid, we will call the `updateTodo` method of the `TodoRepository` and then resolve the failure or the updated value.
### Implementing Routes 🛣️
We will now implement the routes. These are the routes that we will have
* **GET** `/todos` - Get all todos
* **GET** `/todos/:id` - Get a single todo
* **POST** `/todos` - Create a todo
* **PUT** `/todos/:id` - Update a todo
* **PATCH** `/todos/:id` - Update a todo
* **DELETE** `/todos/:id` - Delete a todo
`dart_frog` has a file system routing. For example, let's say we need to create `todos/1` route. We will create a file `routes/todos/[id].dart` and it will be mapped to `todos/1` route.
#### Implementing `todos/` route
To implement all the HTTP methods related to `todos/` route, we will create a new file `routes/todos/index.dart`.
We will create a file `routes/todos/index.dart` and implement the routes as follows:
```dart
import 'dart:io';
import 'package:backend/todo/controller/todo_controller.dart';
import 'package:dart_frog/dart_frog.dart';
Future onRequest(RequestContext context) async {
final controller = context.read();
switch (context.request.method) {
case HttpMethod.get:
return controller.index(context.request);
case HttpMethod.post:
return controller.store(context.request);
case HttpMethod.put:
case HttpMethod.patch:
case HttpMethod.delete:
case HttpMethod.head:
case HttpMethod.options:
return Response.json(
body: {'error': '👀 Looks like you are lost 🔦'},
statusCode: HttpStatus.methodNotAllowed,
);
}
}
```
Here, we are getting the `TodoController` from the `context` and mapping the respective HTTP method to the controller method. We are also handling cases when the HTTP method is not allowed.
#### Implementing `todos/:id` route
Similarly, we will create a file `routes/todos/[id].dart` and implement the routes as follows:
```dart
import 'dart:io';
import 'package:backend/todo/controller/todo_controller.dart';
import 'package:dart_frog/dart_frog.dart';
Future onRequest(RequestContext context, String id) async {
final todoController = context.read();
switch (context.request.method) {
case HttpMethod.get:
return todoController.show(context.request, id);
case HttpMethod.put:
case HttpMethod.patch:
return todoController.update(context.request, id);
case HttpMethod.delete:
return todoController.destroy(context.request, id);
case HttpMethod.head:
case HttpMethod.options:
case HttpMethod.post:
return Response.json(
body: {'error': '👀 Looks like you are lost 🔦'},
statusCode: HttpStatus.methodNotAllowed,
);
}
}
```
Here, we will get the `id` parameter from the route as a second parameter in `onRequest` method as a string. This can be anything. This explains the use of `mapTodoId` function in `typedefs` package.
We will pass the `id` parameter to the controller methods. We will also handle the case when the HTTP method is not allowed.
#### Implementing `/` route
Finally, we will update `routes/index.dart` file to return `methodNotAllowed` response. This is our `/` route, which will be handled as follows:
```dart
import 'dart:io';
import 'package:dart_frog/dart_frog.dart';
Future onRequest(RequestContext context) async {
return Response.json(
body: {'error': '👀 Looks like you are lost 🔦'},
statusCode: HttpStatus.methodNotAllowed,
);
}
```
## 🧪 Testing backend
> Time to put our backend to the test! 🔍
We will run some e2e tests, to verify the backend works fine. create a file `backend/e2e/routes_test.dart` and implement the tests as follows:
```dart
import 'dart:convert';
import 'dart:io';
import 'package:http/http.dart' as http;
import 'package:models/models.dart';
import 'package:test/test.dart';
void main() {
late Todo createdTodo;
tearDownAll(() async {
final response = await http.get(Uri.parse('http://localhost:8080/todos'));
final todos = (jsonDecode(response.body) as List)
.map((e) => Todo.fromJson(e as Map))
.toList();
for (final todo in todos) {
await http.delete(Uri.parse('http://localhost:8080/todos/${todo.id}'));
}
});
group('E2E -', () {
test('GET /todos returns empty list of todos', () async {
final response = await http.get(Uri.parse('http://localhost:8080/todos'));
expect(response.statusCode, HttpStatus.ok);
expect(response.body, equals('[]'));
});
test('POST /todos to create a new todo', () async {
final response = await http.post(
Uri.parse('http://localhost:8080/todos'),
headers: {
'Content-Type': 'application/json',
},
body: jsonEncode(_createTodoDto.toJson()),
);
expect(response.statusCode, HttpStatus.created);
createdTodo =
Todo.fromJson(jsonDecode(response.body) as Map);
expect(createdTodo.title, equals(_createTodoDto.title));
expect(createdTodo.description, equals(_createTodoDto.description));
});
test('GET /todos returns list of todos with one todo', () async {
final response = await http.get(Uri.parse('http://localhost:8080/todos'));
expect(response.statusCode, HttpStatus.ok);
final todos = (jsonDecode(response.body) as List)
.map((e) => Todo.fromJson(e as Map))
.toList();
expect(todos.length, equals(1));
expect(todos.first, equals(createdTodo));
});
test('GET /todos/:id returns the created todo', () async {
final response = await http.get(
Uri.parse('http://localhost:8080/todos/${createdTodo.id}'),
);
expect(response.statusCode, HttpStatus.ok);
final todo =
Todo.fromJson(jsonDecode(response.body) as Map);
expect(todo, equals(createdTodo));
});
test('PUT /todos/:id to update the created todo', () async {
final updateTodoDto = UpdateTodoDto(
title: 'updated title',
description: 'updated description',
);
final response = await http.put(
Uri.parse('http://localhost:8080/todos/${createdTodo.id}'),
headers: {
'Content-Type': 'application/json',
},
body: jsonEncode(updateTodoDto.toJson()),
);
expect(response.statusCode, HttpStatus.ok);
final todo =
Todo.fromJson(jsonDecode(response.body) as Map);
expect(todo.title, equals(updateTodoDto.title));
expect(todo.description, equals(updateTodoDto.description));
});
test('PATCH /todos/:id to update the created todo', () async {
final updateTodoDto = UpdateTodoDto(
title: 'UPDATED TITLE',
description: 'UPDATED DESCRIPTION',
);
final response = await http.patch(
Uri.parse('http://localhost:8080/todos/${createdTodo.id}'),
headers: {
'Content-Type': 'application/json',
},
body: jsonEncode(updateTodoDto.toJson()),
);
expect(response.statusCode, HttpStatus.ok);
final todo =
Todo.fromJson(jsonDecode(response.body) as Map);
expect(todo.title, equals(updateTodoDto.title));
expect(todo.description, equals(updateTodoDto.description));
});
test('DELETE /todos/:id to delete the created todo', () async {
final response = await http.delete(
Uri.parse('http://localhost:8080/todos/${createdTodo.id}'),
);
expect(response.statusCode, HttpStatus.ok);
expect(response.body, jsonEncode({'message': 'OK'}));
});
test('GET /todos returns empty list of todos', () async {
final response = await http.get(Uri.parse('http://localhost:8080/todos'));
expect(response.statusCode, HttpStatus.ok);
expect(response.body, equals('[]'));
});
});
}
final _createTodoDto = CreateTodoDto(
title: 'title',
description: 'description',
);
```
To run the tests, first, start the backend server by running the following command:
```bash
dart_frog dev
```
And then on a new terminal run the tests:
```bash
dart test e2e/routes_test.dart
```
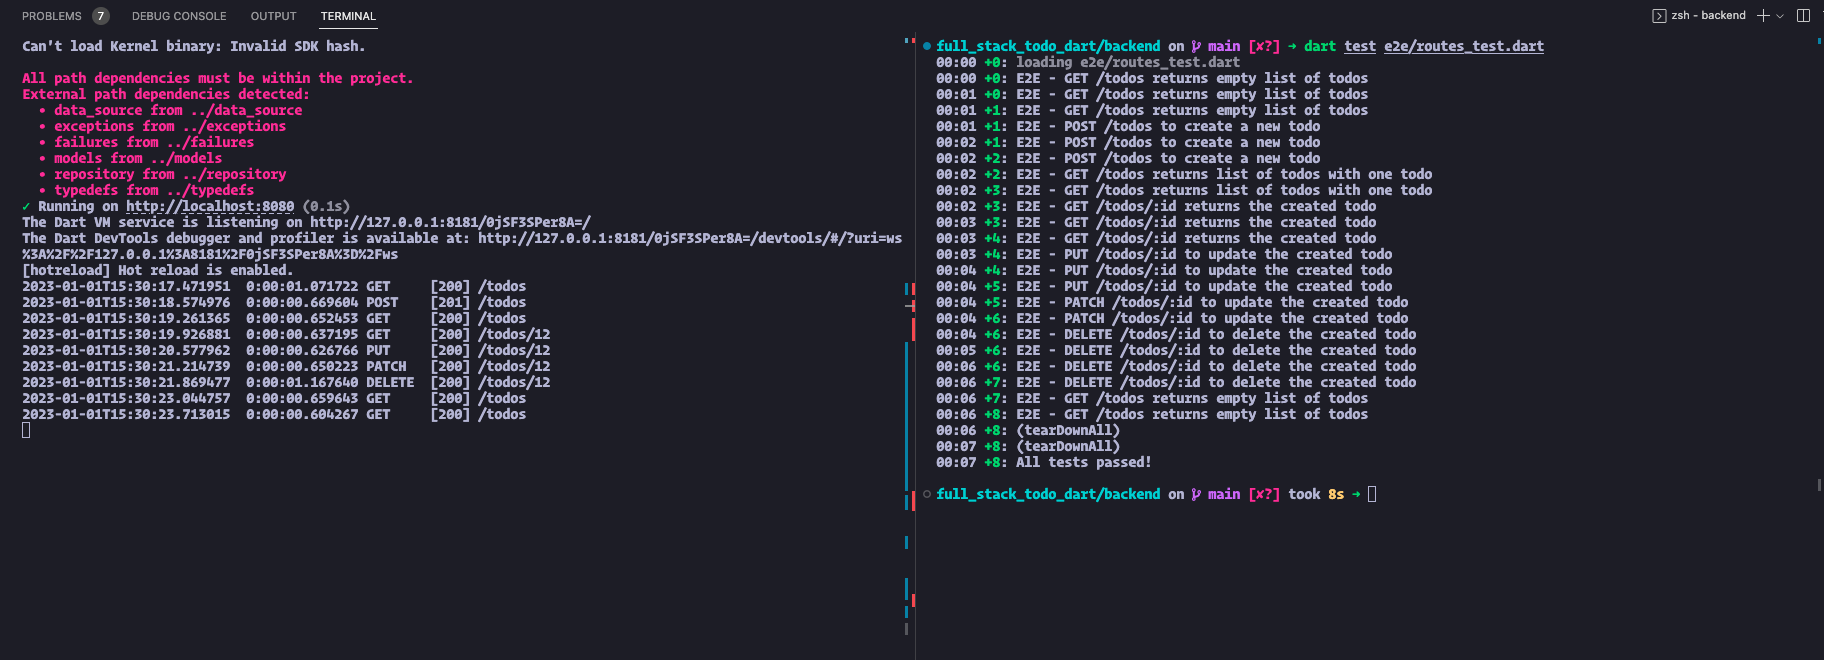
---
Wow, we've made it to the end of part 4! 🎉 It's been a wild ride, but we've finally completed the backend of our full-stack to-do application. We connected to a Postgres database, completed all our backend routes, and fully implemented CRUD operations. We even tested our backend to make sure everything is running smoothly.
But we're not done yet! In the final part of this tutorial, we'll be building the front end of our to-do app using Flutter. It's going to be a blast! 💻
Don't forget, you can always refer back to the GitHub repo for this tutorial at [https://github.com/saileshbro/full\_stack\_todo\_dart](https://github.com/saileshbro/full_stack_todo_dart) if you need a little help along the way.
Until next time, happy coding! 😄
==============================================================================
# 🚀 Building a Fullstack App with dart_frog and Flutter in a Monorepo - Part 3
URL: https://saileshdahal.com.np/building-a-fullstack-app-with-dartfrog-and-flutter-in-a-monorepo-part-3
Published: 2023-01-01
Tags: Flutter, Dart, dart_frog, full stack, Programming Blogs
Series: 🚀 Building a Fullstack App with dart_frog and Flutter in a Monorepo (part 3 of 6)
==============================================================================
In the previous part, we set up models, data sources, repositories, and failures for the full-stack to-do application. In this part, we will:
* Make changes to the failure classes
* Create new failures
* [`RequestFailure`](https://github.com/saileshbro/full_stack_todo_dart/blob/780b4662d4a03c17aaef281b100c8a686d8317bb/failures/lib/src/request_failure/request_failure.dart)
* [`ValidationFailure`](https://github.com/saileshbro/full_stack_todo_dart/blob/780b4662d4a03c17aaef281b100c8a686d8317bb/failures/lib/src/validation_failure/validation_failure.dart)
* [`ServerFailure`](https://github.com/saileshbro/full_stack_todo_dart/blob/780b4662d4a03c17aaef281b100c8a686d8317bb/failures/lib/src/server_failure/server_failure.dart)
* Create new Exceptions
* [`ServerException`](https://github.com/saileshbro/full_stack_todo_dart/blob/780b4662d4a03c17aaef281b100c8a686d8317bb/exceptions/lib/src/server_exception/server_exception.dart)
* [`HttpException`](https://github.com/saileshbro/full_stack_todo_dart/blob/780b4662d4a03c17aaef281b100c8a686d8317bb/exceptions/lib/src/http_exception/http_exception.dart)
* [`NotFoundException`](https://github.com/saileshbro/full_stack_todo_dart/blob/780b4662d4a03c17aaef281b100c8a686d8317bb/exceptions/lib/src/http_exception/not_found_exception.dart)
* [`BadRequestException`](https://github.com/saileshbro/full_stack_todo_dart/blob/780b4662d4a03c17aaef281b100c8a686d8317bb/exceptions/lib/src/http_exception/bad_request_exception.dart)
* Add validation to DTOs
* [Add JSON converters](https://github.com/saileshbro/full_stack_todo_dart/blob/780b4662d4a03c17aaef281b100c8a686d8317bb/models/lib/src/serializers/date_time_converter.dart)
## Creating and updating packages 📦
In this section, we will create new packages using [very\_good\_cli](https://pub.dev/packages/very_good_cli) and update existing ones to efficiently manage the packages in our full-stack to-do application.
### Working with Failure classes
> It's time to shake things up in the failure department! 💥 Let's get to work on updating our failure classes.
### Create `build.yaml`
We will now create a new file called [`build.yaml`](https://github.com/saileshbro/full_stack_todo_dart/blob/780b4662d4a03c17aaef281b100c8a686d8317bb/failures/build.yaml) in the `failures` directory and add the following code. This will change the behaviour of the [`json_serializable`](https://pub.dev/packages/json_serializable) so that it generates JSON keys in `snake_case`.
```yaml
targets:
$default:
builders:
json_serializable:
options:
any_map: false
checked: false
create_factory: true
disallow_unrecognized_keys: false
explicit_to_json: true
field_rename: snake
generic_argument_factories: false
ignore_unannotated: false
include_if_null: true
```
#### Update `Failure`
Let's add a new getter to the `Failure` abstract class to get the status code of the failure. This will allow us to map the failure to the appropriate [HTTP status code](https://developer.mozilla.org/en-US/docs/Web/HTTP/Status) in the controller.
```diff
abstract class Failure {
String get message;
+ int get statusCode;
}
```
#### Update `NetworkFailure`
We will update our failure package and add more failures to it. To do this, we will begin by renaming the `code` field in our `NetworkFailure` class to `statusCode`. This will make the field more meaningful and easier for our readers to understand.
```diff
class NetworkFailure extends Failure with _$NetworkFailure {
/// {@macro network_failure}
const factory NetworkFailure({
required String message,
- required int code,
+ required int statusCode,
@Default([]) List errors,
}) = _NetworkFailure;
```
### Create new failures
> Time to add some more failure friends to our app! 🙌
We'll be creating [`RequestFailure`](https://github.com/saileshbro/full_stack_todo_dart/blob/780b4662d4a03c17aaef281b100c8a686d8317bb/failures/lib/src/request_failure/request_failure.dart), [`ServerFailure`](https://github.com/saileshbro/full_stack_todo_dart/blob/780b4662d4a03c17aaef281b100c8a686d8317bb/failures/lib/src/server_failure/server_failure.dart), and [`ValidationFailure`](https://github.com/saileshbro/full_stack_todo_dart/blob/780b4662d4a03c17aaef281b100c8a686d8317bb/failures/lib/src/validation_failure/validation_failure.dart) to help us map out any potential errors that may occur.
#### `RequestFailure`
To create a `RequestFailure` class, we will create a new file in the `src` directory called `request_failure/request_failure.dart`.
```dart
import 'dart:io';
import 'package:failures/failures.dart';
import 'package:freezed_annotation/freezed_annotation.dart';
part 'request_failure.freezed.dart';
@freezed
class RequestFailure extends Failure with _$RequestFailure {
const factory RequestFailure({
required String message,
@Default(HttpStatus.badRequest) int statusCode,
}) = _RequestFailure;
}
```
We will create two new classes in the `src` directory, `ServerFailure` and `ValidationFailure`. The `ServerFailure` class will be used to represent errors that occur on the server side of our application, and the `ValidationFailure` class will be used to represent validation errors in our application.
#### `ServerFailure`
```dart
import 'dart:io';
import 'package:failures/failures.dart';
import 'package:freezed_annotation/freezed_annotation.dart';
part 'server_failure.freezed.dart';
@freezed
class ServerFailure extends Failure with _$ServerFailure {
const factory ServerFailure({
required String message,
@Default(HttpStatus.internalServerError) int statusCode,
}) = _ServerFailure;
}
```
#### `ValidationFailure`
```dart
import 'dart:io';
import 'package:failures/failures.dart';
import 'package:freezed_annotation/freezed_annotation.dart';
part 'validation_failure.freezed.dart';
@freezed
class ValidationFailure extends Failure with _$ValidationFailure {
const factory ValidationFailure({
required String message,
@Default(HttpStatus.badRequest) int statusCode,
@Default({}) Map> errors,
}) = _ValidationFailure;
}
```
> Don't forget to export and run [`build_runner`](https://pub.dev/packages/build_runner) 😎
```dart
library failures;
export 'src/failure.dart';
export 'src/network_failure/network_failure.dart';
export 'src/request_failure/request_failure.dart';
export 'src/server_failure/server_failure.dart';
export 'src/validation_failure/validation_failure.dart';
```
> 💡 Note: You can run the `build_runner` command by running `flutter pub run build_runner build` in the terminal.
### Working with packages
> Get ready for some package updating fun! 📦
#### Update `typedefs` package
We will be creating a function called `mapTodoId` in the `typedefs` package. This function will be responsible for converting a string id to a `TodoId` object. This is necessary because we need a way to convert user input into a format our application can understand and use. If the id is not valid, the `mapTodoId` function will return a `RequestFailure` object. This will allow us to handle any errors or invalid input gracefully, ensuring that our application is robust and can handle any potential issues
```dart
Either mapTodoId(String id) {
try {
final todoId = int.tryParse(id);
if (todoId == null) throw const BadRequestException(message: 'Invalid id');
return Right(todoId);
} on BadRequestException catch (e) {
return Left(
RequestFailure(
message: e.message,
statusCode: e.statusCode,
),
);
}
}
```
The `mapTodoId` method will return either a `TodoId` object or a `RequestFailure` object. Make sure to add the dependencies [`either_dart`](https://pub.dev/packages/either_dart) and `failures` to the `pubspec.yaml` file of the `typedefs` package.
```yaml
dependencies:
either_dart: ^0.3.0
exceptions:
path: ../exceptions
failures:
path: ../failures
```
#### Create a new `exceptions` package
To handle internal exceptions and map them to the appropriate failures, we will create a new package called `exceptions` and throw our custom exceptions. For example, if we encounter a [`PostgreSQLException`](https://pub.dev/documentation/postgres/latest/postgres/PostgreSQLException-class.html) while inserting a new to-do, we will throw a `ServerException` and map it to the `ServerFailure` class. To create the `exceptions` package, run the following command in the terminal:
```bash
very_good create -t dart_pkg exceptions
```
This package will include different types of exceptions such as `ServerException`, `HttpException`, and `NotFoundException`. The `ServerException` will be thrown in the case of an internal server error, while the `HttpException` is an abstract class that will be extended by other exceptions like `NotFoundException` and `BadRequestException`. We can use these custom exceptions to handle internal errors and map them to the appropriate failure classes, such as `ServerFailure` or `RequestFailure`. We will start by creating a new file inside `src/server_exception/server_exception.dart` and add the following code:
##### `ServerException`
To create `ServerException` we will create a new file `src/server_exception/server_exception.dart` and add the following code:
```dart
class ServerException implements Exception {
const ServerException(this.message);
final String message;
@override
String toString() => 'ServerException: $message';
}
```
##### `HttpExpection`
To create `HttpException` we will create a new file `src/http_exception/http_exception.dart` and add the following code:
```dart
abstract class HttpException implements Exception {
const HttpException(this.message, this.statusCode);
final String message;
final int statusCode;
@override
String toString() => '$runtimeType: $message';
}
```
##### `NotFoundException`
Next, we will create `NotFoundException`, which will be thrown when a resource is not found. To do this, create a new file called `src/http_exception/not_found_exception.dart` and add the following code:
```dart
class NotFoundException extends HttpException {
const NotFoundException(String message) : super(message, HttpStatus.notFound);
}
```
##### `BadRequestException`
Similarly, we will create a new file inside `src/http_exception/bad_request_exception.dart` and add the following code:
```dart
class BadRequestException extends HttpException {
const BadRequestException({
required String message,
this.errors = const {},
}) : super(message, HttpStatus.badRequest);
final Map> errors;
}
```
Make sure to import the `HttpException`. Once you are done with `HttpException`, add an export statement in `http_exception.dart` file.
```dart
export './bad_request_exception.dart';
export './not_found_exception.dart';
```
And finally, export the `HttpException` from `exceptions/lib/exceptions.dart` file.
```dart
library exceptions;
export 'src/http_exception/http_exception.dart';
export 'src/server_exception/server_exception.dart';
```
#### Update `models` package
##### Let's handle the validation
> Ready to add some sass to your data validation? Let's get those DTOs in shape! 💪
To add validation to our `CreateTodoDto` class, we will create a new static method called validated in `models/lib/src/create_todo_dto/create_todo_dto.dart`. This method will return either a `ValidationFailure` object or a `CreateTodoDto` object. We will use this method to ensure that our to-do creation requests contain all necessary information before they are processed. The validation rules are:
* the `title` should not be empty
* the `description` should not be empty
Before we can add the validated method to the `CreateTodoDto` class, we need to make sure that the necessary packages are added to the `pubspec.yaml` file.
```yaml
dependencies:
either_dart: ^0.3.0
exceptions:
path: ../exceptions
failures:
path: ../failures
freezed_annotation: ^2.2.0
json_annotation: ^4.7.0
typedefs:
path: ../typedefs
```
Now we will create a `validated` method inside `CreateTodoDto`
```dart
static Either validated(
Map json,
) {
try {
final errors = >{};
if (json['title'] == null) {
errors['title'] = ['Title is required'];
}
if (json['description'] == null) {
errors['description'] = ['Description is required'];
}
if (errors.isEmpty) return Right(CreateTodoDto.fromJson(json));
throw BadRequestException(
message: 'Validation failed',
errors: errors,
);
} on BadRequestException catch (e) {
return Left(
ValidationFailure(
message: e.message,
errors: e.errors,
statusCode: e.statusCode,
),
);
}
}
```
Similarly, we will create a new static method called `validated` to validate the `UpdateTodoDto`. We will ensure that at least one field is present.
```dart
static Either validated(
Map json,
) {
try {
final errors = >{};
if (json['title'] == null || json['title'] == '') {
errors['title'] = ['At least one field must be provided'];
}
if (json['description'] == null || json['description'] == '') {
errors['description'] = ['At least one field must be provided'];
}
if (json['completed'] == null) {
errors['completed'] = ['At least one field must be provided'];
}
if (errors.length < 3) return Right(UpdateTodoDto.fromJson(json));
throw BadRequestException(
message: 'Validation failed',
errors: errors,
);
} on BadRequestException catch (e) {
return Left(
ValidationFailure(
message: e.message,
statusCode: e.statusCode,
errors: e.errors,
),
);
}
}
```
##### Custom JSON converters
To serialize and deserialize our `DateTime` objects, we will create a new file called `models/lib/src/serializers/date_time_serializer.dart`. In this file, we will add the necessary code to handle the serialization and deserialization of `DateTime` objects.
These classes will implement the [`JsonConverter`](https://pub.dev/documentation/json_annotation/latest/json_annotation/JsonConverter-class.html) interface and provide the necessary logic to convert `DateTime` objects to and from JSON. The `DateTimeConverterNullable` class will handle cases where the `DateTime` object may be `null`, while the `DateTimeConverter` class will handle non-null `DateTime` objects. With these classes in place, we will be able to correctly handle the formatting of `DateTime` objects when retrieving data from the database.
```dart
class DateTimeConverterNullable extends JsonConverter {
const DateTimeConverterNullable();
@override
DateTime? fromJson(dynamic json) {
if (json == null) return null;
return const DateTimeConverter().fromJson(json);
}
@override
String? toJson(DateTime? object) {
if (object == null) return null;
return const DateTimeConverter().toJson(object);
}
}
class DateTimeConverter extends JsonConverter {
const DateTimeConverter();
@override
DateTime fromJson(dynamic json) {
if (json is DateTime) return json;
return DateTime.parse(json as String);
}
@override
String toJson(DateTime object) {
return object.toIso8601String();
}
}
```
Now we can use this converter in our `Todo` model.
```diff
factory Todo({
required TodoId id,
required String title,
@Default('') String description,
@Default(false) bool? completed,
- required DateTime createdAt,
+ @DateTimeConverter() required DateTime createdAt,
- DateTime? updatedAt,
+ @DateTimeConverterNullable() DateTime? updatedAt,
}) = _Todo;
```
Once you have finished updating the `Todo` model to use the converters.
> Don't forget to run `build_runner` 😎
Woo hoo! We made it to the end of part 3 🎉
In this part, we gave our failure classes a little update and created some new ones. We also added some shiny new exceptions and made sure our DTOs were properly validated. We're almost there, friends! Just a few more steps until we can fully implement the CRUD operations for our awesome to-do app.
In the final part, we'll finally be able to connect to a Postgres database and complete all our backend routes. It's going to be a coding party 🎉 Are you ready to join the fun? I know I am! 🤩
And if you ever need a reference, just head on over to the GitHub repo for this tutorial at [https://github.com/saileshbro/full\_stack\_todo\_dart](https://github.com/saileshbro/full_stack_todo_dart).
Let's get ready to code some magic in part 4! 😄
==============================================================================
# 🚀 Building a Fullstack App with dart_frog and Flutter in a Monorepo - Part 2
URL: https://saileshdahal.com.np/building-a-fullstack-app-with-dartfrog-and-flutter-in-a-monorepo-part-2
Published: 2022-12-22
Tags: dart_frog, very_good_cli, Dart, Flutter, Programming Blogs
Series: 🚀 Building a Fullstack App with dart_frog and Flutter in a Monorepo (part 2 of 6)
==============================================================================
In the first part of this article, we set up [melos](https://docs.page/invertase/melos) as a tool for managing monorepo projects and installed [dart\_frog](https://pub.dev/packages/dart_frog) as a web framework for building server-side apps with Dart. We also created a new Dart Frog project, which included adding the `dart_frog` dependency on the project's `pubspec.yaml` file and creating the necessary files and directories.
We will create models, data sources, repositories, and failure classes as a separate Dart package in part 2.
To do this, we will be using [very\_good\_cli](https://cli.vgv.dev/).
## Setting up Models, Repositories, and Data Services 💻
### Installing [very\_good\_cli](https://cli.vgv.dev/)
> **very\_good\_cli**, a Command-Line Interface that provides helpful commands and templates for generating various types of projects, including Flutter apps, Flame games, Flutter packages, Dart packages, federated plugins, and Dart CLI projects.
**Very Good CLI** makes it easy to create and set up these types of projects with a single command, so let's get started!
To install **Very Good CLI**, open a terminal and enter the following command:
```bash
dart pub global activate very_good_cli
```
To confirm that Very Good CLI has been installed correctly, you can enter the following command in a terminal `very_good --version` 🚀
### Creating `typedefs`
We will have our **typedefs**, which will be shared between the backend and frontend of our project. To create a new Dart package for these typedefs, we can use the following command:
```bash
very_good create -t dart_pkg typedefs
```
This will generate a new dart package `typedefs`. Here `-t dart_pkg` means we are creating a new dart package.
Once the `typedefs` package has been created and the necessary files and directories have been generated, you can navigate to `typedefs/lib/src/typedefs.dart` to create a new typedef.
In this file, you can create a new **typedef** by adding the following code:
```dart
/// Primary key type for a Todo.
typedef TodoId = int;
```
This will create a new typedef called `TodoId`, an alias for the type `int`. This typedef can then be used throughout the backend and frontend of your project to represent an identifier for a to-do item. Once you are done, make sure to export the file from `lib/typedefs.dart`
```dart
library typedefs;
export 'src/typedefs.dart';
```
We will add additional shared **typedefs** to this file as needed. [**GitHub Link**](https://github.com/saileshbro/full_stack_todo_dart/tree/main/typedefs)
### Creating `models`
Similarly, we will have a separate package to house shared data models.
1. `CreateTodoDto` This will be used to send and receive payload for creating a new todo.
2. `UpdateTodoDto` This will be used to send and receive payload for updating an existing todo.
3. `Todo` This is the representation of the `Todo` entity.
To create a separate package for models you can use the `very_good` CLI:
```bash
very_good create -t dart_pkg models
```
Once the package has been created, we will install [freezed](https://pub.dev/packages/freezed) for **JSON serialization** and **value equality**, as this library provides helpful tools for these tasks. We will use [json\_serializable](https://pub.dev/packages/json_serializable) for JSON serialization. To install [freezed](https://pub.dev/packages/freezed) and [freezed\_annotation](https://pub.dev/packages/freezed_annotation), open your terminal inside the `models` package and use the command:
```bash
dart pub add freezed json_serializable build_runner -d
dart pub add freezed_annotation json_annotation
```
Inside `models/lib` we will create files in the given order. We have created a parent folder for each model to house the generated codes so that it will look cleaner.
```bash
.
├── models.dart
└── src
├── create_todo_dto
│ └── create_todo_dto.dart
├── todo
│ └── todo.dart
└── update_todo_dto
└── update_todo_dto.dart
```
Now, in `todo.dart` we will use [freezed](https://pub.dev/packages/freezed) package to create a data class.
> [freezed](https://pub.dev/packages/freezed) package is a code generation tool that allows you to create immutable classes with concise, boilerplate-free syntax. It uses the `@freezed` annotation to generate a number of useful methods and operators for your class, such as `==`, `hashCode`, and `copyWith`.
```dart
import 'package:freezed_annotation/freezed_annotation.dart';
import 'package:typedefs/typedefs.dart';
part 'todo.freezed.dart';
part 'todo.g.dart';
@freezed
class Todo with _$Todo {
factory Todo({
required TodoId id,
required String title,
@Default('') String description,
@Default(false) bool? completed,
required DateTime createdAt,
DateTime? updatedAt,
}) = _Todo;
factory Todo.fromJson(Map json) => _$TodoFromJson(json);
}
```
Since `TodoId` is in a separate package, we will have to add it in the `models/pubspec.yaml` file as a dependency. After adding the `pubspec.yaml` should look like this.
```yaml
name: models
description: A Very Good Project created by Very Good CLI.
version: 0.1.0+1
publish_to: none
environment:
sdk: ">=2.18.0 <3.0.0"
dependencies:
freezed_annotation: ^2.2.0
json_annotation: ^4.7.0
typedefs:
path: ../typedefs
dev_dependencies:
build_runner: ^2.3.3
freezed: ^2.3.2
json_serializable: ^6.5.4
lints: ^2.0.0
mocktail: ^0.3.0
test: ^1.19.2
very_good_analysis: ^3.1.0
```
Similarly, we will create `create_todo_dto.dart` for `CreateDotoDto` class.
```dart
import 'package:freezed_annotation/freezed_annotation.dart';
part 'create_todo_dto.freezed.dart';
part 'create_todo_dto.g.dart';
@freezed
class CreateTodoDto with _$CreateTodoDto {
factory CreateTodoDto({
required String title,
required String description,
}) = _CreateTodoDto;
factory CreateTodoDto.fromJson(Map json) =>
_$CreateTodoDtoFromJson(json);
}
```
Similarly, we will create `update_todo_dto.dart` for `UpdateTodoDto` class.
```dart
import 'package:freezed_annotation/freezed_annotation.dart';
part 'update_todo_dto.freezed.dart';
part 'update_todo_dto.g.dart';
@freezed
class UpdateTodoDto with _$UpdateTodoDto {
factory UpdateTodoDto({
String? title,
String? description,
bool? completed,
}) = _UpdateTodoDto;
factory UpdateTodoDto.fromJson(Map json) =>
_$UpdateTodoDtoFromJson(json);
}
```
Once this is done, we run [build\_runner](https://pub.dev/packages/build_runner) and generate the necessary code. To generate the missing code, you can run the following command:
```bash
dart pub run build_runner build --delete-conflicting-outputs
```
This will generate `*.g.dart` and `*.freezed.dart` files. Once this is done, you will have files inside `models/lib` in the given order.
```plaintext
.
├── models.dart
└── src
├── create_todo_dto
│ ├── create_todo_dto.dart
│ ├── create_todo_dto.freezed.dart
│ └── create_todo_dto.g.dart
├── todo
│ ├── todo.dart
│ ├── todo.freezed.dart
│ └── todo.g.dart
└── update_todo_dto
├── update_todo_dto.dart
├── update_todo_dto.freezed.dart
└── update_todo_dto.g.dart
```
Once you are done creating the models, be sure to export them from `lib/models.dart`
```dart
library models;
export 'src/create_todo_dto/create_todo_dto.dart';
export 'src/todo/todo.dart';
export 'src/update_todo_dto/update_todo_dto.dart';
```
You can find the [GitHub link for models here](https://github.com/saileshbro/full_stack_todo_dart/tree/main/models).
### Creating `failures`
In the next step, we will create a separate package to handle failures in our application. This package will contain all the failures that may occur, such as `NetworkFailure` or `ServerFailure`. Whenever we need to handle an error, we will encapsulate the value or error in a union type and return it from a repository. For example, when we make an API call to retrieve data, we may receive either the requested data or an error. By encapsulating this in an `Either` type, we can effectively handle and manage failures in our app.
> This is inspired by [ReSo Coder's Clean Architecture](https://resocoder.com/flutter-clean-architecture-tdd/) tutorial.
To create the failures package:
```bash
very_good create -t dart_pkg failures
```
This will create a new package in `failures` directory. We will use `freezed` and `json_serializable` libraries for data serialization here as well.
```bash
dart pub add freezed json_serializable build_runner -d
dart pub add freezed_annotation json_annotation
```
To begin, we will create a `Failure` class inside the `lib/src/failure.dart` directory. This class will be the base for all failure types and will handle and manage our app's failures.
```dart
abstract class Failure {
String get message;
}
```
We can then create specific failure classes, such as `NetworkFailure`, to return to the caller whenever there is a network exception. For instance, if we have a `TodosRemoteDataSource` that makes a call to a backend and encounters a HTTP exception, the data source can throw a `NetworkException` which will be caught by a repository `TodoRepository`. The repository will then encapsulate the error in a union type and return either the requested data or the failure to the caller. This allows us to effectively handle and manage failures in our app.
To create a `NetworkFailure` class, we will create a new file in the `src` directory called `network_failure/network_failure.dart`.
```dart
import 'package:failures/failures.dart';
import 'package:freezed_annotation/freezed_annotation.dart';
part 'network_failure.freezed.dart';
part 'network_failure.g.dart';
@freezed
class NetworkFailure extends Failure with _$NetworkFailure {
const factory NetworkFailure({
required String message,
required int code,
@Default([]) List errors,
}) = _NetworkFailure;
factory NetworkFailure.fromJson(Map json) =>
_$NetworkFailureFromJson(json);
}
```
Once you have finished creating the `NetworkFailure` class, you can run the `build_runner` command to generate the necessary files for your project.
Make sure to export the failure class from `failures/lib/failures.dart`
```dart
library failures;
export 'src/failure.dart';
export 'src/network_failure/network_failure.dart';
```
You can view [the code from here.](https://github.com/saileshbro/full_stack_todo_dart/tree/main/failures)
### Creating `data_source`
We will create a new package with `very_good_cli` for our data source.
```bash
very_good create -t dart_pkg data_source
```
Once the package is created, we can create an abstract data source contract.
```dart
import 'package:models/models.dart';
import 'package:typedefs/typedefs.dart';
abstract class TodoDataSource {
Future> getAllTodo();
Future getTodoById(TodoId id);
Future createTodo(CreateTodoDto todo);
Future updateTodo({
required TodoId id,
required UpdateTodoDto todo,
});
Future deleteTodoById(TodoId id);
}
```
You can import the missing packages in `pubspec.yaml`. After importing, it should look like this.
```yaml
name: data_source
description: A Very Good Project created by Very Good CLI.
version: 0.1.0+1
publish_to: none
environment:
sdk: ">=2.18.0 <3.0.0"
dependencies:
models:
path: ../models
typedefs:
path: ../typedefs
dev_dependencies:
mocktail: ^0.3.0
test: ^1.19.2
very_good_analysis: ^3.1.0
```
The `TodoDataSource` class will be used by both the frontend and backend of our app to access and manage data related to to-dos. This class will **throw known exceptions** that can be handled in the `TodoRepository`. To manage these exceptions, we will create a separate `exceptions` package where we can **register all the exceptions** used in our app. The `TodoRepository` will then be **responsible for handling these exceptions**, allowing us to effectively manage and handle errors in our application.
Once you are done adding the data source, make sure to export it in `data_sources/data_sources.dart`
```dart
library data_source;
export 'src/todo_data_source.dart';
```
You can view the code [for the data\_source from GitHub.](https://github.com/saileshbro/full_stack_todo_dart/tree/main/data_source)
### Creating `repository`
We will make use of the `TodoDataSource` class to access and manage data related to to-dos. We will also catch any exceptions thrown by the `TodoDataSource` and serialize them as failures. `TodoRepository` will then return the failure or the requested data to the caller.
To create the `TodoRepository` class, we will first navigate to the root directory of our project and create a new package using the `very_good` CLI:
```bash
very_good create -t dart_pkg repository
```
Once we are done, we will add all the dependencies in `pubspec.yaml` and run `dart pub get` to get all the packages.
```yaml
dependencies:
either_dart: ^0.3.0
models:
path: ../models
failures:
path: ../failures
typedefs:
path: ../typedefs
data_source:
path: ../data_source
```
To create an abstract `TodoRepository` class, we will navigate to our project's `lib/src` directory and create a new file called `todo_repository.dart`. Inside this file, we will make the `TodoRepository` class and add the necessary abstract methods that will be used to manage and access data related to to-dos.
```dart
import 'package:either_dart/either.dart';
import 'package:failures/failures.dart';
import 'package:models/models.dart';
import 'package:typedefs/typedefs.dart';
abstract class TodoRepository {
Future>> getTodos();
Future> getTodoById(TodoId id);
Future> createTodo(CreateTodoDto createTodoDto);
Future> updateTodo({
required TodoId id,
required UpdateTodoDto updateTodoDto,
});
Future> deleteTodo(TodoId id);
}
```
We are using [either\_dart](https://pub.dev/packages/either_dart) to encapsulate the failure and data in the same place.
> [either\_dart](https://pub.dev/packages/either_dart) is the error handling and railway-oriented programming library is a Dart library that supports async "map" and async "then" functions for working with asynchronous computations and handling errors with `Future` values.
After you are done, make sure to export it in `src/repository.dart`
```dart
library repository;
export 'src/todo_repository.dart';
```
You can find the [code for this on GitHub](https://github.com/saileshbro/full_stack_todo_dart/tree/main/repository).
Damn! that was a lot of code and a lot of writing 😮💨
🎉 In Part 3, we're going to get started on the implementation of our repository! 💻 We'll begin by setting up the backend and establishing database connections. 🔌 It's going to be a lot of fun and a great opportunity to get hands-on with the code. So stay tuned! 😎
==============================================================================
# 🚀 Building a Fullstack App with dart_frog and Flutter in a Monorepo - Part 1
URL: https://saileshdahal.com.np/building-a-fullstack-app-with-dartfrog-and-flutter-in-a-monorepo-part-1
Published: 2022-12-19
Tags: dart-backend, Dart, Flutter, full stack, Programming Blogs
Series: 🚀 Building a Fullstack App with dart_frog and Flutter in a Monorepo (part 1 of 6)
==============================================================================
## 💡 Introduction
This tutorial will create a full-stack to-do application using Dart and Flutter in a monorepo setup.
> A monorepo is a version control repository containing multiple projects with common code.
This allows for easier management and collaboration on projects within a single repository. We will share a common code between the frontend and backend of our to-do application, like interfaces, data models e.t.c.
The application's backend will be built using [dart\_frog](https://pub.dev/packages/dart_frog), while the front end will be developed using Flutter.
This tutorial teaches you how to:
* 🧰 Set up a monorepo
* 💻 Create a full-stack Dart Flutter application
* 🔗 Manage and share common code between front-end and back end
* 📝 Build a to-do application with CRUD functionality
* 🏁 Complete the tutorial with a functional to-do application
## Let's Go! 🚀
Before we can build our full-stack to-do application, we must set up the necessary tools and dependencies. First, we will install [melos](https://pub.dev/packages/melos).
### Setup [melos](https://docs.page/invertase/melos) 🛠️
> [Melos](https://docs.page/invertase/melos) is a library that will be used to set up and manage monorepo projects.
To install [melos](https://docs.page/invertase/melos), open a terminal and run the following command:
```bash
dart pub global activate melos
```
This command will install Melos globally, allowing us to use it in any project.
Create a `melos.yaml` file and add the below content to set up our full-stack to-do application.
```yaml
name: full_stack_todo_dart
packages:
- /**/pubspec.yaml
```
The `packages` field defines the packages that are part of the monorepo. In this case, we are using the `/**/pubspec.yaml` pattern, which tells Melos to search for all `pubspec.yaml` files in the project and consider them as packages.
### Hopping into backend with [dart\_frog](https://pub.dev/packages/dart_frog) 🐸
To handle the server-side logic of our full-stack to-do application, we will use a library called [dart\_frog](https://pub.dev/packages/dart_frog).
> [dart\_frog](https://pub.dev/packages/dart_frog) is a lightweight web framework for Dart that makes it easy to build server-side applications.
To install [dart\_frog](https://pub.dev/packages/dart_frog), open a terminal and run the following command:
```bash
dart pub global activate dart_frog_cli
```
To create a new dart\_frog project, open a terminal and navigate to the directory where you want to create the project. Then, run the following command:
```bash
dart_frog create backend
```
The command "dart\_frog" creates a new project with necessary files and directories and adds the dependency "dart\_frog" to the project's "pubspec.yaml" file.
Once you have created a new dart\_frog project and set up the backend of your full-stack to-do application, you can add a Melos script to run the server. To do this, open the `melos.yaml` file in the root directory of your project and add the following content:
```yaml
scripts:
backend:dev:
run: melos exec -c 1 --fail-fast -- "dart_frog dev"
description: Starts the dev server for the backend
select-package:
flutter: false
```
Once these steps have been completed, you can run the `backend:dev` script by opening a terminal and navigating to the root directory of your project. Then, run the following command `melos run backend:dev`
This will start the dev server for the backend of your to-do application. You can then start building the server-side logic of your application using dart\_frog.
```plaintext
✓ Running on http://localhost:8080 (0.1s)
```
If you see an output similar to the one above after running the `melos run backend:dev` command means that the dev server for the backend of your full-stack to-do application has been successfully started.
If you open `http://localhost:8080`, you should be greeted with `Welcome to Dart Frog!`
> Stay tuned for part-2 ...